================== BEGIN PAGE: https://docs.fancymenu.net/docs/action-scripts ==================
---
title: Action Scripts
description: How to use action scripts with buttons, sliders, tickers and more.
published: true
date: 2026-05-03T11:01:52.000Z
tags:
editor: markdown
dateCreated: 2025-04-14T20:02:13.319Z
---
# Action Scripts
FancyMenu lets you add interactivity to your menus by assigning **actions** to elements. These actions run when a button is clicked, ticker is ticking, slider gets used, or when a screen opens or closes. You can also build advanced action scripts using simple control statements, such as **if**, **else-if**, **else**, and **while**, to control which actions run and when.
# What Are Actions?
An **action** is a task or job that FancyMenu runs when triggered. For example, an action might open a new screen, send a chat message, or adjust the volume of an audio element. In FancyMenu's editor, actions are configured with a value (if needed) that provides extra details—such as a URL or server address.
# What Are Statements?
To create more complex behavior, FancyMenu supports basic control statements in action scripts. These include:
- **If Statement:** Runs a block of actions only if a specified [condition](/en/conditions) is met.
- **Else-If Statement:** Checks another [condition](/en/conditions) if the preceding *if* (or earlier *else-if*) wasn't met.
- **Else Statement:** Runs if none of the preceding [conditions](/en/conditions) are met.
- **While Statement:** Repeats a block of actions continuously while a [condition](/en/conditions) remains true (with a built‑in timeout to prevent infinite loops).
- **Delay Block:** Waits for the specified time before running its contained actions. The rest of the script keeps running while the delay counts down.
- **Execute Later Block:** Queues contained actions to run on the main thread after a millisecond delay.
- **Comment:** Adds a note inside the script for organization. Comments do not run any action.
By combining these statements with actions, you can build dynamic and conditional behavior, for example, checking if a player's health is low before sending a warning message or repeating an update until a condition changes.
# Where Can You Use Action Scripts?
Action scripts are versatile and can be used throughout your layout. You can assign them, for example, to:
- **Buttons:** Execute an action when the button is clicked.
- **Tickers:** Continuously run an action script to update on-screen information.
- **Sliders:** Trigger an action script whenever the slider's value changes.
- **Screen Events:** Run scripts when a screen opens or closes (for example, playing a sound when a menu appears).
- **Listeners:** When a listener that listeners to a specific event gets fired, it will execute its action script.
# Using Placeholders in Actions
Action values support dynamic content through **placeholders**. Most of the time these placeholders use a JSON-like syntax and are replaced with live data when the action runs.
## JSON-Like Placeholders
These are the normal [placeholders](/en/placeholders) that can be used in many places throughout layouts.
They follow this syntax:
```json
{"placeholder": "placeholder_id", "values": {"key1": "value1", "key2": "value2"}}
```
They can fetch game data like the player's name, screen dimensions, or calculated values using the **Calculator** placeholder. You can also nest placeholders for more advanced uses.
## `$$` Placeholders (Variables)
The `$$` placeholders are special. Some features of FancyMenu will provide these special placeholders for their nested actions, requirements and normal placeholders, so they can be used inside to get more information about the environment (element, listener, etc.) they are in.
For example, if actions are used within a slider, using `$$value` in the action will be replaced with the slider's current value.
When using actions in listeners, every listener will provide its own unique set of variables/placeholders for getting more information about the listener, like pressed mouse button, entered structure, etc.
# How to Set Up and Edit Actions
To add, edit, or remove actions (and statement blocks) for an element, simply **right-click the element** (whether it's a button, slider, ticker, or other interactive item) and then select **Manage Action Script**. This opens the Manage Actions screen, where you can:
- **Add new actions or statements:** Insert new action entries or control statements (if, else-if, else, while) to build your script.
- **Edit existing actions or statements:** Modify the action value or change the control logic.
- **Remove actions or statements:** Delete unwanted actions from the script.
For [listeners](/listeners) there is a special menu to manage and create listeners, including accessing their action scripts to have the same experience as when editing a button's or slider's action script for example.
> When in the Action Script Editor screen, just right-click the big dark-grey area to open a context menu for adding actions, statements and more.
{.is-info}
# Action Script Editor Shortcuts and More
The action script editor has some great QoL features making script editing super easy.
## Shortcuts
- `DEL` : Quick-delete the selected entry
- `ENTER` : Starts the in-line editing of the selected entry (or opens the edit screen if there is not in-line edit for the selected entry)
- `CTRL + C` : Copy the selected action (only works with actions for now)
- `CTRL + V` : Paste the previously copied action
- `CTRL + Z` : One step back (undo)
- `CTRL + Y` : One step forward (redo)
- `ARROW UP` : Navigate one entry up from the currently selected one
- `ARROW DOWN` : Navigate one entry down from the currently selected one
- `SHIFT + ARROW UP` : Move the selected entry one up
- `SHIFT + ARROW DOWN` : Move the selected entry one down
- `A` : Quick-open the Action Chooser screen to add a new action
- `CTRL + S` : Done/save from the editor window
## More QoL Features
- Double-clicking the value of an action lets you edit the value without going into the full value editing screen.
- IF statement chains (with appended ELSE/ELSE-IF statements), WHILE loops and Folders can be collapsed (only visual, does not affect script logic).
- The editor always adds new actions below the selected entry (or nested in the selected chain/loop/folder).
- Right-clicking the dark-grey script area background opens a context menu with options to add actions, statements and everything else important.
# Actions in Detail
This list contains most, if not all, actions available in FancyMenu. It's possible that the list is a bit outdated sometimes due to updates of the mod.
## Next Track (`audio_next_track`)
- **Description:** Goes to the next track in an audio element
- **Value Required:** Yes - `audio_element_identifier` (the ID of the audio element to control)
## Previous Track (`audio_previous_track`)
- **Description:** Goes to the previous track in an audio element
- **Value Required:** Yes - `audio_element_identifier` (the ID of the audio element to control)
## Set Track Volume (`set_audio_element_volume`)
- **Description:** Sets the volume of an audio element (0.0 to 1.0)
- **Value Required:** Yes - `element_identifier:volume`
## Toggle Play/Pause Track (`audio_toggle_play`)
- **Description:** Toggles play/pause of an audio element's current track
- **Value Required:** Yes - `audio_element_identifier`
## Play Audio (`play_audio`)
- **Description:** Plays an audio resource once. The action tracks audio it started so it can later be stopped by `stop_all_action_audios`.
- **Value Required:** Yes - JSON configuration with `audioSource`, `soundChannel`, and `baseVolume`
- **Example Value:** `{"audioSource":"[source:local]/config/fancymenu/assets/example.ogg","soundChannel":"master","baseVolume":1.0}`
## Stop All Action Audios (`stop_all_action_audios`)
- **Description:** Stops all audio tracks that were started by the **Play Audio** action. This does not stop Audio elements, menu open/close sounds, button sounds, or other audio systems.
- **Value Required:** No
## Set Video Element Volume (`set_video_element_volume`)
- **Description:** Sets the volume of a video element (0.0 to 1.0)
- **Value Required:** Yes - `video_element_identifier:volume`
## Set Video Element Play Time (`set_video_element_play_time`)
- **Description:** Seeks a video element to a millisecond timestamp
- **Value Required:** Yes - `video_element_identifier:timestamp_ms`
## Toggle Video Element Paused State (`toggle_video_element_pause_state`)
- **Description:** Toggles the paused state of a video element
- **Value Required:** Yes - `video_element_identifier`
## Set Video Background Volume (`set_video_menu_background_volume`)
- **Description:** Sets the volume of a video menu background (0.0 to 1.0)
- **Value Required:** Yes - `background_identifier:volume`
> To get the identifier of a background, right-click the editor background and click on 'Copy Background Identifier'.
{.is-info}
## Set Video Background Play Time (`set_video_menu_background_play_time`)
- **Description:** Seeks a video menu background to a millisecond timestamp
- **Value Required:** Yes - `background_identifier:timestamp_ms`
> To get the identifier of a background, right-click the editor background and click on 'Copy Background Identifier'.
{.is-info}
## Toggle Video Background Paused State (`toggle_video_menu_background_pause_state`)
- **Description:** Toggles the paused state of a video menu background
- **Value Required:** Yes - `background_identifier`
> To get the identifier of a background, right-click the editor background and click on 'Copy Background Identifier'.
{.is-info}
## Toggle Layout (`toggle_layout`)
- **Description:** Toggles a layout (Enable/Disable) by its name
- **Value Required:** Yes - `layout_name`
## Enable Layout (`enable_layout`)
- **Description:** Enables a layout by its name
- **Value Required:** Yes - `layout_name`
## Disable Layout (`disable_layout`)
- **Description:** Disables a layout by its name
- **Value Required:** Yes - `layout_name`
## Open Screen or Custom GUI (`opengui`)
- **Description:** Opens a screen by its identifier (vanilla, mod, or custom GUI)
- **Value Required:** Yes - `screen_identifier`
> This action **will not work for every screen**, especially mod screens. If the action fails to open a screen, it will show an error. There is not much you can do in that case, because then it's probably a screen that is too complex to get opened automatically by FancyMenu.
>
> Compatibility for mod screens will also not get added manually on FancyMenu's side anymore, because adding compatibility for all the mods out there would take ages, sorry. In most cases it is also not recommended to contact the dev of the other mod in that case, because if FancyMenu can't open the screen, there is not easy way to add support for it. The recommended workaround here is to try to use the **"Mimic Vanilla/Mod Button"** action to mimic a button that opens the specific screen. If there is no button, then you're out of luck, sorry.
{.is-info}
## Close Screen (`closegui`)
- **Description:** Closes the active screen
- **Value Required:** No
## Update Screen (`update_screen`)
- **Description:** Reinitializes the current screen
- **Value Required:** No
## Back to Last Screen (`back_to_last_screen`)
- **Description:** Goes back to the previous screen (the one before the current)
- **Value Required:** No
## Join Server (`joinserver`)
- **Description:** Connects the player to a Minecraft server
- **Value Required:** Yes - `server_ip:port`
## Enter World (`loadworld`)
- **Description:** Enters a Minecraft world
- **Value Required:** Yes - `world_folder_name`
## Enter/Join Last World/Server (`join_last_world`)
- **Description:** Enters/joins the last world or server the player was in
- **Value Required:** No
## Leave World or Server (`disconnect_server_or_world`)
- **Description:** Leaves a world or server and opens a specified screen
- **Value Required:** Yes - `screen_identifier`
## Quit Minecraft (`quitgame`)
- **Description:** Quits Minecraft completely
- **Value Required:** No
## Send Chat Message/Command (`sendmessage`)
- **Description:** Sends a chat message or executes a chat command
- **Value Required:** Yes - `message_text` or `/command_text`
## Execute Command As Integrated Server (`execute_command_as_integrated_server`)
- **Description:** Force-executes a command in singleplayer as the integrated server, ignoring permissions and the cheats setting.
- **Value Required:** Yes - Command text, for example `/give @p minecraft:diamond 1`
> This action only works in singleplayer while the world is not opened to LAN. It intentionally does nothing on multiplayer servers.
{.is-warning}
## Paste to Chat (`paste_to_chat`)
- **Description:** Pastes text to the chat input field (append or replace)
- **Value Required:** Yes - `true:Text` or `false:Text`
## Display In Chat [Client-Side] (`display_in_chat_client_side`)
- **Description:** Prints text directly to local chat (no server)
- **Value Required:** Yes - `text_or_json`
## Send FM Data To Server (`send_fm_data_to_server`)
- **Description:** Sends custom text data to the current FancyMenu server through the FM Data packet channel.
- **Value Required:** Yes - `data_identifier||data`
## Connect To Remote Server (`connect_to_remote_server`)
- **Description:** Opens or reuses a client-initiated WebSocket connection to an external remote server.
- **Value Required:** Yes - Remote server URL, for example `wss://example.com/ws`
## Send Data To Remote Server (`send_data_to_remote_server`)
- **Description:** Opens or reuses a remote server connection and sends text data to it.
- **Value Required:** Yes - `remote_server_url||data`
## Close Remote Server Connection (`close_remote_server_connection`)
- **Description:** Closes a specific remote server connection by request ID.
- **Value Required:** Yes - Request ID, usually from a Remote Server listener variable such as `$$request_id`
## Close All Remote Server Connections (`close_all_remote_server_connections`)
- **Description:** Closes all active remote server connections opened by FancyMenu.
- **Value Required:** No
## Open URL in Browser (`openlink`)
- **Description:** Opens a link in your default browser
- **Value Required:** Yes - `https://example.com`
## Copy Text to Clipboard (`copytoclipboard`)
- **Description:** Copies text to the clipboard
- **Value Required:** Yes - `text_to_copy`
## Print to Game Log (`print_to_log`)
- **Description:** Writes a line to the game log
- **Value Required:** Yes - `text_to_log`
## Set Variable Value (FM Variable) (`set_variable`)
- **Description:** Stores text content in a FancyMenu variable
- **Value Required:** Yes - `variable_name:variable_value`
## Clear All Variables (FM Variable) (`clear_variables`)
- **Description:** Clears ALL of FancyMenu's stored variables
- **Value Required:** No
## Send HTTP Request (`send_http_request`)
- **Description:** Sends an HTTP request; can store the response in a variable
- **Value Required:** Yes - HTTP request configuration
> This action allows you to send data to REST APIs, webhooks, or any HTTP endpoint.
> Supports various authentication methods, custom headers, and different request types.
>
> This action also allows you to store the response of the request in a FancyMenu variable for later use!
{.is-info}
## Manage Resource Pack (`manage_resource_pack`)
- **Description:** Enable/disable/toggle a resource pack by display name (optional reload)
- **Value Required:** Yes - `pack_name|||MODE|||reload_bool`
## Reload Resource Packs (`reload_resource_packs`)
- **Description:** Reloads resource packs (5s cooldown)
- **Value Required:** No
## Reload FancyMenu (`reloadmenu`)
- **Description:** Reloads FancyMenu, including panoramas, slideshows and all resources (heavy)
- **Value Required:** No
> This action has a **big impact on performance** and can cause lags if used in Tickers. It is not recommended to use this action in anything else than a button.
{.is-warning}
## Toggle Element Animator (`toggle_element_animator`)
- **Description:** Toggles an element animator playback state
- **Value Required:** Yes - `animator_identifier`
## Enable Element Animator (`enable_element_animator`)
- **Description:** Enables an element animator
- **Value Required:** Yes - `animator_identifier`
## Disable Element Animator (`disable_element_animator`)
- **Description:** Disables an element animator
- **Value Required:** Yes - `animator_identifier`
## Reset Element Animator (`reset_element_animator`)
- **Description:** Resets an element animator timeline/state
- **Value Required:** Yes - `animator_identifier`
## Mimic Vanilla/Mod Button (`mimicbutton`)
- **Description:** Mimics the click action of a vanilla or mod button
- **Value Required:** Yes - `screen_identifier:widget_locator`
## Mimic Keybind (`mimic_keybind`)
- **Description:** Runs a Minecraft keybind (optional hold)
- **Value Required:** Yes - `keybind_id|||keep_pressed_bool|||duration_ms`
## Set Text Input Field Value (`set_text_input_field_value`)
- **Description:** Sets the value of a custom or vanilla input field by element identifier.
- **Value Required:** Yes - `element_identifier|||new_value|||force_set_when_inactive`
## Create File in Game Directory (`create_file_in_game_dir`)
- **Description:** Creates an empty file in the game directory (instance root). Accepts the `.minecraft/` prefix to target the default launcher profile directory (may differ from the current instance dir).
- **Value Required:** Yes - `file_path`
## Delete File/Folder in Game Directory (`delete_file_in_game_dir`)
- **Description:** Deletes a file or folder in the game directory (instance root). Accepts `.minecraft/` prefix to hit the default launcher profile (can differ from the running instance). Append `*` to delete **all files directly inside** a folder (ignores sub-directories; keeps the folder).
- **Value Required:** Yes - `target_path`
## Copy File/Folder in Game Directory (`copy_file_in_game_dir`)
- **Description:** Copies within the game directory (instance root); `.minecraft/` prefix targets the default launcher profile (not always the current instance). Append `*` to the **source** path to copy every file directly inside that folder (ignores sub-directories); destination must be a directory and cannot use `*`.
- **Value Required:** Yes - `source||destination`
## Move File/Folder in Game Directory (`move_file_in_game_dir`)
- **Description:** Moves within the game directory (instance root); `.minecraft/` prefix targets the default launcher profile (may differ from the current instance). Append `*` to the **source** path to move every file directly inside that folder (ignores sub-directories); destination must be a directory and cannot use `*`.
- **Value Required:** Yes - `source||destination`
## Rename File/Folder in Game Directory (`rename_file_in_game_dir`)
- **Description:** Renames a file or folder inside the game directory (instance root); `.minecraft/` prefix targets the default launcher profile (may differ from current instance). Keeps contents intact, only the name changes.
- **Value Required:** Yes - `path||new_name`
## Download File to Game Directory (`download_file_to_game_dir`)
- **Description:** Downloads a file asynchronously into the game directory (instance root); `.minecraft/` prefix targets the default launcher profile (not necessarily the running instance). Provide the **target folder**; filename is derived from headers/URL automatically.
- **Value Required:** Yes - `url||target_folder`
## Extract ZIP File In Game Directory (`extract_zip_file_in_game_dir`)
- **Description:** Extracts a ZIP file into a target folder inside the game directory or default `.minecraft` directory. Triggers the **On ZIP Extracted via Action** listener when finished.
- **Value Required:** Yes - `source_zip_path||target_folder_path`
## Open File/Folder In Game Directory (`open_file_folder_in_game_dir`)
- **Description:** Opens a file or folder with the operating system's default app. The target must stay inside the game directory or the default `.minecraft` directory.
- **Value Required:** Yes - `target_path`
## Write File in Game Directory (`write_file_in_game_dir`)
- **Description:** Writes or appends text inside the game directory (instance root); `.minecraft/` prefix targets the default launcher profile (may differ from this instance). Creates the file if missing. Supports `\n` in the value to insert line breaks; append mode controlled by the final boolean.
- **Value Required:** Yes - `path|||content|||append_bool`
## Select File from System (`select_file_to_game_dir`)
- **Description:** Opens a native file picker (any location) and copies the selected file into the game directory (instance root) or default `.minecraft/` when prefixed (that default may differ from this instance). Supports extension filters, custom filter label, and optional overwrite toggle.
- **Value Required:** Yes - selection configuration
## Show Toast (`show_toast`)
- **Description:** Displays a configurable toast notification
- **Value Required:** Yes - toast configuration
## Start Scheduler (`start_scheduler`)
- **Description:** Starts a scheduler by its scheduler ID.
- **Value Required:** Yes - `scheduler_id`
## Stop Scheduler (`stop_scheduler`)
- **Description:** Stops a scheduler by its scheduler ID.
- **Value Required:** Yes - `scheduler_id`
## Set Minecraft Option (`edit_minecraft_option`)
- **Description:** Edits a Minecraft config option
- **Value Required:** Yes - `option_name:set_to_value`
================== END PAGE: https://docs.fancymenu.net/docs/action-scripts ==================
================== BEGIN PAGE: https://docs.fancymenu.net/docs/advanced-positioning-sizing ==================
---
title: Advanced Positioning & Sizing
description: How to use Advanced Positioning and Sizing of elements.
published: true
date: 2025-08-01T01:44:12.713Z
tags:
editor: markdown
dateCreated: 2025-04-14T20:03:22.929Z
---
# Advanced Positioning & Sizing
Advanced positoning/sizing allows you to have **full control over the position and size of your elements**. This is very powerful but also **a lot more time-consuming** than using FancyMenu's automated sizing and positioning.
> If you just want elements to better scale with Minecraft's **GUI scale**, it is recommended to use layout-wide **auto-scaling** instead, which can be enabled by first forcing a GUI scale in the menu that opens when right-clicking the editor background and then enabling **Auto-Scaling** in the same menu.
{.is-warning}
# Toggling Advanced Positioning/Sizing Mode
To **enable** andvanced positioning/sizing for an element, **right-click** it and click on **Advanced Positioning** or **Advanced Sizing**.
The element will automatically switch to the advanced mode when you set an advanced position or size value.
To **disable** it and switch back to normal positioning/sizing, **clear all positioning/sizing values**.
> While an element is in Advanced Sizing/Positioning mode, resizing and/or moving the element could be disabled or restricted.
{.is-warning}
# Calculating Positions/Sizes
The reason why advanced positioning/sizing is so powerful is that you can use **placeholders** in the position/size values.
This allows you to use the **Calculator** placeholder (located in the **Advanced** placeholder category) in combination with placeholders of the **GUI** category, like **Screen Width**, **GUI Scale**, **Element Width** and more.
> You can add placeholders by clicking on the **Placeholders** button at the top-right side of the text editor. If you don't see this button, the content you want to edit does **not support** placeholders.
{.is-info}
To calculate something with the **Calculator** placeholder, replace the example expression with your own. You can use nested placeholders in the expression, so you can make use of the screen size, element size, etc. placeholders there.
For example, this placeholder will simply solve `1 + 1` and will show as `2` later:
`{"placeholder":"calc","values":{"expression":"1 + 1","decimal":"false"}}`
The `decimal` variable is set to `false`, which is important for most sizing/positioning calculations, so just set this always to `false` when working with advanced positioning/sizing.
The following calculator uses the **Screen Width** placeholder and divides it by `2`:
`{"placeholder":"calc","values":{"expression":"{"placeholder":"guiwidth"} / 2","decimal":"false"}}`
================== END PAGE: https://docs.fancymenu.net/docs/advanced-positioning-sizing ==================
================== BEGIN PAGE: https://docs.fancymenu.net/docs/apng ==================
---
title: APNGs
description: How to make FancyMenu-compatible APNG images.
published: true
date: 2026-05-03T11:01:52.000Z
tags:
editor: markdown
dateCreated: 2025-04-14T20:14:10.093Z
---
# Animated PNG Images
> For new large or complex animations, prefer [AFMA/FMA files](/fma). FancyMenu 3.9.0 can use Watermedia V3 + Watermedia Binaries V3 for faster APNG/GIF decoding when available, but AFMA is still the preferred FancyMenu animation format.
{.is-info}
APNGs are an animated version of PNG images, making it possible to have the same features as with a GIF, but in full, lossless PNG quality!
FancyMenu has built-in APNG support, but it's a bit picky about what APNGs are supported.
It needs **uncompressed** APNGs that are **not interlaced**.
# Making APNG Animations
You would be surprised how difficult it is to find a good APNG editor, especially with options to disable compression and interlacing.
A great choice for an editor is [ScreenToGif](https://www.screentogif.com/), which is actually a tool to record GIFs and APNGs of your screen, but it's also great to make normal APNGs by skipping the record part and directly loading into the editor!
## Open The Editor
The first thing you see after opening [ScreenToGif](https://www.screentogif.com/) is this screen. Click on **Editor** here.

## Load the Frames
Now you need your PNG frames. Drag-&-Drop them into the editor.

## Frame Delay
To configure the delay between frames, select the frame(s) you want to edit, switch to the **Edit** tab and in the **Delay (Duration)** section, click on **Override**.

## Looping
The looping behavior can be configured in the **Save As** menu. Take a look at the next step for how to open this menu.
## Exporting the APNG
Now you're ready to switch to the **File** tab again to click on **Save As**.
In the save menu, make sure to:
- Set the file type to **APNG** (first setting, you maybe need to scroll to the top of the menu first)
- Disable **Detect Unchanged Pixels**
> You can also configure the **looping behavior** in the that menu! Disabling **Looped Apng** will make the APNG not loop at all, and when enabling it you can choose between a specific number of loops or infinite looping.
{.is-info}

## Using the APNG in FancyMenu
Now you can copy your APNG file to `/config/fancymenu/assets/`. Then you will be able to use it for nearly everything that accepts images.
> It is **really important** that the APNG file name ends with `.apng`!
> FancyMenu will not be able to identify the image as APNG if it's not ending with `.apng`.
{.is-warning}

================== END PAGE: https://docs.fancymenu.net/docs/apng ==================
================== BEGIN PAGE: https://docs.fancymenu.net/docs/background-music ==================
---
title: Menu Background Music
description: How to customize the music played in menus.
published: true
date: 2026-05-03T11:01:52.000Z
tags:
editor: markdown
dateCreated: 2025-04-14T20:14:14.268Z
---
# Menu Background Music
It's possible to replace Minecraft's default menu background music with custom tracks or just disable the normal Vanilla music that plays in menus.
# Disabling Vanilla Music
FancyMenu has multiple ways to disable Vanilla menu music. This can be useful if you plan to play other audio tracks in screens or if you just don't want music to play at all in some screens.
## Globally
If you want no music in menus at all, this is the easiest way to do that.
To globally disable or replace Vanilla menu music in FancyMenu 3.9.0+, go to FancyMenu's menu bar at the top of screens and click **Customization -> Global Customizations**. Global Customizations can replace menu music without requiring a resource pack and without enabling customizations for every screen.
> Disabling Minecraft's default music will disable it in every screen, not just the current one.
{.is-info}
## Per Screen
If you want more control over where Vanilla menus music should play, you should use the **Music Controller** element. This element gets added to layouts like every other element by **right-clicking the editor background** and then clicking on **New Element -> Music Controller**.
By **right-clicking** the element you can customize what types of music that plays in menus should be disabled (normal menu music and world music that keeps playing in screens that don't pause the game, like the Inventory screen).
> This element supports **loading requirements**, so you have even more control over when Vanilla music should play!
{.is-info}
# Adding Custom Music
Now we can add the actual custom background music.
If you want to play the same custom music in all screens and need layout-level control, you should use a **universal layout**, which gets loaded in every screen that has customizations enabled. For simple global menu music replacement, use [Global Customizations](/global-customizations) instead.
When using a universal layout, the music will **continue playing** when going from one menu with the layout enabled to another one with the same layout enabled.
If you want to play different music per screen, use normal layouts.
In this example we will use **universal layouts**.
Add a new **Audio** element to the universal layout, which will act as our background music player.
Now add music tracks to it that should play in the background.
That's basically it already.
You can also set the Audio element to shuffle mode and change its sound channel if needed.
Save the layout and leave the editor.
# Enabling Customizations for All Menus
We used a **universal layout** in this example, because we want our background music to play in multiple screens.
Since layouts only load in screens that have **customizations enabled**, we need to enable them now for every screen we want our music to play.
To do that, click on **Customization** and enable **Current Screen Customization**.
Repeat this for every screen you want your custom background music to play.
And that's it! You now have custom background music in your Minecraft menus!
================== END PAGE: https://docs.fancymenu.net/docs/background-music ==================
================== BEGIN PAGE: https://docs.fancymenu.net/docs/browser-api ==================
---
title: Browser JavaScript API
description: How to use FancyMenu's JavaScript API in MCEF-based mod features like the Browser element.
published: true
date: 2026-05-03T11:01:52.000Z
tags:
editor: markdown
dateCreated: 2025-08-24T09:30:22.976Z
---
# FancyMenu JavaScript API
FancyMenu injects a JavaScript bridge into every MCEF-backed feature (for example the **Browser** element). The bridge lets web content:
- run any FancyMenu [action](./action-scripts) directly from JavaScript,
- read any FancyMenu [placeholder](/placeholders) asynchronously.
Two globals expose the API:
- `window.fancymenu` – primary namespace
- `window.FancyMenu` – alias (mirrors the exact shape of `fancymenu`)
Use the `fancymenu-ready` event, or feature detection, to ensure the bridge is available before calling it.
## 1. Namespaces & Structure
- `fancymenu.actions` – execute FancyMenu actions from the browser.
- `fancymenu.placeholders` – read FancyMenu placeholder values asynchronously.
- `FancyMenu` mirrors `fancymenu`, so both expose the same sub-namespaces.
Actions expose two helpers:
- `fancymenu.actions.execute(actionType, actionValue?)`
- `fancymenu.actions.executeWithCallback(actionType, actionValue?, onSuccess?, onFailure?)`
## 2. Availability
```javascript
if (typeof fancymenu !== 'undefined') {
// safe to use
}
window.addEventListener('fancymenu-ready', () => {
console.log('FancyMenu API is ready');
});
```
Content may also be hosted locally: place HTML files in `config/fancymenu/assets/` and load them through URLs of the form `file:///config/fancymenu/assets/.html`.
## 3. Executing Actions
Use the `fancymenu.actions` namespace. Each call mirrors the action strings used in FancyMenu scripts.
### Quick Calls
```javascript
fancymenu.actions.execute('quitgame'); // action without value
fancymenu.actions.execute('opengui', 'title_screen'); // action with value
fancymenu.actions.execute('set_variable', 'hp:20'); // value uses name:value format
```
### With Callbacks
```javascript
fancymenu.actions.executeWithCallback(
'opengui',
'title_screen',
result => console.log('Opened title screen'),
error => console.error('Open failed:', error)
);
// The value parameter is optional. When omitted, pass the callbacks directly after actionType.
fancymenu.actions.executeWithCallback(
'quitgame',
result => console.log('Quit triggered'),
error => console.error('Quit failed:', error)
);
Legacy helpers `fancymenu.execute(...)` and `fancymenu.executeWithCallback(...)` still work and delegate to the `actions` namespace, so existing content does not need immediate changes.
```
### Common Action Types
- `quitgame` – immediately quits the game (no value)
- `back_to_last_screen` – returns to the previous GUI (no value)
- `opengui` – opens a FancyMenu or vanilla screen (value: screen identifier)
- `openlink` – launches a browser (value: URL)
- `sendmessage` – posts a chat line (value: message text)
- `set_variable` – assigns a FancyMenu variable (value: `name:value`)
- `joinserver` – connects to a server (value: address)
- `disconnect_server_or_world` – disconnects and moves to a target screen (value: screen identifier)
Every action that exists in FancyMenu is available through the bridge; see [action scripts](./action-scripts) for the complete catalog.
## 4. Reading Placeholders
FancyMenu’s [placeholder](/placeholders) system is exposed through `fancymenu.placeholders` (and `FancyMenu.placeholders`). Both helper methods return `Promise`:
```ts
fancymenu.placeholders.get(identifier: string): Promise
fancymenu.placeholders.getWithVars(identifier: string, ...vars: string[]): Promise
```
### Supplying Variables
- Variables are strings in `name:value` form. The bridge splits on the **first** colon only, so the value can contain additional colons.
- Names and values are trimmed; empty names are rejected.
- Provide as many variables as the placeholder requires. Omit optional ones.
### Examples
```javascript
// No variables
fancymenu.placeholders.get('playername')
.then(name => console.log('Player:', name));
// One variable
fancymenu.placeholders.getWithVars('uptime_duration', 'output_as_millis:false')
.then(seconds => console.log('Uptime (s):', seconds));
// Multiple variables
fancymenu.placeholders.getWithVars(
'split_text',
'input:apple|banana|carrot',
'regex:\\|',
'max_parts:-1',
'split_index:1'
).then(part => console.log('Selected part:', part));
```
### Error Model
Rejected promises contain a structured error:
```ts
interface PlaceholderError {
code: 'NOT_FOUND' | 'MISSING_VARIABLE' | 'INVALID_VARIABLE' | 'EVALUATION_ERROR' | 'INTERNAL_ERROR';
message: string;
details?: unknown;
}
```
Example handling:
```javascript
fancymenu.placeholders.get('unknown')
.catch(error => console.warn(error.code, error.message));
```
## 5. Complete Example
```html
FancyMenu Integration
Game Controls
```
## 6. Best Practices & Notes
- **Detect the bridge** before using it, or listen for `fancymenu-ready`.
- **Handle errors** (callbacks for [actions](/action-scripts), `.catch` for [placeholders](/placeholders)) to present useful feedback.
- **Validate input** before passing it to actions or [placeholder](/placeholders) variables.
- **Throttle requests**; avoid spamming the bridge with rapid-fire calls (especially placeholder refresh loops).
- **Security**: actions execute with the player’s normal permissions. Treat user-provided data with care to avoid injection.
## 7. Troubleshooting
1. Confirm the page is loaded in a FancyMenu-controlled MCEF browser.
2. Check the browser console for JavaScript errors.
3. Verify the [placeholder](/placeholders) identifier or [action](/action-scripts) type is correct and that required values are supplied.
4. Review the Minecraft log (`latest.log`) for FancyMenu error messages if execution fails unexpectedly.
================== END PAGE: https://docs.fancymenu.net/docs/browser-api ==================
================== BEGIN PAGE: https://docs.fancymenu.net/docs/button-slider-templates ==================
---
title: Button & Slider Templates
description: >-
How to use button/slider templates to apply a specific button/slider design to
ALL buttons at once.
---
# Using Button Elements as Templates for Buttons and Sliders
It is possible to use a Button element as a template for other buttons and even sliders. By doing that, you can apply a specific button/slider design to ALL buttons/sliders in a menu or even the all menus at once when using a universal layout.
> [!IMPORTANT]
> Since FancyMenu 3.9.0 it is recommended to use [Global Customizations](/global-customizations) instead of Button/Slider Templates whenever possible, which can replace vanilla button and slider textures globally without using a resource pack. Use global customizations for broad vanilla UI styling, and use templates only when you need layout-specific behavior.
# Important Before You Start
If you only want to change the texture of a single button or slider, it is easiest and recommended to simply **right-click** the button or slider (Vanilla and Custom) in the editor. There is an option to set the **Background Textures** (and slider handle textures) for buttons and sliders.
# What is a Template Button?
A template button is a special kind of custom button in FancyMenu that lets you control how other buttons and sliders look and behave. It's like creating a master design that many other elements will follow.
When you create a template button, you can make many buttons or sliders share the same:
- Size (width and height)
- Position
- Visibility
- Opacity (how see-through they are)
- Text labels
- **Button textures** (automatically shared when custom textures are set)
This is super helpful when you want to make your menu look consistent or when you need to update many buttons at once!
# Who Can Use Templates?
Only **custom buttons** can work as templates. However, these templates can be applied to:
- Vanilla buttons (the default Minecraft buttons)
- Custom buttons (buttons you create in FancyMenu)
- Vanilla sliders (like volume controls)
- Custom sliders (sliders you create in FancyMenu)
# How to Create a Template Button
1. Open the FancyMenu editor for the screen you want to customize
2. Add a new custom button element to your layout
3. Right-click on your new button
4. Select "Template Settings" from the menu
5. Click "Is Template: ON" to enable template mode
Your button will now be ready to work as a template for other buttons and sliders!
# Template Sharing Options
You can choose which types of elements your template will affect:
- **Buttons** - Your template will only affect buttons (both vanilla and custom)
- **Sliders** - Your template will only affect sliders (both vanilla and custom)
To set this option:
1. Right-click your template button
2. Go to "Template Settings"
3. Click on "Share With: [Current Option]" to cycle between options
> **Important**: You can have two templates active at the same time - one for buttons AND one for sliders. This means you can create separate template designs for different element types on the same screen!
{.is-warning}
# What Can Be Templated
You can control exactly which properties your template will share with other elements:
## Properties That Can Be Toggled On/Off:
1. Right-click your template button
2. Go to "Template Settings"
3. Toggle any of these options:
- **Width** - Makes all affected elements the same width as your template
- **Height** - Makes all affected elements the same height as your template
- **X Position** - Places all affected elements at the same X coordinate as your template
- **Y Position** - Places all affected elements at the same Y coordinate as your template
- **Opacity** - Gives all affected elements the same transparency as your template
- **Visibility** - Controls whether affected elements are shown or hidden
- **Label** - Makes all affected elements use the same text as your template
## Properties That Are Always Shared:
- **Button textures** - When you set custom textures on your template, they will automatically be applied to all affected elements
- Unlike other properties, texture sharing cannot be turned off
- Textures are only applied when custom textures are actually set on the template
- If no custom textures are set, the original element textures will be used
# Customizing the Template Appearance
Your template button can be customized just like any other button:
1. Right-click on your template button
2. You can set:
- Button textures (normal, hover, and inactive states)
- Labels (normal and hover)
- Sounds (hover and click)
- Tooltips
For buttons, you can set custom textures for different states:
- Normal background (when not interacting)
- Hover background (when your mouse is over it)
- Inactive background (when the button is disabled)
For sliders, you can also set:
- Slider handle textures
- Slider background textures
# Important Tips
1. **Template buttons won't appear in the game** - They're only visible in the editor, so place them wherever is convenient.
2. **You can have two templates active simultaneously** - One template for buttons and one template for sliders can be active at the same time.
3. **Only one template per type is active** - If you have multiple button templates, only the top one in your element list will be used for buttons. The same applies to slider templates.
4. **Changes to the template update instantly** - When you edit your template, all affected buttons and sliders will update right away.
5. **Use the right sharing mode** - Remember that "Buttons" mode won't affect sliders, and "Sliders" mode won't affect buttons.
6. **Apply properties selectively** - You don't have to apply all properties. For example, you might want to template just the textures and size but allow elements to keep their original positions.
7. **Textures are always shared when set** - Unlike other properties, any custom textures you apply to the template will automatically be shared with matching elements. You don't need to toggle this feature on/off.
# Example Uses
- Create a consistent style for all buttons on a screen
- Make all sliders match your custom theme with a separate template
- Create a "hidden mode" where you can show/hide multiple buttons at once
- Change the size of many buttons with just one edit
- Give all buttons in your menu the same custom textures and sounds
================== END PAGE: https://docs.fancymenu.net/docs/button-slider-templates ==================
================== BEGIN PAGE: https://docs.fancymenu.net/docs/commands ==================
---
title: Commands
description: FancyMenu's commands and how to use them.
published: true
date: 2025-06-26T20:50:09.935Z
tags:
editor: markdown
dateCreated: 2025-04-14T20:14:18.072Z
---
# Commands
FancyMenu adds some commands to the game that can be very useful when combining them with other mods like FTB Quests.
> FancyMenu needs to be on the **SERVER** (and client) to use commands in Multiplayer!
{.is-warning}
## /openguiscreen
The `/openguiscreen` command lets you open a GUI (Vanilla/mod and custom GUIs).
It can even remotely open GUIs for other players when FancyMenu is installed on both server and clients.
For a more in-detail description of this command, take a look at the [Open GUIs by Command](/opengui-command) page.
This command will not work for every screen, especially mod screens. If the command fails to open a screen, it will show an error. There is not much you can do in that case, because then it's probably a screen that is too complex to get opened automatically by FancyMenu.
I will also not manually add compatibility for mod screens anymore, because adding compatibility for all the mods out there would take me ages, sorry.
**Usage:** `/openguiscreen `
## /closeguiscreen
The `/closeguiscreen` command lets you close the current GUI.
Huh? This is totally useless you say?
Well yes, but actually no.
This command is useful for when using mods that trigger commands on specific actions.
So yes, this command is absolutely useless when using it without other mods, but can be really helpful if you have the right mods installed!
**Usage:** `/closeguiscreen `
## /fmvariable
The `/fmvariable` command allows you to set and get FancyMenu variables.
To execute this command as another player on servers, you can use the `/execute as` Vanilla command.
So lets say you want to execute the `/fmvariable` command as the player `ExamplePlayer`. In that case you would type:
`/execute as ExamplePlayer run fmvariable...`.
**Usage:** `/fmvariable [] []`
### Get
To **get a variable value**, use the `get` sub-command like this:
`/fmvariable get some_variable`
Then the value of this variable will be printed to your chat.
### Set
To **set a varaible**, use the `set` sub-command like this:
`/fmvariable set some_variable new_value true`
The last argument here is to set if you want to receive chat feedback, which means if you want this command to print messages to your chat.
================== END PAGE: https://docs.fancymenu.net/docs/commands ==================
================== BEGIN PAGE: https://docs.fancymenu.net/docs/conditions ==================
---
title: Conditions (Requirements)
description: How to use loading requirements.
published: true
date: 2026-05-03T11:01:52.000Z
tags: loading requirements, loading requirement, requirement, requirements
editor: markdown
dateCreated: 2025-04-14T20:14:22.175Z
---
# Requirements
Requirements (aka. "loading requirements") allow you to make parts of your layouts visible or invisible based on various conditions like if an element is hovered, the window has a specific size or if you're currently in a world.
They can also be used in action scripts of buttons, sliders, tickers and everything else with an action script input.
# Adding Requirements to Elements
To add one or more requirements to elements, just right-click the element and click on **Loading Requirements**.
# Layout-wide Requirements
You can also change the visibity of whole layouts by right-clicking the **editor background** and then clicking on **Loading Requirements [Layout-Wide]**.
# Action Scripts
Requirements can also be used in action scripts.
You can add them in the action script editor screen and use them to execute specific actions only if the condition of the requirement is met.
# Requirement Values
Some requirements need you to set some values to work properly. If that's the case, the requirement screen should tell you to set all values first, but if not, just check if the **Edit Requirement Value** button is clickable when adding the requirement.
Always check the requirement's description if you're not sure what to set as value.
Some value inputs even support **TAB auto completion**.
FancyMenu 3.9.0 reworks the Manage Requirements window to use a right-click context menu, keyboard navigation, search, undo/redo (`CTRL + Z` / `CTRL + Y`) and `CTRL + S` as the **Done** shortcut.
# Requirements in Detail
The following list contains most, if not all, requirements available in FancyMenu. It is possible that the list is sometimes a bit outdated due to updates for the mod.
## Is Element Hovered
Checks if a specific element is hovered by the mouse cursor.
**Value required**: Yes - Element ID of the target element (e.g., `some_element_ID`). You can get the ID by right-clicking an element in the editor.
## Is Element Focused
Checks if a specific element currently has keyboard focus (for example, a text field or focused button).
**Value required**: Yes - Element ID of the target element (the same ID shown in the editor)
> This is not the same as when an element is just hovered, even tho it looks similar. Focused elements keep looking "hovered" even when they are not hovered anymore. Elements get focused when clicking them or when using the keyboard to navigate in menus.
{.is-info}
## Is Any Element Hovered
Checks if any element in the layout is currently being hovered by the mouse cursor.
**Value required**: No
## Is Any Button Hovered
Checks if any button (vanilla or custom) is currently being hovered by the mouse cursor.
**Value required**: No
## Is Layout Enabled
Checks if a specific layout is currently enabled.
**Value required**: Yes - The name of the layout (e.g., `my_cool_main_menu_layout`)
## Is Scheduler Running
Checks if a scheduler is currently running.
**Value required**: Yes - Scheduler ID (e.g., `my_scheduler`)
## Is GUI Scale
Checks if the current GUI scale matches certain conditions.
**Value required**: Yes - Can accept numeric values like `1`, `2`, etc.
## Is Button Active
Checks if a specific button is active (clickable).
**Value required**: Yes - Element ID of the target button (e.g., "some_element_ID")
## Is Screen Title
Checks if the screen's DISPLAY title matches a specific text or localization key. This will only check for the display name/title of the screen, like "Options" or "Pause". It will NOT check for the menu/screen identifier (like `title_screen`)!
**Value required**: Yes - The exact title text or localization key of the screen
## Is Key Pressed
Checks if a specific keyboard key is currently being pressed.
**Value required**: Yes - The key code of the target key. Selected via a UI when editing the requirement value.
## Is Any Screen Open
Checks if any screen/menu is currently open (returns false if no screen is showing).
**Value required**: No
## Is MC Debug Overlay Enabled
Checks if the F3 debug overlay is currently visible.
**Value required**: No
## Is Active Cursor Type
Checks if FancyMenu's currently active cursor type matches a specific standard cursor type.
**Value required**: Yes - Cursor type: `normal`, `writing`, `crosshair`, `pointing_hand`, `resize_horizontal`, `resize_vertical`, `resize_nwse`, `resize_nesw`, `resize_all`, or `not_allowed`
## Is Customization Menu Bar Visible
Checks if FancyMenu's customization menu bar is currently visible.
**Value required**: No
## Is Modpack Mode Enabled
Checks if FancyMenu's Modpack Mode is enabled.
**Value required**: No
## Mouse Clicked
Checks if a specific mouse button is being pressed.
**Value required**: Yes - `left` or `right` to indicate which mouse button to check
## Is Fullscreen
Checks if the game is currently in fullscreen mode.
**Value required**: No
## Is Window Width
Checks if the game window width matches specific values.
**Value required**: Yes - Window width in pixels (e.g., "1920"). Multiple values can be provided by separating with commas.
## Is Window Height
Checks if the game window height matches specific values.
**Value required**: Yes - Window height in pixels (e.g., "1080"). Multiple values can be provided by separating with commas.
## Is Window Width Bigger Than
Checks if the game window width is bigger than a specific value.
**Value required**: Yes - Window width in pixels (e.g., "1920")
## Is Window Height Bigger Than
Checks if the game window height is bigger than a specific value.
**Value required**: Yes - Window height in pixels (e.g., "1080")
## Is Multiplayer
Checks if the player is currently in a multiplayer world.
**Value required**: No
## Is Singleplayer
Checks if the player is currently in a singleplayer world.
**Value required**: No
## Is World Loaded
Checks if any world is currently loaded.
**Value required**: No
## Is Adventure
Checks if the player is currently in adventure game mode.
**Value required**: No
## Is Creative
Checks if the player is currently in creative game mode.
**Value required**: No
## Is Spectator
Checks if the player is currently in spectator game mode.
**Value required**: No
## Is Survival
Checks if the player is currently in survival game mode.
**Value required**: No
## Is Game Mode
Checks if the player is in a specific game mode.
**Value required**: Yes - Game mode name (e.g., "creative", "survival", "adventure", "spectator")
## Is Difficulty
Checks if the current game difficulty matches a specific value.
**Value required**: Yes - Difficulty name (e.g., "peaceful", "easy", "normal", "hard")
## Is Hardcore
Checks if the currently loaded world is in hardcore mode.
**Value required**: No
## Is Camera Perspective
Checks if the current camera perspective matches a specific perspective.
**Value required**: Yes - `first_person`, `third_person_back`, or `third_person_front`
## Is Raining
Checks if it's currently raining in the player's location.
**Value required**: No
## Is Thundering
Checks if there's currently a thunderstorm in the player's world.
**Value required**: No
## Is Clear Weather
Checks if the weather is currently clear (not raining or thundering).
**Value required**: No
## Is Snowing
Checks if it's currently snowing at the player's location.
**Value required**: No
## Is Player Running
Checks if the player is currently sprinting.
**Value required**: No
## Is Player Sneaking
Checks if the player is currently sneaking/crouching.
**Value required**: No
## Is Player Using Item
Checks if the player is currently using an item.
**Value required**: No
## Is Player Swimming
Checks if the player is currently swimming.
**Value required**: No
## Is Player Jumping or Falling
Checks if the player is currently jumping.
**Value required**: No
## Is Player Under Water
Checks if the player is completely under water.
**Value required**: No
## Is Player In Water
Checks if the player is in water (can be partially submerged).
**Value required**: No
## Is Player In Lava
Checks if the player is in lava.
**Value required**: No
## Is Player In Fluid
Checks if the player is in any fluid (water, lava, etc.).
**Value required**: No
## Is Player Riding Entity/Vehicle
Checks if the player is riding any entity.
**Value required**: No
## Is Player Riding Jumpable Entity
Checks if the player is riding an entity that can jump (like a horse).
**Value required**: No
## Is Player Riding Entity With Health
Checks if the player is riding a living entity with health (like animals, not boats).
**Value required**: No
## Is Player In Powder Snow
Checks if the player is currently in powder snow.
**Value required**: No
## Was Player In Powder Snow
Checks if the player was in powder snow (used for effects that persist after leaving).
**Value required**: No
## Is Player Wearing Pumpkin
Checks if the player is wearing a carved pumpkin on their head.
**Value required**: No
## Is Player Flying With Elytra
Checks if the player is currently flying with an elytra.
**Value required**: No
## Is Player Creative Flying
Checks if the player is flying in creative mode.
**Value required**: No
## Has Player Absorption Hearts
Checks if the player has any absorption hearts (golden hearts).
**Value required**: No
## Is Player Withered
Checks if the player is affected by the wither effect.
**Value required**: No
## Is Player Fully Frozen
Checks if the player is fully frozen (usually from powder snow).
**Value required**: No
## Is Player Poisoned
Checks if the player is affected by the poison effect.
**Value required**: No
## Is Player In Biome
Checks if the player is in a specific biome.
**Value required**: Yes - Biome identifier (e.g., `minecraft:birch_forest`)
## Is Player In Dimension
Checks if the player is in a specific dimension.
**Value required**: Yes - Dimension identifier (e.g., `minecraft:overworld`, `minecraft:the_nether`, `minecraft:the_end`)
## Is Player In Structure
Checks if the player is currently inside a specific structure. Requires FancyMenu on the server for server worlds.
**Value required**: Yes - Structure identifier (e.g., `minecraft:village`)
## Is Entity Nearby
Checks if a specific entity type is within a certain radius of the player.
**Value required**: Yes - Format: "radius:entity_id" (e.g., `10:minecraft:pig` - checks for pigs within 10 blocks)
## Is Effect Active
Checks if a specific potion effect is active on the player.
**Value required**: Yes - Effect identifier (e.g., `minecraft:speed`, `minecraft:strength`)
## Is Any Effect Active
Checks if the player has any potion effect active.
**Value required**: No
## Is Player Left-Handed
Checks if the player is set to left-handed mode in the game options.
**Value required**: No
## Is Inventory Slot Filled
Checks if a specific inventory slot contains an item.
**Value required**: Yes - Slot number (0-35 for main inventory, slots 0-8 are hotbar)
## Is Item Hovered in Inventory
Checks if the cursor is hovering any item in an inventory screen.
**Value required**: No
## Is Cursor Holding Inventory Item
Checks if the cursor is currently holding an inventory item stack.
**Value required**: No
## Is Hotbar Slot Selected
Checks if a specific hotbar slot is currently selected.
**Value required**: Yes - Hotbar slot number (0-8)
## Has Player Permission Level
Checks if the player has at least the specified permission/OP level on the current world or server.
**Value required**: Yes - Permission level number (0-4, where 4 is server operator)
## Is Attack Strength Weakened
Checks if the player's attack strength is currently weakened (not fully charged).
**Value required**: No
## Is Real Time Day
Checks if the current real-world day of the month matches a specific value.
**Value required**: Yes - Day number (1-31). Multiple values can be provided by separating with commas.
## Is Real Time Hour
Checks if the current real-world hour matches a specific value.
**Value required**: Yes - Hour in 24-hour format (0-23). Multiple values can be provided by separating with commas.
## Is Real Time Minute
Checks if the current real-world minute matches a specific value.
**Value required**: Yes - Minute (0-59). Multiple values can be provided by separating with commas.
## Is Real Time Month
Checks if the current real-world month matches a specific value.
**Value required**: Yes - Month number (1-12, where 1 is January). Multiple values can be provided by separating with commas.
## Is Real Time Second
Checks if the current real-world second matches a specific value.
**Value required**: Yes - Second (0-59). Multiple values can be provided by separating with commas.
## Is Real Time Week Day
Checks if the current real-world day of the week matches a specific value.
**Value required**: Yes - Day of week as number (1-7, where 1 is Sunday). Multiple values can be provided by separating with commas.
## Is Real Time Year
Checks if the current real-world year matches a specific value.
**Value required**: Yes - Full year (e.g., "2023"). Multiple values can be provided by separating with commas.
## File/Folder Exists
Checks if a specific file or folder exists on the system.
**Value required**: Yes - Path to the file or folder (absolute or relative to the game directory)
## Is OS Linux
Checks if the operating system is Linux.
**Value required**: No
## Is OS macOS
Checks if the operating system is macOS.
**Value required**: No
## Is OS Windows
Checks if the operating system is Windows.
**Value required**: No
## Is Internet Connection Available
Checks if an active internet connection is available.
**Value required**: No
## Is Game Language
Checks if the current game language matches a specific value.
**Value required**: Yes - Language code (e.g., `en_us` for English)
## Is Mod Loaded
Checks if a specific mod is loaded.
**Value required**: Yes - Mod ID (e.g., `fancymenu`, `jei`). You can also check for Optifine with `optifine`. Multiple mod IDs can be provided by separating with commas.
## Is MCEF Loaded
Checks if MCEF (Minecraft Chromium Embedded Framework) is installed and initialized.
**Value required**: No
## Is Number
Provides advanced number comparison with different comparison modes.
**Value required**: Yes - Complex format: `["mode":"comparison_mode","number":"value1","compare_with":"value2"]$` where `comparison_mode` can be `equals`, `bigger-than`, `smaller-than`, `bigger-than-or-equals`, or `smaller-than-or-equals`
## Is Text
Provides advanced text comparison with different comparison modes.
**Value required**: Yes - Complex format: `["mode":"comparison_mode","text":"text1","compare_with":"text2"]$` where `comparison_mode` can be `equals`, `contains`, `starts-with`, or `ends-with`
## Is Server IP
Checks if the current server IP matches a specific value.
**Value required**: Yes - Server IP address (with or without port)
## Is Server Online
Checks if a specific server is online and reachable.
**Value required**: Yes - Server IP address (with or without port)
## Is Resource Pack Enabled
Checks if a specific resource pack is currently selected/active.
**Value required**: Yes - Resource pack title or pack ID (e.g., `Programmer Art` or the pack's ID)
## Is Variable Value (FM Variable)
Checks if a FancyMenu variable has a specific value.
**Value required**: Yes - Format: "variable_name:expected_value"
## Only Once Per Session
Returns true only once per game session. Useful for one-time announcements or actions.
**Value required**: No
================== END PAGE: https://docs.fancymenu.net/docs/conditions ==================
================== BEGIN PAGE: https://docs.fancymenu.net/docs/copyright-notice ==================
---
title: Title Screen Copyright
description: About the copyright text in the Title screen.
published: true
date: 2025-06-26T14:04:14.635Z
tags:
editor: markdown
dateCreated: 2025-06-26T14:03:50.591Z
---
# The Title Screen Copyright Notice
Some of you would like to delete/hide the copyright text in the Title screen. This is **NOT POSSIBLE**, which is by design.
You can move the Copyright element, just not out of screen. You can also change its opacity, but you can't make it fully invisible, which is also by design.
Please don't delete copyright notices. Thank you.
================== END PAGE: https://docs.fancymenu.net/docs/copyright-notice ==================
================== BEGIN PAGE: https://docs.fancymenu.net/docs/custom-cursor ==================
---
title: Custom Cursor
description: How to make menus use a custom mouse cursor.
published: true
date: 2025-06-25T18:46:37.027Z
tags:
editor: markdown
dateCreated: 2025-06-25T18:46:32.912Z
---
# Custom Mouse Cursor
FancyMenu allows you to set a custom mouse cursor per screen.
To do that, simply add a new **Cursor** element to a layout and right-click it to set a cursor texture.
If you want the custom cursor to show up in all screens, you should use a **universal layout**.
================== END PAGE: https://docs.fancymenu.net/docs/custom-cursor ==================
================== BEGIN PAGE: https://docs.fancymenu.net/docs/custom-guis ==================
---
title: Custom GUIs
description: How to add a new GUI screen to the game.
published: true
date: 2026-05-03T11:01:52.000Z
tags:
editor: markdown
dateCreated: 2025-04-14T20:14:26.193Z
---
# Custom GUIs
FancyMenu allows you to customize existing GUI screens, but it also allows you to add completely new ones and fill it with elements.
# Adding a New Screen
To add a new screen, navigate to **Customization -> Custom GUIs -> Manage Custom GUIs**.

In the next menu, click on **New GUI**.

Here you need to give your new GUI a unique identifier and you can customize other parts of the basic screeen behavior.
When you're done, press **Done**.

Now you have a new empty GUI. To open it, select the GUI in the **Manage Custom GUIs** menu and click on **Open GUI**.

This will open the still pretty empty GUI screen. To make it less empty, just create a new layout for it like you would do with any other screen.

# Opening the GUI via Action
The last part is to give normal users access to your GUI. The easiest way to do that is to use the **Open Screen or Custom GUI** action with a button, slider or ticker.

# Opening the GUI via Command
You can also open your custom GUI via an [in-game command](./commands#openguiscreen).
This even allows you to remotely open the GUI for other users!
# Popup Mode
Starting with FancyMenu v3.8.0, Custom GUIs support a "Popup Mode" that makes them look like a popup getting opened on top of another screen (the previous screen the Custom GUI got opened from). This setting can be toggled individually for each Custom GUI in its settings.
FancyMenu 3.9.0 also adds an option to toggle the screen background overlay for Custom GUIs while in a world. Use it when you want to disable or keep the blur/dark tint behind a Custom GUI opened over gameplay.
================== END PAGE: https://docs.fancymenu.net/docs/custom-guis ==================
================== BEGIN PAGE: https://docs.fancymenu.net/docs/customizing-scrollable-screens ==================
---
title: Scrollable Screens
description: How to customize scrollable screens.
published: true
date: 2025-07-17T15:16:10.099Z
tags:
editor: markdown
dateCreated: 2025-07-05T20:01:34.059Z
---
# Customizing Scrollable Screens
Customizing scrollable screens like the Options screens can be a bit tricky, since FancyMenu can't "see" or customize content inside scroll areas.
Since FancyMenu v3.6.0+, it is possible to make SOME of these screens customizable by automatically exposing widgets inside scroll areas of a specific screen. This is pretty powerful, but also pretty experimental, so it will not work in all screens.
To enable the exposing feature for a specific screen, click on **menu bar -> Customization -> Expose Scroll Area Content Of Current Screen**. It is not possible to enable this feature for all screens at once and some screens will not allow you to enable it at all, like the Singleplayer and Multiplayer menus.
Enabling this feature will stack all widgets found in scroll areas in the top-left corner of the screen. This is by design and not a bug. You can then open a layout **for the current screen** and schould be able to see and edit (move, resize, etc.) these widgets in the editor.
The most important thing to keep in mind when using this feature is that exposing scroll area widgets will REMOVE the original scroll area from the screen and everything inside the scroll area that is not a normal widget (widgets are buttons and sliders) will get LOST, so it will not be visible or interactable while the exposing feature is enabled.
================== END PAGE: https://docs.fancymenu.net/docs/customizing-scrollable-screens ==================
================== BEGIN PAGE: https://docs.fancymenu.net/docs/decoration-overlays ==================
---
title: Decoration Overlays
description: Add fullscreen visual overlays to menus in the FancyMenu layout editor.
published: true
date: 2026-05-03T11:01:52.000Z
tags:
editor: markdown
dateCreated: 2026-05-03T11:01:52.000Z
---
# Decoration Overlays
Decoration Overlays are fullscreen effects that render in front of your menu elements.
They are useful when you want to add atmosphere or motion to a menu without building those effects manually.
Common examples:
- Add **Snowfall** for a winter menu with snow buildup.
- Add **Rainfall** for a storm look with puddles and drips.
- Add **Fireflies** for a calm night-style menu.
- Add **String Lights** for festive or decorative menu themes.
- Add **Leaves**, **Fireworks**, or **Confetti** for seasonal/event menus.
- Add the **Browser** overlay to show a fullscreen webpage/video layer.
# Where To Find It
Open a layout in the layout editor, then right-click the editor background and open **Decoration Overlays**.
# Quick Start
1. Open a layout in the layout editor.
2. Right-click the background (empty area).
3. Open **Decoration Overlays**.
4. Select an overlay type.
5. Set **Show Overlay** to **Enabled**.
6. Configure the overlay settings.
7. Save the layout and test the screen.
# How Overlay Types Work
Each overlay type has its own submenu and its own **Show Overlay** toggle.
- You can enable only the types you want.
- You can combine multiple enabled types in one layout.
- Settings are per overlay type (for example color, intensity, speed, density, scale, special behavior).
> [!INFO]
> It is possible to stack multiple instances of the same overlay type by using multiple layouts with the same type enabled.
# Overlay Types
- **Snowfall**: snowfall with optional snow accumulation on surfaces/buttons.
- **Rainfall**: rain with optional puddles, drips, and optional thunder flashes.
- **Fireflies**: moving firefly groups with configurable group amount, density, size, and color.
- **String Lights**: configurable string combinations, light colors, wind/flicker behavior, and holiday color mode.
- **Leaves**: falling leaves with configurable colors, wind, speed, scale, and density.
- **Fireworks**: frequent fireworks with configurable amount, explosion size, and scale.
- **Confetti**: confetti rain with optional mouse-click confetti mode.
- **Browser**: fullscreen browser overlay with URL and media settings.
- **GLSL Shader**: fullscreen custom shader overlay (for animated or static shader-based visuals).
# Browser Overlay: Interactive vs Passive
The Browser overlay can be configured either as an interactive browser or as a passive visual layer.
- **Process Mouse/Keyboard** settings control whether the browser itself handles input.
- **Consume Mouse/Keyboard** settings control whether input is blocked from the menu behind it.
Practical setup examples:
- Interactive browser in front: enable both **Process** and **Consume**.
- Visual-only browser layer: disable **Process** and disable **Consume**.
> [!IMPORTANT]
> The Browser decoration overlay requires the **MCEF** mod.
================== END PAGE: https://docs.fancymenu.net/docs/decoration-overlays ==================
================== BEGIN PAGE: https://docs.fancymenu.net/docs/deleted-vanilla-elements ==================
---
title: Deleted Vanilla Elements
description: How to delete Vanilla elements and make them visible again.
published: true
date: 2025-05-26T04:17:45.533Z
tags:
editor: markdown
dateCreated: 2025-04-14T20:14:30.203Z
---
# Deleting Vanilla Elements
You can hide all default/Vanilla elements (including some mod elements) that are visible in the layout editor. If they are visible, just **right-click** them and click on **Delete**.
# Bringing Back Deleted Vanilla Elements
To make deleted/hidden Vanilla elements like buttons, logos or other types of elements visible again, just open the layout you deleted them in, then **navigate to the menu bar -> Element -> Deleted Vanilla Elements** and **left-click** the element(s) you want to make visible again.
If the deleted elements aren't listed in the menu, you have the wrong layout open and need to find the one you deleted them in.
================== END PAGE: https://docs.fancymenu.net/docs/deleted-vanilla-elements ==================
================== BEGIN PAGE: https://docs.fancymenu.net/docs/dragger ==================
---
title: Dragger
description: How to drag elements in menus by using the Dragger element.
published: true
date: 2025-07-05T19:19:41.915Z
tags:
editor: markdown
dateCreated: 2025-07-05T19:19:37.358Z
---
# Dragger
The Dragger element is an element in FancyMenu that allows you to make menus interactive in a rather uncommon way. The Dragger is an element that can be dragged with the mouse OUTSIDE the editor, which means users can basically grab the element and move it around.
This is cool and all, but moving around an element that does nothing else is pretty pointless, right? Well, no, because you can attach other elements to it by setting the Dragger element as anchor point for the other elements that should move with the Dragger.
The position offset of Dragger elements is persistent and gets saved across game restarts, which basically just means that when a user moves the Dragger, it stays at this "custom" position, even when restarting the game.
The Dragger element is only visible in the editor and invisible outside, so make sure to use another element as "body" for it, if you want the user to see where the dragable area is.
================== END PAGE: https://docs.fancymenu.net/docs/dragger ==================
================== BEGIN PAGE: https://docs.fancymenu.net/docs/dummy-screen-instances ==================
---
title: World Loading Screens
description: How to edit the screens that show when joining a world or server.
published: true
date: 2025-06-28T19:14:12.041Z
tags:
editor: markdown
dateCreated: 2025-06-28T19:12:15.371Z
---
# World Loading Screens
When you load into a world or join a server, you've probably noticed that screens show up there that you can't really customize, because they get closed automatically.
To edit them, you need to open an instance of them that will stay open as long as you want, which is possible by opening a "dummy screen instance" of them.
The "Dummy Screen Instances" are a feature of FancyMenu that makes it possible to open SOME of the screens that vanish too fast to customize them.
To see all screens that can be opened via the Dummy Screen Instance feature, click on **menu bar -> Tools -> Dummy Screen Instances**. The menu that opens shows all screens you can open as a dummy screen instance. **Left-clicking** the screens in the menu will open a dummy instance of them for you to customize them in peace.
For example, when joining a world or server, there are at least two screens that will show up during loading:
- Level Loading Screen (aka. World Loading Screen)
- Generic Dirt Message Screen (aka. Dirt Message Screen)
> **Important:** The "World Loading Screen" is not the same as the "Game Loading Screen" (aka. Splash Screen or Resource Reloading Screen). The "Game Loading Screen" can be customized with **Drippy Loading Screen**, which is an addon for FancyMenu.
{.is-warning}
================== END PAGE: https://docs.fancymenu.net/docs/dummy-screen-instances ==================
================== BEGIN PAGE: https://docs.fancymenu.net/docs/element-animator ==================
---
title: Element Animator
description: How to animate elements with keyframes using the Element Animator.
published: true
date: 2026-05-03T11:01:52.000Z
tags:
editor: markdown
dateCreated: 2025-04-14T20:14:34.288Z
---
# Element Animator
The **Animator** is an element that lets you animate other elements. With this element, you can smoothly change another element’s size, position, and anchor point over time using keyframes. Keyframes are like snapshots that capture how the element should look at a specific moment. The Animator element then plays these snapshots in order to create smooth motion.
> The **Element Animator** allows you to control the **position, size and anchor point** of elements. It is **NOT** possible to control any other settings of elements, such as opacity, visibility, rotation etc.!
{.is-warning}
# Video Tutorial
Since many of you were a bit confused about how the animator works, I made a little video that shows how to work with it.
[FancyMenu | How to Use the Element Editor - YouTube](https://www.youtube.com/watch?v=F9S8cIPssww) (youtu.be/F9S8cIPssww)
# Adding the Animator Element
1. **Right-Click the Background:**
In the layout editor, right-click on the background.
2. **Select New Element -> Element Animator:**
In the menu that pops up, go to **New Element** and click on **Element Animator**. This adds the Animator Element to your layout.
3. **Set It Up:**
After adding, the Animator element shows up with its default settings. You can change options like looping or color by right-clicking the Animator and choosing from the menu.
# Managing Keyframes
Keyframes are like bookmarks that tell the Animator what the element should look like at a certain time.
## Opening the Keyframe Editor
- **Open the Editor:**
Right-click the Animator element and choose **Edit Keyframes** (or **Manage Keyframes**). This opens a screen where you can add, edit, or delete keyframes.
## Recording and Adding Keyframes
- **Start Recording:**
In the keyframe editor, press the **`R` key** to start recording. When recording, the preview box changes color to show it’s active.
- **Change the Preview:**
Move or resize the preview box to set the look you want. In offset mode, the preview stays centered on a crosshair so changes are shown as offsets.
- **Add a Keyframe:**
Press the **`K` key** to save the current look as a keyframe. This keyframe saves the preview’s position, size, and anchor settings.
## Editing Keyframes
- **Select a Keyframe:**
Click on a keyframe marker in the timeline. You can also hold **Ctrl** and click to select more than one.
- **Move a Keyframe:**
Drag the keyframe marker left or right to change its time. You can also use:
- **Left Arrow:** to move it 100ms earlier.
- **Right Arrow:** to move it 100ms later.
- **Fine-Tune the Preview:**
When a keyframe is selected, adjust the preview box by moving or resizing it. Use **Ctrl + Z** to undo and **Ctrl + Y** to redo changes if needed.
## Removing Keyframes
- **Delete a Keyframe:**
Select a keyframe and press the **Delete key** to remove it.
- **Delete Multiple Keyframes:**
You can select several keyframes (for example, using **Ctrl + A** to select all) and press Delete to remove them all.
## Keyframe Smoothing
Keyframe smoothing is a feature that helps you evenly space out your keyframes. This makes your animation look more consistent and smooth.
- **Select Multiple Keyframes:**
First, select two or more keyframes that you want to smooth out (use **Ctrl + Click** or **Ctrl + A**).
- **Click the Smoothing Button:**
In the keyframe editor’s bottom toolbar, click the button labeled **Distance Smoothing**.
- **Enter a New Distance:**
A small input box will appear. Type in a value (in milliseconds) to set the same time gap between each selected keyframe.
- **Apply the Smoothing:**
Press Enter to apply the smoothing. The keyframes will be adjusted so that the time difference between them is even.
# Previewing Your Animation
After you have recorded keyframes, you can see how your animation will look:
- **Play the Animation:**
In the keyframe editor, press the **`P` key** or click the play button. The preview will start from the beginning and show how the preview box changes over time.
- **Note on Looping:**
While previewing in the keyframe editor, the animation will **not loop**. This means it plays from start to end only once. Looping will only be active when the Animator element is applied to a target element in the final layout.
- **Pause the Preview:**
Press the **`P` key** again to pause the animation if you want to stop at a certain point.
- **Drag the Progress Bar:**
If available, you can drag the timeline marker to check how the animation looks at any specific time.
# Choosing Target Elements
After setting up your keyframes, you need to choose which layout elements will be animated:
1. **Open the Target Manager:**
Right-click the Animator element and choose **Manage Targets**.
2. **Add Targets:**
Click **Add Target** to see a list of available elements. Pick the ones you want to animate.
3. **Remove Targets:**
To remove a target, open the manager and click **Remove Target**.
When the animation plays in the final layout, the Animator will use your keyframes to change the chosen elements’ size, position, and more. Looping will be applied here if you set it.
# Keyboard Shortcuts
Use these shortcuts in the keyframe editor to work faster:
- **`R` Key:** Start or stop recording.
- **`T` Key:** Pause or resume recording.
- **`P` Key:** Play or pause the animation preview.
- **`K` Key:** Add a new keyframe at the current time.
- **Left/Right Arrow Keys:**
- **Left Arrow:** Move a keyframe 100ms earlier.
- **Right Arrow:** Move a keyframe 100ms later.
- **Delete Key:** Remove the selected keyframe(s).
- **Ctrl + A:** Select all keyframes.
- **Ctrl + Z:** Undo your last change.
- **Ctrl + Y:** Redo the change you just undid.
- **Ctrl + Keyframe Dragging**: Drag multiple selected keyframes at once.
# Extra Settings and Tips
- **Loop Animation:**
You can set the Animator to loop. When looping is on, the animation will restart after the last keyframe—but note that this only happens for the final target element. In the keyframe editor preview, looping does not occur.
- **Ignore Size/Position:**
If you do not want the keyframes to change an element’s size or position, turn these options off.
- **Timing Offsets:**
FancyMenu 3.9.0 adds timing offsets for controlled elements. You can offset individual target elements, or use random timing offsets in a configured range, so one animation can start at slightly different times for each target.
- **Offset Mode:**
In offset mode, animations are applied as changes from the element’s original spot. The preview is shown centered on a crosshair.
- **Undo and Redo:**
Use **Ctrl + Z** to undo and **Ctrl + Y** to redo changes.
- **Check the Order:**
Make sure your keyframes are in the right order by time. The system sorts them for you, but if you move one, double-check the order.
- **Preview Changes:**
Use the play button or **`P` key** to see your animation in action before saving it.
# Conclusion
By following these simple steps, you can add an Animator element to your layout and create smooth animations. Whether you record live changes with the preview, adjust keyframes with your keyboard, choose which elements to animate, or preview your animation to see how it looks, the Animator element gives you an easy way to bring life to your custom menus.
Happy animating!
================== END PAGE: https://docs.fancymenu.net/docs/element-animator ==================
================== BEGIN PAGE: https://docs.fancymenu.net/docs/element-identifiers ==================
---
title: Element Identifiers
description: How element identifiers work in FancyMenu.
published: true
date: 2025-05-17T19:06:46.339Z
tags:
editor: markdown
dateCreated: 2025-05-17T19:06:11.365Z
---
# Element Identifiers
Every element in FancyMenu has a unique identifier that gets automatically applied to it when creating it.
These identifiers are used to, well, identify the element, so other parts of FancyMenu, like placeholders, actions and loading requirements can communicate with the element.
# Getting the Identifier of Elements
To get the identifier of an element, because you need it somewhere else, just **right-click** the element in the editor and click on **Copy Element Identifier**. Doing that will copy the element's identifier to the clipboard, so you can easily paste it where you need it.
================== END PAGE: https://docs.fancymenu.net/docs/element-identifiers ==================
================== BEGIN PAGE: https://docs.fancymenu.net/docs/element-opacity ==================
---
title: Element Opacity
description: How to control the opacity of elements.
published: true
date: 2025-09-03T17:05:25.530Z
tags:
editor: markdown
dateCreated: 2025-08-04T19:13:04.533Z
---
# Element Opacity
Most elements in FancyMenu (with some exceptions) support setting their opacity via their right-click menu.
The opacity value of elements supports placeholders, which makes it possible to dynamically update their opacity based on the placeholder.
This makes it possible to create custom fading logic when used in combination with Ticker elements to update variable values and then apply it as opacity via placeholders.
To set the opacity of elements, **right-click the element -> Opacity -> Set**.
# Fading In/Out Elements
If you simply want to fade-in or -out elements, it's probably easier to just use the built-in fading feature of elements. You can enable fading in the right-click menu of elements.
This feature makes elements fade-in every time they load, be it the initial load when opening a menu or when the element's loading requirements make it load. They will fade-out whenever their loading requirements make it unload/invisible.
The fading feature supports setting a fading speed to control how fast and element should fade in or out.
================== END PAGE: https://docs.fancymenu.net/docs/element-opacity ==================
================== BEGIN PAGE: https://docs.fancymenu.net/docs/elements ==================
---
title: Elements
description: Everything to know about FancyMenu's element types.
published: true
date: 2026-05-03T11:01:52.000Z
tags:
editor: markdown
dateCreated: 2025-07-05T21:09:31.485Z
---
# Elements
Elements are the building blocks of your custom layouts in FancyMenu. You can add them to any layout to display information, add interactivity, or create stunning visual effects.
# Adding Elements to a Layout
You can add a new element to your layout from within the **Layout Editor**.
1. **Right-click** on the editor's background to open the context menu.
2. Hover over **New Element**.
3. A list of all available element types will appear. Click on the one you want to add.
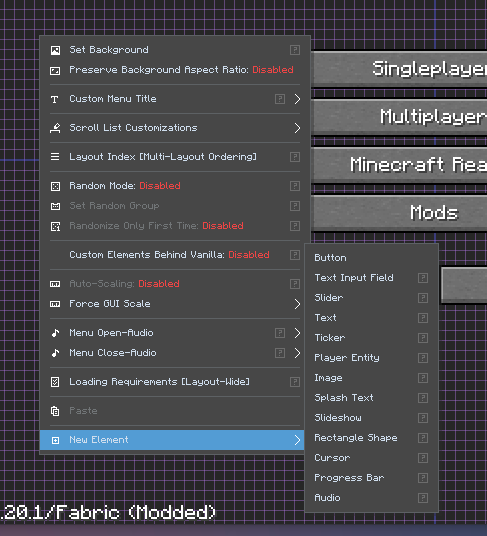
Once an element is added, you can move, resize, and customize it by **right-clicking** on it to open its specific context menu. To learn more about how to arrange elements, see the [Positioning Elements](https://docs.fancymenu.net/en/positioning-elements) and [Element Identifiers](https://docs.fancymenu.net/en/element-identifiers) pages.
# Elements in Detail
The following list contains most, if not all, elements available in FancyMenu. The list can sometimes be a little outdated due to updates of FancyMenu.
## Button
A clickable button that can perform a wide variety of actions. This is one of the most powerful and versatile elements for creating interactive menus.
* **Use Cases:**
* Creating a "Join Discord" or "Visit Website" button.
* Adding a quick-join button for a specific server.
* Building custom navigation between different menus.
* Creating buttons that toggle other layouts on or off.
* **Key Features:**
* **Actions:** Can execute a sequence of actions, such as opening a URL, joining a server, sending a chat command, mimicking another button's function, controlling variables, and much more. Learn more at the [Action Scripts](https://docs.fancymenu.net/en/action-scripts) documentation.
* **Custom Appearance:** Fully customizable textures for normal, hovered, and inactive states. Supports transparent backgrounds, nine-slicing, custom label colors, hover label colors, label scale, label shadow toggles and button icon textures.
* **Sounds:** Custom click, hover and unhover sounds.
* **Template Mode:** Can act as a template to apply its appearance and properties to all other Vanilla or modded buttons in the menu, ensuring a consistent look. Read more at the [Button & Slider Templates](https://docs.fancymenu.net/en/button-slider-templates) page.
## Slider
A slider that users can drag to select a value from a list or a range. It can execute actions whenever its value changes.
* **Use Cases:**
* Creating a custom volume control.
* A slider to switch between different themes or background images (using the "List" type).
* Adjusting a specific Minecraft option, like brightness or render distance.
* **Key Features:**
* **Types:** Can be a `Value List` (e.g., "Easy", "Normal", "Hard"), an `Integer Range` (e.g., 1-100), or a `Decimal Range` (e.g., 0.0-1.0).
* **Dynamic Actions:** Executes actions on value change. The slider's current value can be used within its actions to perform dynamic tasks, which can be used with [Variables](https://docs.fancymenu.net/en/variables).
* **Customization:** The slider's label can dynamically display its current value. The handle and background textures are fully customizable, including transparent backgrounds, label color/scale options, text shadow toggles and custom click/unhover sounds.
## Checkbox
A standard checkbox that can be toggled on or off. It can execute actions upon being toggled.
* **Use Cases:**
* An "I agree to the rules" checkbox.
* A setting to enable or disable a specific feature in your custom menu.
* Toggling a layout or variable on/off.
* **Key Features:**
* **Actions on Toggle:** Executes [Action Scripts](https://docs.fancymenu.net/en/action-scripts) when its state changes. The current state (`true` or `false`) can be accessed within its actions.
* **Variable Mode:** Can be linked directly to a FancyMenu variable, making the checkbox state read from and write to that variable.
* **Custom Appearance:** Supports custom textures for the background (in normal, hover, and inactive states) and the checkmark itself.
## Text Input Field
A field where users can type text. Its content can be linked to a FancyMenu variable, allowing you to capture and use user input.
* **Use Cases:**
* A "Server IP" input field that works with a "Join Server" button.
* A field to enter a player's name for a custom skin preview.
* Creating a basic login-like interface.
* **Key Features:**
* **Variable Linking:** The text entered by the user is stored in a specified [variable](https://docs.fancymenu.net/en/variables).
* **Input Validation:** Can be configured to only accept specific character types, such as numbers, URLs, or plain text.
* **Max Length:** You can set a maximum character limit for the input.
* **Appearance and Sounds:** Supports custom background color, border colors, border rounding, text color, hint/placeholder text, hint color, hover sounds, unhover sounds and click sounds.
## Tooltip
A text box that can be configured to appear at a specific location or follow the mouse cursor. Its visibility is typically controlled by [Conditions (Loading Requirements)](https://docs.fancymenu.net/en/conditions).
* **Use Cases:**
* Displaying detailed information when a user hovers over a button or image.
* Creating context-sensitive help tips that appear under certain conditions.
* Showing dynamic information (like server status) next to the cursor.
* **Key Features:**
* **Mouse Following:** Can be set to follow the mouse pointer.
* **Markdown Support:** The tooltip content supports full Markdown formatting.
* **Custom Background:** The background can be a solid color or a custom nine-sliced texture for a fully themed look.
## Item
Displays a single Minecraft item, either from vanilla or a mod.
* **Use Cases:**
* Using items as icons for buttons or menu selections.
* Creating a shop or kit selection GUI.
* Displaying a player's held item or armor.
* **Key Features:**
* **Custom Data:** You can set the item's name, lore, count, enchantment glint, and even custom NBT data. You can learn more about using NBT with the [NBT Data Placeholder](https://docs.fancymenu.net/en/nbt-data-placeholder) documentation.
* **Tooltip Display:** Can be configured to show the item's standard tooltip on hover.
## Block/Item JSON Model
Renders a block or item JSON model from Minecraft resources or external sources.
* **Use Cases:**
* Displaying a 3D resource-pack model in a menu.
* Showing item/block previews with custom textures.
* Building model-based decorative UI elements.
* **Key Features:**
* **Model Source:** Can load model JSON from Minecraft resources or external sources.
* **Texture Overrides:** Supports setting a custom texture.
* **Rendering Controls:** Includes rotation and light controls.
## Image
Displays a static image from a local file, a web URL, or a Minecraft resource location.
* **Use Cases:**
* Adding a server logo or modpack brand.
* Creating decorative borders or UI frames.
* Using images as part of a more complex UI design.
* **Key Features:**
* **Nine-Slicing:** Allows the image to be used as a scalable border or panel without distorting the corners. Learn more at the [Nine-Slicing & Tiling](https://docs.fancymenu.net/en/nine-slicing-and-tiling) page.
* **Texture Repeating:** The image can be tiled to fill the element's area.
* **Tinting:** You can apply a color tint to the image.
* **Rounded Corners:** Non-nine-sliced and non-repeated images can have rounded corners.
* **Parallax Effect:** Can be configured to move slightly with the mouse for a 3D effect. See the [Parallax Effect](https://docs.fancymenu.net/en/parallax) page for more.
## Text
A highly versatile element for displaying text. It can be used for anything from single-line labels to multi-page, scrollable documents.
* **Use Cases:**
* Displaying server rules, patch notes, or welcome messages.
* Creating dynamic info panels using [placeholders](https://docs.fancymenu.net/en/placeholders), e.g., "Welcome, `{"placeholder":"playername"}`!".
* Adding labels and descriptions to your UI.
* **Key Features:**
* **Content Sources:** Text can be entered directly, loaded from a local file, or fetched from a web URL.
* **Markdown Support:** Supports a wide range of Markdown for rich text formatting, including headers, lists, code blocks, and tables. The appearance of Markdown elements is fully customizable. See the [Text Formatting](https://docs.fancymenu.net/en/text-formatting) page for more info.
* **Scrolling:** Automatically becomes scrollable if the content is larger than the element's area. Scrollbars can be customized or disabled.
* **Styling:** Full control over text color, scale, alignment, shadow, and line spacing.
## Video
Plays a video file. This is perfect for cinematic intros or decorative looping backgrounds.
> The new native Video element in FancyMenu 3.9.0 requires **Watermedia V3** and **Watermedia Binaries V3**. The old **Video [MCEF]** element is deprecated.
{.is-warning}
* **Use Cases:**
* An animated modpack or server trailer.
* A looping, ambient video to add life to your menu.
* An in-game tutorial video.
* **Key Features:**
* **Sources:** Supports both local video files and web URLs. See the [Videos (MP4)](https://docs.fancymenu.net/en/video) page for details.
* **Playback Control:** Can be set to loop automatically. Its volume, sound channel and aspect-ratio preserving behavior are adjustable.
* **Interactive Control:** The video's playback, seek time and volume can be controlled via button actions.
## GLSL Shader
Renders a custom GLSL shader inside an element.
* **Use Cases:**
* Animated shader panels.
* Procedural visual effects.
* Shadertoy-style menu effects clipped to an element rectangle.
* **Key Features:**
* **Shader Runtime:** Supports single-pass and multipass shaders.
* **Shadertoy Support:** Can use Shadertoy-style `mainImage` shaders.
* **Uniforms:** Exposes FancyMenu and input uniforms. See the [GLSL Shader API](https://docs.fancymenu.net/en/glsl-shader-api) page for details.
## Slideshow
Displays a sequence of images. The configuration for the slideshow (images, timing, transitions) is done in a separate `.properties` file located in the `/config/fancymenu/assets/slideshows/` directory.
* **Use Cases:**
* A rotating gallery of in-game screenshots.
* Showcasing key features of a modpack.
* A dynamic background that cycles through different scenes.
* **Key Features:**
* Loads pre-configured slideshows. See the [Slideshows](https://docs.fancymenu.net/en/slideshows) documentation for setup instructions.
* Can be set to maintain the aspect ratio of the images.
## Rectangle Shape
A simple, solid-colored rectangle.
* **Use Cases:**
* Creating a semi-transparent background behind text to improve readability.
* Designing simple UI panels and dividers.
* As a colored placeholder during layout design.
* **Key Features:**
* Supports HEX RGBA colors, rounded corners and optional blur, allowing the shape to work as a simple panel, tint or blur background.
## Circle Shape
A simple, solid-colored circle/ellipse shape.
* **Use Cases:**
* Creating circular accents, indicators or soft UI areas.
* Building themed UI decorations without a texture file.
* **Key Features:**
* Works similar to the Rectangle Shape element and supports color/blur-style visual customization.
## Splash Text
A recreation of Minecraft's iconic yellow, bouncing splash text from the title screen.
* **Use Cases:**
* Replacing the vanilla splash text with your own custom messages.
* Adding an eye-catching, animated message to any menu.
* **Key Features:**
* **Content Sources:** Can use the default vanilla splashes, a list of custom text entered directly, or text from a local file.
* **Customization:** You can toggle the bouncing effect and customize the text's color, scale, rotation, and shadow.
## Player Entity
Renders a player model in the menu.
* **Use Cases:**
* Displaying the current player's character on the main menu.
* Creating a team selection or class preview screen.
* A "profile" section showing the player's skin and name.
* **Key Features:**
* **Dynamic Appearance:** Can be configured to automatically copy the current player's skin, cape, and name. For more on this, check out the [Player Heads](https://docs.fancymenu.net/en/player-heads) guide.
* **Custom Poses:** Offers fine-grained control over the rotation of the head, body, arms, and legs. The head and body can also be set to follow the mouse cursor.
* **Attributes:** Can be set to be a baby, crouching, or have a slim model.
## Browser
An element that renders a live web page inside the game.
This element requires the **MCEF (Minecraft Chromium Embedded Framework)** mod to be installed and working!
You can download MCEF from the official project pages on [CurseForge](https://www.curseforge.com/minecraft/mc-mods/mcef) and [Modrinth](https://modrinth.com/mod/mcef).
For newer Minecraft versions (1.21.5+), the official MCEF projects do not provide builds, but there is a fork with builds for latest Minecraft versions, which can be found [here](https://www.curseforge.com/minecraft/mc-mods/mcef-keksuccino) (CurseForge) and [here](https://modrinth.com/mod/mcef-keksuccino) (Modrinth). This fork is maintained by Keksuccino, to get builds for latest Minecraft versions out as fast as possible.
* **Use Cases:**
* Displaying a server's live Dynmap.
* Embedding a YouTube video player.
* Showing a wiki or documentation page directly in-game.
* **Key Features:**
* **Interactivity:** Can be made fully interactable, allowing users to click links, scroll, and type.
* **Media Control:** Offers options to mute media, loop videos, and hide video controls on the loaded page.
### Loading Local HTML Files
The Browser element lets you load local HTML documents in `/config/fancymenu/assets/`! This means you can display local browser-rendered content for fancy looking changelogs and more.
To load a local HTML file, start your URL with `file:///`, followed by the SHORT file path, for example `/config/fancymenu/assets/cool_changelog.html`, which makes it look like this: `file:///config/fancymenu/assets/cool_changelog.html`.
On **Linux** you need to give it the absolute file path, but since hardcoding an absolute path would break the layout, you need to let a placeholder convert the short path to an absolute one dynamically: `file:///{"placeholder":"absolute_path","values":{"short_path":"/config/fancymenu/assets/cool_changelog.html"}}`.
It is SUPER IMPORTANT that you start the short path with `/` on Linux, like in the example above. Without this it will not work.
## Element Animator
A powerful tool for creating complex, keyframe-based animations. It can animate the position, size, and anchor point of one or multiple other elements.
* **Use Cases:**
* Creating a sophisticated intro animation where menu elements slide or fade into view.
* Making decorative elements pulsate, rotate, or move along a path.
* Animating a notification to pop up and then disappear.
* **Key Features:**
* **Keyframe Editor:** A dedicated editor for adding, editing, and sequencing keyframes on a timeline.
* **Multi-Target:** A single Animator can control multiple "target" elements at once.
* **Control:** Animations can be set to loop. You can also choose to animate only position or size.
* **Timing Offsets:** Target elements can use individual or randomized start timing offsets.
* **[Learn more about the Element Animator.](https://docs.fancymenu.net/en/element-animator)**
## Ticker
An invisible element that executes a list of actions at a regular interval (every "tick").
> For new background automation in FancyMenu 3.9.0+, consider using [Schedulers](https://docs.fancymenu.net/en/schedulers). Schedulers are global, easier to organize and can keep running independently of a specific screen.
{.is-info}
* **Use Cases:**
* Periodically checking a server's online status and updating a text element.
* Creating a countdown timer that updates a text label.
* Running a script repeatedly to create custom behaviors.
* **Key Features:**
* **Timing Control:** You can set the delay between ticks in milliseconds.
* **Tick Modes:** Can be set to tick continuously, only once per game session, or once every time the menu is loaded.
* **Asynchronous:** Can run its [actions](https://docs.fancymenu.net/en/action-scripts) in a separate thread to avoid impacting game performance, though some actions cannot be run this way.
## Audio
An invisible element that plays audio files. It can manage a playlist of tracks and offers various playback controls.
* **Use Cases:**
* Adding custom background music to a menu.
* Creating a music player with buttons to control playback (next/previous track, volume).
* Playing ambient soundscapes.
* **Key Features:**
* **Playlist:** Can manage multiple audio tracks.
* **Playback Modes:** Can play tracks in order or shuffle them (with support for track weighting to make some tracks more common than others).
* **Control:** Supports looping, volume adjustment, and can be assigned to a specific sound channel (e.g., Master, Music). For more info, see the [Menu Background Music](https://docs.fancymenu.net/en/background-music) page.
## Music Controller
An invisible element used to control Minecraft's default music playback within a specific menu.
* **Use Cases:**
* Disabling the default menu music on a screen where you want to play your own custom music via an **Audio** element.
* Stopping in-world music from continuing to play when a menu is opened in-game.
* **Key Features:**
* Separate toggles to control vanilla "Menu Music" and "World Music."
## Progress Bar
A customizable bar that visually represents a numerical value.
* **Use Cases:**
* A loading bar that tracks world loading progress using `{"placeholder":"world_load_progress"}`.
* Visual health, hunger, or experience bars for an in-game HUD.
* A volume indicator that is controlled by a **Slider** element.
* **Key Features:**
* **Dynamic Value:** The progress value (0-100 or 0.0-1.0) is set via a text field that supports [placeholders](https://docs.fancymenu.net/en/placeholders).
* **Appearance:** The bar's direction (up, down, left, right), colors, textures and nine-slicing for bar/background textures are all customizable.
* **Animation:** Features a smooth filling animation to make progress changes look less jarring.
## Dragger
An invisible element that the user can click and drag to move around. Other elements can be anchored to it to create movable widgets.
* **Use Cases:**
* Creating a draggable clock or information panel.
* Allowing users to customize the position of UI elements to their preference.
* **Key Features:**
* **Persistent Position:** The dragged offset is saved, so the element stays where the user left it, even after restarting the game.
* **Anchor Point:** Acts as a movable anchor for other elements, which is a key part of [Positioning Elements](https://docs.fancymenu.net/en/positioning-elements).
## Cursor
An invisible element that replaces the default system cursor with a custom image when a layout is active.
* **Use Cases:**
* Creating a fully themed UI that matches your modpack's aesthetic.
* **Key Features:**
* **Custom Texture:** Use any image for your cursor.
* **Hotspot:** You can define the exact pixel on the image that serves as the "click point". See the [Custom Cursor](https://docs.fancymenu.net/en/custom-cursor) guide for more.
================== END PAGE: https://docs.fancymenu.net/docs/elements ==================
================== BEGIN PAGE: https://docs.fancymenu.net/docs/essential ==================
---
title: Essential Mod
description: How to customize Essential's UI.
published: true
date: 2025-08-04T01:11:43.629Z
tags:
editor: markdown
dateCreated: 2025-07-31T18:11:30.915Z
---
# Essential
Recent versions of the Essential mod added compatibility with FancyMenu, which means you should now be able to fully customize all elements Essential adds to the Title screen and Pause screen!
For a detailed guide about how to customize Essential's UI, you should take a look at [this wiki page](https://essential.gg/wiki/fancymenu) of the Essential wiki!
# Customization Issues
If you encounter some bug or inconvenience while trying to customize Essential's elements, it is almost always caused by Essential and the Essential devs need to fix it on their side.
You should report the bug/issue to the Essential team via their Discord or GitHub.
# Links used in this page
- Essential wiki page about FancyMenu: https://essential.gg/wiki/fancymenu
================== END PAGE: https://docs.fancymenu.net/docs/essential ==================
================== BEGIN PAGE: https://docs.fancymenu.net/docs/fancymenu-ui-scale ==================
---
title: FancyMenu's UI Scale
description: How to change the scale of FancyMenu's UI.
published: true
date: 2026-05-03T11:01:52.000Z
tags:
editor: markdown
dateCreated: 2025-08-04T19:19:36.697Z
---
# FancyMenu's UI Scale
FancyMenu's UI (such as the menu bar and context menus) uses a separate scale that is not linked to Minecraft's normal GUI scale.
In case FancyMenu's UI looks too small or big for you, you can change the UI scale via **menu bar -> Customization -> Settings -> FancyMenu's UI**.
FancyMenu 3.9.0 adds more UI scale choices. When the UI scale is set to **Auto**, the smallest automatic scale is now `1.25`; you can still manually choose scale `1` if you prefer it.
The only exception to this are actual full screens added by FancyMenu, such as the screen to manage variables or the layout editor. These screens, in most cases, use Minecraft's normal GUI scale, but it's possible that some screens use a different auto-scaling logic to automatically show at a smaller scale when the window would otherwise be too small to fit all of the screen's content.
================== END PAGE: https://docs.fancymenu.net/docs/fancymenu-ui-scale ==================
================== BEGIN PAGE: https://docs.fancymenu.net/docs/faq ==================
---
title: FAQ
description: Frequently asked questions.
published: true
date: 2026-05-03T11:01:52.000Z
tags:
editor: markdown
dateCreated: 2025-08-04T19:44:22.004Z
---
# FAQ
### I need help with an issue. What information should I provide?
To get the best help, please provide as much context as possible:
1. **A clear description of the problem:** What did you expect to happen, and what actually happened?
2. **Your `latest.log` file:** This is the most important file for troubleshooting. Find it in your instance's `/logs/` folder. **Do not send a crash log** unless specifically asked; the `latest.log` is much more useful. Use a site like https://gist.github.com to share it.
3. **Your Minecraft Version:** (e.g., 1.20.1)
4. **Your Mod Loader and Version:** (e.g., Forge 47.2.0, Fabric 0.15.7)
5. **Your FancyMenu Version:** (e.g., 3.5.2)
6. **Screenshots or videos** of the issue can also be very helpful.
### How do I change the layering of elements (move something in front of or behind another)?
* **Custom vs. Custom:** To change the render order of your own custom elements, use the **Layers widget**. You can open it via the menu bar: **Window -> Widgets -> Layers**. From there, you can drag elements up or down in the hierarchy. You can also right-click an element and use "Move One Layer Up/Down".
* **Custom vs. Vanilla:** To render all your custom elements behind all vanilla elements (e.g., to put a background image behind the default buttons), **right-click the editor background** and toggle the option **"Render Custom Elements Behind Vanilla"**.
### Can I exclude certain buttons from a universal button template?
**No. If a template button has custom textures set, these textures are always shared with all affected elements. You cannot exclude individual buttons.**
### How do I make a button do something when clicked?
Use an **Action Script**.
1. Right-click the button in the editor.
2. Select **Edit Action Script**.
3. Click **Add Action** and choose from the list (e.g., `Open Screen or Custom GUI`, `Join Server`, `Set Variable Value`).
* More info: [Action Scripts](https://docs.fancymenu.net/en/action-scripts)
### Can I create a completely new menu screen from scratch?
Yes, this is done using **Custom GUIs**.
1. In the menu bar, go to **Customization -> Custom GUIs -> Manage Custom GUIs**.
2. Click **"New GUI"** and give it a unique identifier.
3. You can then open this new empty screen and create a layout for it, adding any elements you want.
4. This Custom GUI can then be opened via a button action.
* More info: [Custom GUIs](https://docs.fancymenu.net/en/custom-guis)
### My game is taking a long time to load after enabling pre-loading.
This is expected behavior. Pre-loading large resources like high-resolution animations or sounds during the initial startup will naturally increase the game's loading time.
### My FMA animation is using too much RAM!
Classic FMA files can consume a lot of memory when they contain many high-resolution frames. FancyMenu 3.9.0 adds AFMA, which is much better for large or complex animated textures. For classic FMA files, keep animations short and avoid very large frame counts/resolutions. Animations are meant for short, decorative loops, not for playing full videos.
### Does FancyMenu work with OptiFine?
No. OptiFine is **not compatible** and is known to break many mods, including FancyMenu. It is highly recommended to use modern alternatives like Sodium/Embeddium + Iris/Oculus.
* More info: [OptiFine Alternatives](https://docs.fancymenu.net/en/optifine-alternatives)
### My game is crashing. How do I figure out if it's a mod conflict?
The best way to check for a mod conflict is to **run the game with only FancyMenu and its dependencies** (Konkrete, Melody). If the crash no longer occurs, you can add your other mods back in small groups until the crash happens again to identify the conflicting mod.
### A button from another mod disappears or doesn't work when I try to edit it.
This usually means the other mod adds its buttons in a non-standard way that FancyMenu cannot interact with. This is an issue that the other mod's developer would need to fix on their end. FancyMenu cannot customize elements it cannot "see".
### Can I use FancyMenu layouts on a server?
FancyMenu is a client-side mod. All layouts and customizations are on the player's client. You cannot put layouts on a server to force players to see them. However, you can distribute your `config/fancymenu` folder as part of a modpack. If you want to use commands like `/fmvariable` or `/openguiscreen` from the server, then FancyMenu (or its Spigot plugin) must be installed on the server.
### What's the difference between FancyMenu v2 (for older MC versions) and v3?
FancyMenu v3 is a complete rewrite with many new features, a more stable architecture, and better performance. V2 is outdated, no longer supported, and missing many features like advanced placeholders and scripting. It is highly recommended to use v3 on a modern Minecraft version (1.18.2+). V2 layouts can be automatically converted to v3 when you load them, but some manual fixing may be required.
### Where can I find pre-made layouts and templates?
The FancyMenu community shares layouts in the `#layout-templates` channel on the official Keksuccino's Mods Discord server.
### How can I make the Player Entity render behind other elements?
You can't. Due to how Minecraft renders entities, the Player Entity element will almost always render in front of other 2D elements, regardless of the layer settings.
### My Player Entity has only one leg! What happened?
This is a visual glitch, likely caused by a mod conflict with another mod that alters player animations or models. Check the Player Entity's Pose settings to see if the legs have been rotated or moved by accident.
### How do I create a delay between actions in a script?
FancyMenu 3.9.0 adds **Delay** and **Execute Later** blocks to action scripts. Use those for most delayed action logic. For repeating background logic, use [Schedulers](https://docs.fancymenu.net/en/schedulers).
### Can I customize menus from the Create mod?
No. FancyMenu has known incompatibilities with Create's complex GUIs. Customization for Create screens has been intentionally disabled to prevent crashes.
### Why do buttons from mod X disappear in the editor?
This means the mod adds its buttons in a custom, non-vanilla way. FancyMenu cannot "see" or interact with these elements, so it cannot customize them. The developer of the other mod would need to change how they add their buttons for them to be compatible.
### What is the recommended resolution for background images and button textures?
Backgrounds: A standard 1920x1080 (1080p) image is a great starting point and will scale well for most users.
Buttons: Most vanilla buttons are around 150-200 pixels wide and 20 pixels high. Matching this size for custom textures is a good practice for consistency.
### Is there a way to automatically open a menu or run a command when a player completes an in-game objective (like a quest)?
FancyMenu itself cannot detect in-game events like this. However, you can integrate it with a questing mod like FTB Quests. Most quest mods allow you to run a command as a quest reward. You would set the reward to execute the `/openguiscreen` or `/fmvariable` command to interact with your menus.
### How do I make a button inactive or "grayed out"?
You can control a button's active state using Loading Requirements.
Right-click the button in the editor and select "Active State".
Add a requirement that must be met for the button to be active. For example, to permanently disable a button, you could add an Is Number requirement that checks if 0 equals 1 (which is always false).
The button will now use its "Inactive Background" texture and will be unclickable.
### How can I remove the header and footer (the dirt texture bars) on scrollable screens?
In FancyMenu v3, you can customize these. In the layout editor, right-click the editor background and look for options like "Customize Header/Footer". You can set their textures to be fully transparent to effectively remove them visually. Note that this may not work on all screens, especially older or heavily modded ones.
### I can't create a layout "for the current screen". The button is greyed out.
You need to enabled customizations for that screen first via **menu bar -> Customization -> Current Screen Customizations -> toggle it to Enabled**.
### I can't customize any elements of a screen when opening it in the editor. It's just an empty screen then.
This could mean you accidentally created a universal layout instead of one **for the current screen**.
It could also mean that the screen you are customizing is a scrollable screen, which are screens that FancyMenu can't customize by default.
The third possibility is that it's a screen from a mod that adds elements in a non-Vanilla way, which makes FancyMenu unable to customize these elements.
### There are weird grey boxes at my Text element.
These translucent (low opacity) boxes/rectangles can be at the right or bottom edge of your Text element and they are not a bug. These are the scroll grabbers of the Text element, since the element is scrollable.
If you don't want these boxes to be visible, you can either right-click the element and disable scrolling completely OR you can also set the grabber textures to completely transparent ones in the same right-click menu, if you want the element to be still scrollable.
### How can I show the latest Minecraft changelog in my menus?
There's a great [GitHub project](https://github.com/ClaytonTDM/minecraft-changelogs-markdown) that converts Minecraft's changelogs to FancyMenu-compatible Markdown, so you can show the latest MC changelog in your menus! It updates daily to fetch new changelogs.
For example, to show the latest Minecraft changelog in a Text element, set its **Source Mode** to **Resource** and set its resource source to **Web**. Then use this URL as source: `https://clay.is-a.dev/minecraft-changelogs-markdown/{"placeholder":"mcversion"}/fancymenu.md`
### What's the easiest way to stretch any element to the size of the screen?
Most elements have an option in their right-click context menus to stretch them horizontally and vertically. Enabling this will make them always stretch to the full width and/or height of the screen. Horizontal and vertical stretching can be toggled independently.
### I can't click buttons or interact with sliders when they are behind or in front of a Text element.
This happens because Text elements are interactable by default (to be able to grab the scroll grabber or click Markdown hyperlinks), which means they consume mouse clicks and scroll events. The best way would be to simply not move buttons behind/in front of Text elements, but if there is no way around it, you can make the Text element not interactable by **right-clicking it** and then setting **Interactable** to **Disabled**. Keep in mind this makes the Text element a static, non-interactable text, so you can't scroll it anymore or click on hyperlinks.
### How can I make it so buttons and sliders do not get selected/focused anymore when navigating in screens with the Arrow and Tab keyboard keys?
To make buttons and sliders not navigable, you need to **right-click** it and set **Navigable** to **Disabled**. The button/slider will still be clickable, but you can't focus it with Arrow/Tab navigation anymore.
This is also useful if you want to add buttons/sliders to the Chat screen, so you can still use the Arrow Up key to scroll through older messages without accidentally selecting buttons/sliders in the screen.
### One of FancyMenu's context menus is missing an option that should be there.
FancyMenu's context menus (the menus that open when you right-click somewhere or when you interact with menu bars) are SCROLLABLE. This means you can use your scroll wheel while your mouse cursor is over the menu to scroll up or down, which let's you see more options that were previously not visible.
================== END PAGE: https://docs.fancymenu.net/docs/faq ==================
================== BEGIN PAGE: https://docs.fancymenu.net/docs/ffmpeg-frames ==================
---
title: Get Frames from Videos
description: How to get frames from a video file.
published: true
date: 2025-04-16T19:18:14.899Z
tags: ffmpeg, mp4, mkv, video, frame, frames
editor: markdown
dateCreated: 2025-04-14T20:14:40.022Z
---
# How to Get Frames from a Video Using FFmpeg
*This page was partly generated by ChatGPT AI.*
FFmpeg is a free tool that helps you work with videos and audio files. One cool thing you can do with it is take pictures (frames) out of a video, like an MP4 file. Here’s how you can do that step by step.
MP4 will be used in the following commands, but FFmpeg also supports other video formats like AVI, MOV, MKV and MPEG.
# What You Need
Before you start, make sure you have:
1. **FFmpeg Installed**:
- Download FFmpeg from the official [FFmpeg website](https://ffmpeg.org/download.html). Make sure to download the "full" build.
- Follow the setup instructions for your computer.
2. **Command Line Access**:
- Use the terminal (Linux/macOS) or command prompt (Windows) to run FFmpeg commands.
3. **A Video File**:
- Have an MP4, AVI, MOV, MKV or MPEG video file ready to use.
# Before You Start
Before running any commands, make sure to prepare the following:
## Enable File Extensions
- It’s important to see file extensions like `.mp4` or `.avi` when renaming your video file.
- **On Windows**:
- Open File Explorer.
- Click on the "View" tab at the top.
- Check the box that says "File name extensions."
- **On macOS**:
- Open Finder.
- Click on "Finder" in the menu bar and select "Preferences."
- Go to the "Advanced" tab and check the box for "Show all filename extensions."
## Create an Output Folder
- Create a folder named `output_frames` in the directory where the FFmpeg executable is located. This is where your extracted frames will be saved.
## Prepare Your Video File
- Place the video file you want to extract frames from in the same directory as the FFmpeg executable.
- Rename the video file to `input` followed by its file extension (e.g., `input.mp4`, `input.avi`, etc.). This ensures that the commands below will work without modification.
# How to Open FFmpeg
Before you can use FFmpeg, you need to open it using the command line. Here’s how you can do it step by step on Windows and macOS.
## On Windows:
1. **Open the Command Prompt**:
- Press the `Windows` key and the `R` key at the same time to open the Run box.
- Type `cmd` and press Enter. This opens the Command Prompt.
2. **Go to the FFmpeg Folder**:
- You need to tell the computer where FFmpeg is located. Use the `cd` command to go to the folder where you saved FFmpeg.
- For example, if FFmpeg is in a folder called `ffmpeg-2024\bin` on your desktop, type this:
```bash
cd C:\Users\YourUsername\Desktop\ffmpeg-2024\bin
```
(Replace "YourUsername" with your actual username on the computer.)
3. **Check That FFmpeg Works**:
- To make sure FFmpeg is working, type this command:
```bash
ffmpeg -version
```
- If it’s working, you’ll see information about FFmpeg appear on the screen.
## On macOS:
1. **Open the Terminal**:
- Press `Command` and `Space` at the same time to open Spotlight Search.
- Type `Terminal` and press Enter to open it.
2. **Go to the FFmpeg Folder**:
- Use the `cd` command to go to the folder where you saved FFmpeg.
- For example, if FFmpeg is in your `Downloads` folder, type this:
```bash
cd ~/Downloads/ffmpeg-2024/bin
```
3. **Check That FFmpeg Works**:
- To make sure FFmpeg is ready, type this command:
```bash
./ffmpeg -version
```
- If FFmpeg is working, you’ll see details about it appear on the screen.
# How to Save All Frames
To save all frames from a video, use this command:
```bash
ffmpeg -i input.mp4 output_frames/%d.png
```
## What This Means:
- `-i input.mp4`: This is your input video file. It should be in the same directory as the FFmpeg executable. Make sure to change `input.mp4` to the correct file name and extension.
- `output_frames/frame_%04d.png`: This is how the frames will be saved:
- `output_frames/`: Saves all frames in a folder called `output_frames`.
- `%d.png`: The frames will be named using numbers like `1.png`, `2.png`, and so on, keeping them in order.
# Save Frames at Certain Times
If you don’t want all the frames, you can save one frame every second (or other intervals). Use this command:
```bash
ffmpeg -i input.mp4 -vf "fps=1" output_frames/%d.png
```
## What This Means:
- `-i input.mp4`: This is your input video file. It should be in the same directory as the FFmpeg executable. Make sure to change `input.mp4` to the correct file name and extension.
- `-vf "fps=1"`: This saves one frame per second. Change the `1` to another number if you want frames more or less often (e.g., `fps=0.5` saves one frame every two seconds, and `fps=2` saves two frames every second).
- `output_frames/%d.png`: Saves the frames in a folder named `output_frames` with names like `1.png`, `2.png`, and so on.
# Change the Size and Quality of Frames
You can also adjust the size and quality of the frames you save. Here’s how:
```bash
ffmpeg -i input.mp4 -vf "scale=1280:720" -q:v 2 output_frames/%d.png
```
## What This Means:
- `-i input.mp4`: This is your input video file. It should be in the same directory as the FFmpeg executable. Make sure to change `input.mp4` to the correct file name and extension.
- `-vf "scale=1280:720"`: Changes the frame size to 1280x720 pixels.
- `-q:v 2`: Sets the picture quality (1 is best, higher numbers mean lower quality).
- `output_frames/%d.png`: Saves the frames in a folder named `output_frames` with names like `1.png`, `2.png`, and so on.
# Tips for Saving Frames
1. **Save Space**:
- If the video is long, you can save frames at intervals instead of saving every frame. This is especially useful for when using them as FMA animation frames in FancyMenu.
2. **Learn More**:
- Run `ffmpeg -h` in your terminal to see all the cool things FFmpeg can do.
Now you’re ready to use FFmpeg to save frames from your video!
================== END PAGE: https://docs.fancymenu.net/docs/ffmpeg-frames ==================
================== BEGIN PAGE: https://docs.fancymenu.net/docs/fix-audio ==================
---
title: Fix Audio Files
description: How to fix audio files in case FancyMenu fails to play them.
published: true
date: 2025-04-14T20:14:47.283Z
tags: wav, ogg, audio
editor: markdown
dateCreated: 2025-04-14T20:14:44.259Z
---
# Fixing Audio Files
Minecraft is a little bit picky about what audio files it plays.
Sometimes it happens that audio files work fine in other audio players, but FancyMenu failes to play them.
If that's the case, you can try to fix the audio file to make it work in Minecraft.
# OGG Files
In most cases it's pretty easy to fix OGG files.
90% of your audio file problems get solved by simply re-converting the file.
1. Go to https://convertio.co/ogg-mp3/ and convert your OGG to MP3.
2. Go to https://convertio.co/mp3-ogg/ and convert the MP3 you got in the last step back to OGG.
The file should work fine now.
If it still doesn't work, make sure it's not a super big audio file and check if the audio file plays in other audio players.
# WAV Files
For WAV files it's mostly an unsupported sample rate and similar things that make the audio not work correctly in Minecraft.
Make sure that your audio:
- Has a sample rate of 48KHz
- Has a bit rate of 16bit
- Is a valid WAV file that works outside of MC
You can easily (re)convert your audio to the correct bit and sample rate by using this website:
https://audio.online-convert.com/convert-to-wav
**IMPORTANT:**
Even if you think your audio already has the correct format, bit rate and sample rate, please re-convert it anyway using the website mentioned above.
# Other Causes
Sometimes it's not the file that's broken, but other things that are not configured correctly, etc.
## Volume Too Low
Maybe your Minecraft volume is too low for you to hear the audio.
Make sure the MASTER channel and all other channels are loud enough.
## Mod Conflict
Maybe another mod is incompatible with the audio system my mods use.
In that case, please open an issue on GitHub, thank you very much.
================== END PAGE: https://docs.fancymenu.net/docs/fix-audio ==================
================== BEGIN PAGE: https://docs.fancymenu.net/docs/fm-data ==================
---
title: Client < - > Server Data Sharing
description: Send and receive custom data between server and client with FancyMenu.
---
# FM Data
The "FM Data" system lets you send custom text data between server and client.
Every FM Data message has:
1. A **data identifier** (what kind of message this is)
2. A **data value** (the actual content)
Example idea:
- Identifier: `hud.food`
- Data: `18/20`
# Quick Start
1. Server sends data with `/fmdata send ...`
2. Client receives it with the FancyMenu listener **On FM Data Received**
3. Client can also send data back with the action **Send FM Data To Server**
4. Server can react automatically with `/fmdata listener ...`
5. Server can auto-send data on join with `/fmdata welcome_data ...`
# Server -> Client
Use:
```mcfunction
/fmdata send
```
Examples:
```mcfunction
/fmdata send Player761 hud.food 18/20
/fmdata send @a "food value update" "18 of 20"
```
Notes:
- `` supports normal player selectors like `@a`, `@p`, `@s`
- Use quotes for values with spaces
# Client: Receive Data
Use FancyMenu listener:
- **On FM Data Received**
Available variables:
- `$$data_identifier`
- `$$data`
- `$$sent_by`
`$$sent_by` is:
- Server IP in multiplayer
- `integrated_server` in singleplayer
Common use cases:
- Update text elements
- Trigger menu actions
- Run logic based on incoming identifier/data
# Client -> Server
Use FancyMenu action:
- **Send FM Data To Server**
The action has 2 inputs:
1. Data Identifier
2. Data
The server can then process incoming data with `/fmdata listener ...`.
# Server Listeners
Server listeners listen for incoming data from clients and can run one or multiple commands when they get triggered.
Server listeners are saved and stay active after restart.
Manage them with:
- `/fmdata listener list`
- `/fmdata listener add ...`
- `/fmdata listener edit ...`
- `/fmdata listener remove ...`
## Add / Edit Syntax
```mcfunction
/fmdata listener add
```
```mcfunction
/fmdata listener edit
```
## Remove Syntax
```mcfunction
/fmdata listener remove
```
## Matching Types
`matching_type_identifier` and `matching_type_data` can be:
- `equals`
- `contains`
- `starts_with`
- `ends_with`
## Matching Rules
- `ignore_case_identifier` and `ignore_case_data` are true/false toggles
- `listen_for_identifier` supports wildcard `*` (always matches)
- `listen_for_data` supports wildcard `*` (always matches)
- `fire_for_player` uses normal player selectors (for example `@a`, `@p`, `Player761`)
## Commands On Fire
`commands_to_execute_on_fire` is one text input.
- Separate multiple commands with `|||`
- Escape a literal separator as `\|\|\|`
You can use two special placeholders here that get replaced right before the commands get executed:
- `%fm_sender%` -> player who sent the FM Data
- `%fm_data%` -> data value received from client
Commands run as server commands.
## Example Commands
React to a button press from any player:
```mcfunction
/fmdata listener add button_ping equals equals false false @a ui.button pressed "tellraw @a {\"text\":\"%fm_sender% pressed the button\"}"
```
Run multiple commands when data contains `gold`:
```mcfunction
/fmdata listener add reward equals contains false true @a reward "gold" "say Reward from %fm_sender%: %fm_data%|||effect give %fm_sender% minecraft:speed 3 1 true"
```
# Welcome Data
Welcome data sends FM Data to matching players when they join.
Manage entries with:
- `/fmdata welcome_data list`
- `/fmdata welcome_data add ...`
- `/fmdata welcome_data edit ...`
- `/fmdata welcome_data remove ...`
## Add / Edit Syntax
```mcfunction
/fmdata welcome_data add
```
```mcfunction
/fmdata welcome_data edit
```
## Remove Syntax
```mcfunction
/fmdata welcome_data remove
```
Notes:
- `` supports normal selectors like `@a`, `@p`, `@s`
- Data is sent to matching players when they join
- Entries are saved and loaded automatically
## Example Commands
Send welcome data to all joining players:
```mcfunction
/fmdata welcome_data add welcome_all @a hud.welcome "Welcome!"
```
Send welcome data only to one player:
```mcfunction
/fmdata welcome_data add welcome_vip Player761 hud.vip "VIP perks enabled"
```
# Best Practices
1. Use clear identifiers like `hud.food`, `menu.shop.open`, `quest.progress`.
2. Keep data format consistent for each identifier.
3. Start simple: test with `/fmdata send` before building complex listeners.
4. Use `@a` only when you really want global behavior.
5. Use `/fmdata listener list` and `/fmdata welcome_data list` to keep configs clean.
================== END PAGE: https://docs.fancymenu.net/docs/fm-data ==================
================== BEGIN PAGE: https://docs.fancymenu.net/docs/fma ==================
---
title: Animations (FMA/AFMA)
description: How to make and use FancyMenu animation files.
---
# Animations
AFMA/FMA files are special animated texture files created for FancyMenu.
They are pretty much the same as APNGs, but way more optimized for FancyMenu.
# AFMA Files
FancyMenu 3.9.0 adds **AFMA** (Advanced FancyMenu Animation), the successor to classic FMA files.
AFMA files are no longer ZIP files. They use FancyMenu's newer animation format with better file sizes, lower memory usage and better performance.
For new large or complex animated textures, use **AFMA** instead of classic FMA.
To create an AFMA file, do this:
1. Open FancyMenu's menu bar.
2. Go to **Tools -> AFMA Creator**.
3. Import/convert your frames with the creator.
> [!IMPORTANT]
> AFMA files can't be packed manually like classic FMA files. You need to use the **AFMA Creator** to pack/create them.
Classic FMA files are still supported and were optimized in FancyMenu 3.9.0, so existing layouts do not need to be converted immediately.
# Classic FMA Files
## Making an FMA
Making an FMA file is as easy as creating a ZIP file! Well, that's mostly because it _is_ a ZIP file under the hood.
### File Extensions
You need to see file extensions to be able to follow this documentation, so make sure to **ENABLE FILE EXTENSIONS** before you start.
On Windows, this works by opening a random folder and then clicking on the arrow on the top-right side to extend the menu below.
Then go to the **View** tab and enable **File Name Extensions**.
### Preparation
Lets start with creating a new folder for the content of the FMA file.
In this example, lets call the folder `fancymenu_animation`.
In this folder, create two more folders. The first folder **has** to be called `frames` and the second folder **has** to be called `intro_frames`.
Now in the same folder, create a new TXT file and rename it to `metadata.json`.
Please make sure the file is not still a TXT file. You **have to** change the file extension to `json`.
Now you should have a folder called `fancymenu_animation` and in this folder are a folder called `frames`, a folder called `intro_frames` and a JSON file called `metadata.json`.
### The Metadata JSON
This is the file that tells FancyMenu how it should handle your FMA texture.
It contains information such as the frame times (how long a frame is visible) and the loop count.
Please open the `metadata.json` file with a text editor.
Copy this text to the file:
```json
{
"loop_count": 0,
"frame_time": 41,
"frame_time_intro": 41,
"custom_frame_times": {
},
"custom_frame_times_intro": {
}
}
```
This is the basic template of how the file should look like.
Now you can customize it to your liking.
#### `loop_count`
This is to control how many times the texture should loop (restart it's animation).
Setting this to `0` means it will loop indefinitely. It will *never stop*.
Everything bigger than `0` means how many times the texture plays. So for example, setting the value to `1` means the texture will only play once, then stops at the last frame, `2` means it will play two times, then stop at the last frame *and so on*.
#### `frame_time`
This is the universal frame time in **milliseconds** for the frames of the animated texture.
Frame time means how long the frame is visible before the animation goes to the next frame.
#### `frame_time_intro`
This is basically the same as `frame_time`, but for the **intro** frames of your animated texture.
Intro frames are **optional** and you will learn more about them later.
#### `custom_frame_times`
This is **optional** and can be used for overriding the frame time for specific (non-intro) frames.
For example, you want all your frames to show for `41` milliseconds, so you set `frame_time` to `41`, but you want the first and second frames to show for `5000` milliseconds.
In that case, you would do this:
```json
{
"loop_count": 0,
"frame_time": 41,
"frame_time_intro": 41,
"custom_frame_times": {
0: 5000,
1: 5000
},
"custom_frame_times_intro": {
}
}
```
Frames are zero-based, which means the first frame of the animation is `0`, the second one is `1` and so on.
There needs to be a **comma** at the end of every custom frame time entry, **except** of the last one!
#### `custom_frame_times_intro`
This is exactly the same as `custom_frame_times`, but in this case for the **intro** frames. Intro frames are **optional** and you will learn more about them later.
That's it for the `metadata.json` file. Save it now and close the text editor.
### The Frames
> Is is recommended to use **200 frames at max** at a **max resolution of 1080p** per animation, because animations eat lots of memory and they are not videos. They are meant to be used for short animated loops, not to play full videos with 24 FPS.
{.is-danger}
The frames of your animated texture go into the `frames` folder.
Frames need to be **PNG FILES**! There is **NO SUPPORT FOR JPEG AND OTHER FORMATS**!
Every frame **has to** be called just the number of the frame and the file extension.
The first frame should be called `0.png`, the second one `1.png`, the third one `2.png` and so on.
The texture will **NOT WORK** if the frames have invalid file names!
To **extract frames from videos**, please take a look at [this docs page](/ffmpeg-frames).
### The Intro
This feature is **OPTIONAL**.
The **intro** feature of FMA files is a special way to play some frames **before** the actual frames of the `frames` folder start playing.
The intro will **never loop** and only plays the very first time the animation plays, which allows you to play something like a fade-in animation before the actual animation starts playing in a loop.
Intro frames go into the `intro_frames` folder and work the same as normal frames:
Frames need to be **PNG FILES**! There is **NO SUPPORT FOR JPEG AND OTHER FORMATS**!
Every frame **has to** be called just the number of the frame and the file extension.
The first frame should be called `0.png`, the second one `1.png`, the third one `2.png` and so on.
The texture will **NOT WORK** if the frames have invalid file names!
### Packing the FMA File
Now everything important is in the `fancymenu_animation` folder, so you can pack your FMA file now!
Packing the FMA file basically just means to pack the folder content to a ZIP file.
The content needs to be in the **ROOT of the ZIP** file, so it can't be in an extra folder inside the ZIP.
On Windows, the easiest way to pack your FMA content to a ZIP file is by selecting everything in the `fancymenu_animation` folder and then **right-clicking** the `metadata.json` file. In the context menu that opens, click on **Send To -> Compressed ZIP Folder**.
Now there should be a new ZIP file in the `fancymenu_animation` folder called `metadata.zip`, `frames.zip` or `intro_frames.zip`.
When you open this file, its content should look like this:
Now you need to rename the file to `fancymenu_animation.fma`. Make sure to REPLACE the `.zip` with `.fma`, so it's not a ZIP anymore.
Of course you can change the `fancymenu_animation` part to whatever you want, but make sure it stays a `.fma` file!
That's it! You now have a (hopefully) working FMA file!
# Using AFMA & FMA Files in FancyMenu
> [!IMPORTANT]
> AFMA/FMA files are considered **animated textures**, so you add them via **Image** inputs. Almost everything that takes images (PNG, JPEG, GIF, etc.) will also accept FMA and AFMA files.
You can use AFMA/FMA files like any other animated texture/image format. FancyMenu sees it as normal image, so you can use it everywhere you can set a texture to something, like **Image elements or Image menu backgrounds**.
Make sure the AFMA/FMA file is in the `/config/fancymenu/assets/` folder, because FancyMenu can only pick textures and other resources from its `assets` folder.
================== END PAGE: https://docs.fancymenu.net/docs/fma ==================
================== BEGIN PAGE: https://docs.fancymenu.net/docs/game-intro ==================
---
title: Game Intro
description: Play animated content before the game shows the Title screen for the first time.
published: true
date: 2026-05-03T11:01:52.000Z
tags:
editor: markdown
dateCreated: 2025-04-14T20:14:52.822Z
---
# Game Intros
You know those cool little videos that play when you start a game?
FancyMenu lets you do this in Minecraft!
# APNGs, GIFs and Videos as Intro
FancyMenu supports animated textures and, starting with FancyMenu 3.9.0, videos as game intro content.
To set intro content in FancyMenu 3.9.0+, navigate to FancyMenu's **menu bar**, then **Customization -> Global Customizations** and configure **Game Intro** there.
Video intros support sound, including volume and sound-channel settings. Native video support requires **Watermedia V3** and **Watermedia Binaries V3**.
The Game Intro consumes mouse clicks while it is open, so clicks will not accidentally hit the screen behind it.
================== END PAGE: https://docs.fancymenu.net/docs/game-intro ==================
================== BEGIN PAGE: https://docs.fancymenu.net/docs/global-customizations ==================
---
title: Global Customizations
description: Apply global FancyMenu tweaks that affect all screens.
published: true
date: 2026-05-03T11:01:52.000Z
tags:
editor: markdown
dateCreated: 2026-05-03T11:01:52.000Z
---
# Global Customizations
Global Customizations are FancyMenu tweaks that apply across the game UI.
Use them when you want one consistent style/behavior everywhere instead of editing each screen layout separately.
> [!INFO]
> Unlike most FancyMenu customization features, Global Customizations work even if normal screen customizations are disabled.
> They do **not** require enabling customizations per screen, which means one change can affect all screens right away.
Common examples:
- Use one shared button and slider style for all screens.
- Replace menu background, panorama, and menu music globally.
- Apply global startup/window behavior (GUI scale, fullscreen, window title/icon).
- Replace vanilla button textures globally without a resource pack.
- Replace vanilla menu music globally without a resource pack.
# Where To Find Them
Open FancyMenu's **menu bar** while **not** in the layout editor, then **Customization -> Global Customizations**.
# Quick Start
1. Open **Customization -> Global Customizations**.
2. Pick one category to start with (for example **Custom Button Textures**).
3. Configure the options in that category (resource pickers, toggles, or number inputs).
4. Test the result in multiple screens.
5. Fine-tune related settings (for example transparency, label styles, nine-slice borders).
# What You Can Customize
## Global behavior and startup
- **Game Intro** (an intro video or animation that plays before the Title screen shows up)
- **Singleplayer Screen World Icons**
- **Multiplayer Screen Server Icons**
- **Seamless World Loading** (uses a screenshot of the world as world loading screen background)
- **Custom Window Icon**
- **Custom Window Title**
- **Default GUI Scale**
- **Force Fullscreen on Launch**
## Button visuals
- **Custom Button Textures** (Normal/Hover/Inactive states, transparent mode, nine-slice + border sizes)
- **Button Labels** (underline-on-hover, base/hover color, scale, shadow)
## Slider visuals
- **Custom Slider Textures**
- **Slider Background Texture** (texture, transparent mode, nine-slice + border sizes)
- **Slider Handle Textures** (Normal/Hover/Inactive states, nine-slice + border sizes)
- **Slider Labels** (underline-on-hover, base/hover color, scale, shadow)
## Menu visuals and audio
- **Custom Menu Background Texture**
- **Custom Menu Background Panorama**
- **Play Vanilla Menu Music** (enable/disable playing Vanilla menu music)
- **Custom Menu Music Tracks**
- **Custom Button/Slider Click Sound**
# Custom Menu Music Tracks
Use **Custom Menu Music Tracks** to build a randomized track list for menus.
Configured custom tracks replace vanilla menu music in menus.
- Open **Custom Menu Music Tracks** to open **Manage Menu Music Tracks**.
- Use **Add Track** to add audio sources.
- Use **Remove Track** to remove one entry.
- Use **Clear Tracks** to remove all entries.
================== END PAGE: https://docs.fancymenu.net/docs/global-customizations ==================
================== BEGIN PAGE: https://docs.fancymenu.net/docs/glsl-shader-api ==================
---
title: GLSL Shader API
description: Write FancyMenu GLSL shaders for backgrounds, elements, and decoration overlays.
published: true
date: 2026-05-03T11:01:52.000Z
tags:
editor: markdown
dateCreated: 2026-05-03T11:01:52.000Z
---
# FancyMenu GLSL Shader API
This document describes the GLSL runtime used by FancyMenu's:
- `GLSL` menu background
- `GLSL` element
- `GLSL` decoration overlay
It covers compile modes, multipass routing, supported uniforms, and practical shader authoring patterns.
## 1. Runtime Overview
FancyMenu renders shaders with an internal OpenGL pipeline (`#version 150`) and supports:
- single-pass shaders (`Image` pass only)
- multipass shaders (`Buffer A` / `B` / `C` / `D` + `Image`)
- Shadertoy-style entry points (`mainImage`)
- direct fragment entry points (`main`)
Shader sources are inline text fields:
- `Shader Source` (Image pass, required to render)
- `Buffer A Source` (optional)
- `Buffer B Source` (optional)
- `Buffer C Source` (optional)
- `Buffer D Source` (optional)
If Image source is empty, rendering fails with a "no source" error.
## 2. Compile Modes
FancyMenu supports three compile modes:
- `Auto`
- `Direct Fragment`
- `Shadertoy`
### 2.1 Shadertoy mode
Expected entry point:
```glsl
void mainImage(out vec4 fragColor, in vec2 fragCoord)
```
FancyMenu wraps it into `main()` and passes local area coordinates:
```glsl
mainImage(fmColor_FancyMenu, gl_FragCoord.xy - fmAreaOffset);
```
The wrapper multiplies output alpha by `fmOpacity`.
### 2.2 Direct mode
Expected entry point:
```glsl
void main()
```
Compatibility behavior:
- A `gl_FragColor` compatibility variant is attempted.
- A no-compat variant is also attempted (for modern explicit `out vec4` shaders).
In direct mode, `fmOpacity` is not automatically applied to your output. Apply it manually if needed.
### 2.3 Auto mode
Auto tries compatible variants in sequence (Shadertoy/direct) and uses the first one that compiles.
## 3. Source Preprocessing and Built-in Macros
Before compile, FancyMenu normalizes source:
- removes UTF-8 BOM
- converts CRLF/CR to LF
- strips `#version ...` lines
- strips `precision ...;` lines
Runtime-injected preamble includes:
- `#version 150`
- `in vec2 fmUv_FancyMenu` (fullscreen UV in `[0,1]`, bottom-left origin)
- `#define iGlobalTime iTime`
- `#define texture2D texture`
- `#define textureCube texture`
Note:
- If your source already declares a known uniform name (e.g. `iTime`), FancyMenu avoids injecting a duplicate declaration.
- FancyMenu still tries to upload values to that name at runtime.
- `textureCube` is only an alias macro here; `iChannel0..3` are `sampler2D` uniforms.
## 4. Pass System (Image + Buffer A-D)
FancyMenu has 5 pass slots:
- `Buffer A`
- `Buffer B`
- `Buffer C`
- `Buffer D`
- `Image` (final on-screen pass)
Behavior:
- Buffer passes only run if their source is non-empty.
- Image pass must be present to render output.
- Buffers are rendered to floating-point textures (`GL_RGBA16F`), then ping-ponged (read/write swap each frame).
### 4.1 Channel routing per pass
Each pass exposes routing for `iChannel0..3`. Per channel you can select:
- `None`
- `Resource 0`
- `Resource 1`
- `Resource 2`
- `Resource 3`
- `Buffer A`
- `Buffer B`
- `Buffer C`
- `Buffer D`
Resource channels come from the `iChannel# Resource` settings.
Defaults:
- all `iChannel` routings default to `None`
- no buffer pass is active until that buffer source is non-empty
Important:
- Routing to the same buffer pass (feedback) reads previous-frame data (ping-pong read texture).
- If a routed source is missing/inactive, a fallback texture is bound and `iChannelResolution[n].z` becomes `0.0`.
## 5. Coordinates and Area Semantics
Shaders run in an area rectangle:
- Menu background: full screen area
- GLSL element: element rectangle
Coordinate conventions:
- Pixel uniforms are in area-local pixels.
- Y origin is bottom-left for shader-facing pixel coords.
- Mouse coordinates are not clamped; values can be outside area if cursor is outside.
Special fields:
- `fmAreaOffset`: area bottom-left position in screen pixel space
- `fmAreaTopLeft`: area top-left position in screen pixel space
- `fmAreaSize`: area size in pixels
## 6. Uniform API Reference
All uniforms below are available for both background and element shaders.
## 6.1 Shadertoy-compatible uniforms
| Uniform | Type | Meaning |
|---|---|---|
| `iResolution` | `vec3` | `(areaWidthPx, areaHeightPx, 1.0)` |
| `iTime` | `float` | Accumulated shader time in seconds |
| `iTimeDelta` | `float` | Delta time of last render, affected by freeze/time scale |
| `iFrameRate` | `float` | Minecraft FPS fallback runtime FPS |
| `iFrame` | `int` | Per-runtime frame counter |
| `iMouse` | `vec4` | See details below |
| `iDate` | `vec4` | `(year, month, day, secondsOfDayWithFraction)` |
| `iSampleRate` | `float` | Constant `44100.0` |
| `iChannelTime[4]` | `float[4]` | Currently all set to `iTime` |
| `iChannelResolution[4]` | `vec3[4]` | `(width, height, validFlag)` per channel |
| `iChannel0..3` | `sampler2D` | Routed texture inputs |
### `iMouse` details
`iMouse = vec4(x, y, z, w)`
- `x`, `y`: current area-local mouse pixel position, or hold/frozen behavior if the toggle is enabled
- `z`, `w`: left-click origin
- positive while left mouse button is held
- negative after release
Toggle-controlled behavior:
- `Update iMouse Position Only While Holding LMB = Off`:
- `iMouse.xy` updates continuously
- `... = On`:
- `iMouse.xy` updates only while LMB is down, then remains at last held position
Default value:
- `Off` (continuous updates)
## 6.2 FancyMenu-specific uniforms
| Uniform | Type | Meaning |
|---|---|---|
| `fmAreaOffset` | `vec2` | Area bottom-left pixel offset in screen space |
| `fmAreaSize` | `vec2` | Area size in pixels |
| `fmAreaPosition` | `vec2` | Same as `fmAreaOffset` |
| `fmAreaTopLeft` | `vec2` | Area top-left pixel offset in screen space |
| `fmScreenSize` | `vec2` | Full screen size in pixels |
| `fmGuiScale` | `float` | Current GUI scale |
| `fmMouse` | `vec4` | `(localPxX, localPxYBottom, localNormX, localNormY)` |
| `fmMouseDelta` | `vec2` | Mouse delta in area pixels (Y is inverted to shader-up) |
| `fmMouseButtons` | `ivec4` | Button down states for buttons `0..3` |
| `fmMouseClickCount` | `ivec4` | Cumulative press counts for buttons `0..3` |
| `fmMouseReleaseCount` | `ivec4` | Cumulative release counts for buttons `0..3` |
| `fmMouseScroll` | `vec2` | Scroll delta since this runtime's previous render |
| `fmMouseScrollTotal` | `vec2` | Cumulative scroll totals |
| `fmKeyEvent` | `ivec4` | `(lastKeyCode, lastScanCode, lastModifiers, lastAction)` |
| `fmKeyEventCount` | `int` | Cumulative key event counter |
| `fmCharEvent` | `ivec4` | `(lastCodePoint, lastModifiers, 0, 0)` |
| `fmCharEventCount` | `int` | Cumulative char-typed event counter |
| `fmDateParts` | `ivec4` | `(year, month, day, dayOfWeekIso1To7)` |
| `fmTimeParts` | `ivec4` | `(hour, minute, second, millisecondPart0To999)` |
| `fmDayOfYear` | `int` | Day of year |
| `fmWeekOfYear` | `int` | ISO week of year |
| `fmUnixTimeSeconds` | `int` | Unix epoch seconds |
| `fmUnixTimeMilliseconds` | `int` | Millisecond part of current time (`0..999`) |
| `fmPartialTick` | `float` | Current partial tick |
| `fmGameDeltaTicks` | `float` | Minecraft game delta ticks |
| `fmRealtimeDeltaTicks` | `float` | Minecraft realtime delta ticks |
| `fmInWorld` | `int` | `1` when in a world, else `0` |
| `fmIsPaused` | `int` | `1` when paused, else `0` |
| `fmOpacity` | `float` | Effective opacity multiplier (`0..1`) |
| `fmVariableCount` | `int` | Current amount of FancyMenu variables |
Key action values (`fmKeyEvent.w`):
- `0` = release
- `1` = press
- `2` = repeat
## 6.3 FancyMenu Variable Uniform API
FancyMenu variables are exposed directly as runtime uniforms (for background, element, and decoration overlay shaders) without shader recompilation when values change.
### Naming
For each variable ``, FancyMenu exposes:
- `fmVarFloat_`
- `fmVarInt_`
- `fmVarBool_`
- `fmVarVec2_`
- `fmVarVec3_`
- `fmVarVec4_`
- `fmVarExists_` (`1` = variable currently exists, `0` = not present/removed)
Uniform suffix sanitization for ``:
- allowed chars are `[A-Za-z0-9_]`
- all other chars are converted to `_`
- if the first char is a digit, `_` is prepended
Examples:
- variable `player_hp` -> suffix `player_hp`
- variable `player-hp` -> suffix `player_hp`
- variable `2nd_phase` -> suffix `_2nd_phase`
Important:
- these dynamic variable uniforms are **not auto-declared** in shader source (declare the ones you use manually)
- avoid variable names that sanitize to the same suffix, because they map to the same GLSL uniform name
### Value conversion
Given variable text value `v`:
- `fmVarFloat_*`: parsed float (`0.0` fallback)
- `fmVarInt_*`: parsed int (`0` fallback)
- `fmVarBool_*`: boolean/int interpretation (`true/yes/on/enabled` => `1`, `false/no/off/disabled` => `0`, otherwise numeric non-zero => `1`)
- vector parsing accepts separators: whitespace, `,`, `;`, `|`
- `fmVarVec2_*`: first 2 parsed components
- `fmVarVec3_*`: first 3 parsed components
- `fmVarVec4_*`: first 4 parsed components
- if fewer components are present, the last parsed component is repeated for missing slots
- if no numeric components are present, all vector components use scalar fallback
If a variable gets removed:
- `fmVarExists_*` becomes `0`
- all corresponding `fmVar*_*` values are reset to `0`
### Example declaration and usage
```glsl
uniform float fmVarFloat_player_hp;
uniform int fmVarBool_is_boss_phase;
uniform vec3 fmVarVec3_theme_color;
uniform int fmVarExists_player_hp;
void mainImage(out vec4 fragColor, in vec2 fragCoord) {
vec2 uv = fragCoord / iResolution.xy;
float hp = clamp(fmVarFloat_player_hp / 100.0, 0.0, 1.0);
vec3 theme = fmVarVec3_theme_color;
float boss = float(fmVarBool_is_boss_phase);
vec3 col = mix(theme * 0.25, theme, hp);
col += vec3(0.2, 0.0, 0.0) * boss;
if (fmVarExists_player_hp == 0) {
col = vec3(0.15);
}
fragColor = vec4(col, 1.0);
}
```
## 7. Input Tracking Model
FancyMenu tracks input globally and snapshots it per render:
- mouse move/drag
- mouse press/release
- scroll
- key press/release/repeat
- char typed
Mouse robustness:
- Runtime reconciles button states with GLFW polling each frame to prevent stuck-button states.
If `Pass Input Events To Shader` is disabled:
- input uniforms are reset to neutral values each frame
- counters and events are zeroed in shader-visible data
## 8. Texture Input Details
Resource channels (`iChannel# Resource`) expect 2D textures.
Texture state per channel:
- valid resource: bound texture, real width/height, `iChannelResolution[n].z = 1.0`
- missing/inactive/None: fallback texture, `iChannelResolution[n].xyz = (0,0,0)`
Buffer textures:
- internal format: `RGBA16F` (floating point)
- filtering: linear
- wrap: clamp-to-edge
This is suitable for multipass data (including values outside `[0,1]`).
## 9. Rendering and Blending Notes
- Buffer passes render offscreen without blending.
- Final Image pass uses the `Enable Blending` setting for compositing.
- Shadertoy wrapper applies `fmOpacity` to alpha automatically.
- Direct shaders should apply `fmOpacity` manually if required.
## 10. Practical Templates
## 10.1 Minimal Shadertoy-style shader
```glsl
void mainImage(out vec4 fragColor, in vec2 fragCoord) {
vec2 uv = fragCoord / iResolution.xy;
vec3 col = vec3(uv, 0.5 + 0.5 * sin(iTime));
fragColor = vec4(col, 1.0);
}
```
## 10.2 Minimal direct fragment shader
```glsl
out vec4 FragColor;
void main() {
vec2 uv = gl_FragCoord.xy - fmAreaOffset;
uv /= iResolution.xy;
vec3 col = vec3(uv.x, uv.y, 0.5 + 0.5 * sin(iTime));
FragColor = vec4(col, fmOpacity);
}
```
## 10.3 Minimal feedback multipass
### Buffer A source
Route: `Buffer A iChannel0 Input -> Buffer A`
```glsl
void mainImage(out vec4 fragColor, in vec2 fragCoord) {
vec2 uv = fragCoord / iResolution.xy;
vec4 prev = texture(iChannel0, uv);
vec4 seed = vec4(uv, 0.0, 1.0);
fragColor = mix(prev, seed, 0.02);
}
```
### Image source
Route: `Image iChannel0 Input -> Buffer A`
```glsl
void mainImage(out vec4 fragColor, in vec2 fragCoord) {
vec2 uv = fragCoord / iResolution.xy;
fragColor = texture(iChannel0, uv);
}
```
## 11. Troubleshooting Checklist
- No output:
- verify Image source is non-empty
- verify compile mode matches your entry point (`mainImage` vs `main`)
- Purple/invalid textures:
- verify resource bindings and channel routing
- check `iChannelResolution[n].z` (`0.0` means invalid/unavailable)
- Wrong coordinates in direct shader:
- use `gl_FragCoord.xy - fmAreaOffset` for local area coords
- Drag behavior wrong:
- use the `Update iMouse Position Only While Holding LMB` toggle
- Opacity not applied in direct shader:
- multiply alpha by `fmOpacity` yourself
================== END PAGE: https://docs.fancymenu.net/docs/glsl-shader-api ==================
================== BEGIN PAGE: https://docs.fancymenu.net/docs/home ==================
---
title: Getting Started
description: >-
The world of FancyMenu awaits you! This is the beginning of something
beautiful!
---
# For Developers
If your are a developer and want to make an addon for FancyMenu or integrate FancyMenu in your mod, better take a look at the [developer documentation](https://github.com/Keksuccino/FancyMenu-Dev-Docs/wiki).
# Getting Started
The first time using FancyMenu can be a bit overwhelming, but don't worry, most of it is actually pretty self-explaining once you start working with it!
> Please **keep in mind** that this page is just to get into FancyMenu and help you with your **very first steps**.
Make sure to also check out the rest of the documentation for more in-detail information about FancyMenu's features!
{.is-info}
# The Menu Bar
One of the first things you will notice when starting the game is the **menu bar** at the top of every menu.
The **menu bar** is your entry point to basically all of FancyMenu's features like **creating layouts** to **customize menus**, changing the **window title and icon** and much more.
> If you acidentally pressed some keys and the **menu bar disappeared**, you can bring it back by pressing **CTRL + ALT + C**.
{.is-warning}
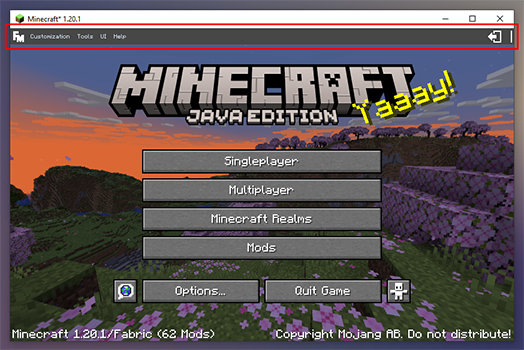
# Your First Layout
Since you probably want to customize Minecraft's menus, let me tell you something about **layouts**!
Layouts are like customization layers for menus and they allow you to add new elements and customize existing ones.
To make a new layout for a **specific menu**:
1. Open the menu you want to create a layout for (the Title Screen for example)
2. Open the **Customization** tab of the **menu bar**
Customizations are disabled for all menus by default and you need to activate them for every menu you want to customize, so let's click on the **"Current Screen Customization: Disabled"** entry first, which will switch the toggle to **Enabled**.

After doing that, click on **Layouts -> New -> For Current Screen**.
This will open the **layout editor** where you can add elements to the layout and customize Vanilla and mod elements (like buttons).
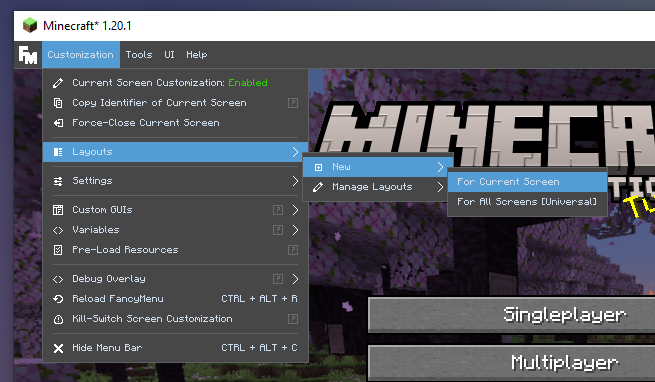
## Editing the Layout
Most customization options can be accessed by **right-clicking the editor background**.
Doing that will open a context menu with lots of options, like customizing the **menu backround** or **adding elements** to the layout.
## Adding Elements to Layouts
To add a new element to your layout, **right-click** the background of the editor.
In the context menu that opens, click on **New Element** and choose one of the many types of elements.

## Customizing Elements
To customize an element, **right-click** it, which will open a context menu with everything you can customize for that element type.
It doesn't matter if the element is a custom element added by you or a Vanilla element that was already part of the menu.

## Positioning Elements
Every element in FancyMenu is connected to an **anchor point**.
Anchor points are necessary for calculating an element's position and if used correctly, they prevent elements from overlapping each other, going out-of-screen or move to the wrong place when resizing the window.
They are the origin point from where the element's position is getting calculated.
By default, elements are connected to the **"Center of Screen"** anchor point, which is basically just the exact center of the screen, no matter the window size.
So lets say an element is 2 centimetres away from the center of the screen while being connected to the **"Center of Screen"** anchor. In that case, the element will **always** be 2 centimetres away from the screen's center, no matter the window size.
You can see the anchor point an element is connected to when dragging it. This will (by default) also show all other anchor points. You can hover an anchor point while dragging an element to change the element's anchor to the hovered anchor point.
Elements itself can also work as an anchor point for other elements! Just hover an element while dragging another and the dragged element's anchor point will get changed to the hovered element.
**[Learn more about how to position your elements.](/positioning-elements)**

## Saving Your Work
Don't forget to save your work!
You will see an "Unsaved Changes" indicator in the top-right corner of the editor if you need to save your work before closing it.
This can be done by pressing **CTRL + S** or by clicking on **Layout -> Save**!
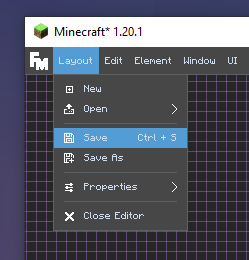
*Congratulations! You can now make Minecraft's menus look a lot more beautiful!*
================== END PAGE: https://docs.fancymenu.net/docs/home ==================
================== BEGIN PAGE: https://docs.fancymenu.net/docs/ice-and-fire ==================
---
title: Ice & Fire Main Menu
description: How to disable Ice and Fire's custom main menu.
published: true
date: 2025-04-14T20:15:02.802Z
tags:
editor: markdown
dateCreated: 2025-04-14T20:14:59.763Z
---
To disable the custom title screen in the Ice and Fire mod you need to change its configuration. Here’s how you can do it:
## 1. Locate the Configuration File
- **File Name:** The setting is found in the file named **`iceandfire-client.toml`**.
- **Folder Location:** This file is usually located in your **`.minecraft/config`** folder (or in the equivalent configuration directory if you’re using a custom launcher or modpack).
## 2. Edit the Config File
- **Open the File:** Use any plain text editor (such as Notepad on Windows or TextEdit on macOS) to open `iceandfire-client.toml`.
- **Find the Setting:** Scroll down until you find an option related to the custom main menu. It may be commented and look similar to this:
```toml
# Whether to display the dragon on the main menu or not [default: true]
B:"Custom main menu"=true
```
- **Change the Value:** Set this option to **false** by changing the line to:
```toml
B:"Custom main menu"=false
```
This change tells the mod not to render its custom main menu (often featuring the dragon or other thematic visuals).
## 3. Save and Restart
- **Save the File:** After making the change, save the file.
- **Restart Minecraft:** Close and restart Minecraft for the changes to take effect. When the game loads, it should now use the default main menu rather than the custom one from the mod.
## Additional Tips
- **Double-check You’re Editing the Correct File:** There might be a separate common configuration file, so make sure you’re editing **`iceandfire-client.toml`** (this is the client-specific configuration, not the common one).
- **Back Up First:** It’s always a good idea to make a backup of the original config file before you modify it.
- **Modpacks:** If you’re using a modpack, the config file might be inside the pack’s folder structure, but the principle remains the same.
This method has been confirmed by users in the community—for instance, several users on the Feed The Beast forums mentioned finding and changing the `"Custom main menu"` option in **`iceandfire-client.toml`** solved their issue. (See discussion where a user noted, “set the ice and fire config to not display it in iceandfire-client.toml” and that the file is located in the config folder.) citeturn0search1
Following these steps should disable the custom main menu provided by the mod so you can use your texture pack’s own main menu background.
================== END PAGE: https://docs.fancymenu.net/docs/ice-and-fire ==================
================== BEGIN PAGE: https://docs.fancymenu.net/docs/incompatibility-list ==================
---
title: Incompatibility List
description: A list of mods that are known to be incompatible with FancyMenu.
published: true
date: 2025-12-19T10:25:05.030Z
tags:
editor: markdown
dateCreated: 2025-04-14T20:15:03.963Z
---
# List of Incompatible Mods
The following mods are known to be incompatible with FancyMenu in some way.
Some of the mods have workarounds to make them work with FancyMenu.
If that's the case, it's written after the mod name in the list below.
**In case you found an incompatible mod that isn't part of this list already, please open an issue on GitHub! Thank you very much!**
* [Animated Loading Screen](https://modrinth.com/mod/animated-loading-screen) (Makes menus look bugged)
* [Animated Mojang Logo](https://www.curseforge.com/minecraft/mc-mods/animated-mojang-logo) (Layouts will sometimes not load; Also breaks Drippy Loading Screen)
* [Bedrockify](https://www.curseforge.com/minecraft/mc-mods/bedrockify) (Compatible when you disable all menu modifications of the mod, at least for the menus you want to customize)
* [BetterFPS](https://www.curseforge.com/minecraft/mc-mods/betterfps) (Buttons and menus of this mod aren't customizable)
* [Chat Colors](https://www.curseforge.com/minecraft/mc-mods/chat-colours) (Crash on startup)
* [Chloride](https://modrinth.com/mod/chloride) (FPS placeholder does not work when this mod is installed)
* [Colormatic](https://www.curseforge.com/minecraft/mc-mods/colormatic) (Huge lag when starting MC and breaks FM's audio stuff)
* [Controllable](https://www.curseforge.com/minecraft/mc-mods/controllable) (Custom buttons added to menus with FancyMenu aren't clickable via Controllable's “Virtual Mouse” feature)
* [Controlify](https://modrinth.com/mod/controlify) (Seems to crash the game, but I can't fix that on my end - see [this issue](https://github.com/Keksuccino/FancyMenu/issues/1144) for more context)
* [Crash To Main Menu](https://www.curseforge.com/minecraft/mc-mods/crash-to-main-menu)
* [Custom Loading Screen](https://www.curseforge.com/minecraft/mc-mods/better-loading-screen)
* [Custom Main Menu](https://www.curseforge.com/minecraft/mc-mods/custom-main-menu)
* [Debugify](https://www.curseforge.com/minecraft/mc-mods/debugify) (Use [Modern Debugify](https://www.curseforge.com/minecraft/mc-mods/modern-debugify) instead)
* [Dynamic Surroundings](https://www.curseforge.com/minecraft/mc-mods/dynamic-surroundings) (Breaks FancyMenu's Audio elements, but anything else should work fine)
* [EnhancedVisuals](https://www.curseforge.com/minecraft/mc-mods/enhancedvisuals) (Seems to break animations, makes backgrounds translucent and probably more)
* [Entity Model Features](https://modrinth.com/mod/entity-model-features) (Crashes the game, but I can't fix it on my end - see [this issue](https://github.com/Keksuccino/FancyMenu/issues/1115) for more context)
* [Fossils and Archeology Revival](https://www.curseforge.com/minecraft/mc-mods/fossils) (Works ingame, but the custom main menu isn’t supported—can be disabled in its config)
* [Holographic Renderers](https://www.curseforge.com/minecraft/mc-mods/holographic-renderers) (Crash on startup)
* [Ice and Fire](https://www.curseforge.com/minecraft/mc-mods/ice-and-fire-dragons) (Works if the custom main menu is disabled in its config)
* [Jurassicraft](https://www.curseforge.com/minecraft/mc-mods/jurassicraft) (Crashes on start when enabling customizations for its GUIs—delete them from `config/fancymenu/customizablemenus.txt`)
* [Legacy4J](https://www.curseforge.com/minecraft/mc-mods/legacy-minecraft) (Crashes the game)
* [MalisisCore](https://www.curseforge.com/minecraft/mc-mods/malisiscore) (Breaks main-menu customization)
* [Main Menu Scale Mod](https://www.curseforge.com/minecraft/mc-mods/main-menu-scale)
* [MCA Reborn](https://www.curseforge.com/minecraft/mc-mods/minecraft-comes-alive-reborn) (Works, but some of its menus break FM's menu bar and/or are not customizable)
* [Minecraft Comes Alive](https://www.curseforge.com/minecraft/mc-mods/minecraft-comes-alive-mca) (Works fine, but its menus aren’t customizable)
* [MineTogether](https://www.curseforge.com/minecraft/mc-mods/creeperhost-minetogether) (Seems to break layouts when GUI scale > 2)
* [Mod Menu](https://www.curseforge.com/minecraft/mc-mods/modmenu) (**WORKS FINE** in most cases, but if you experience a duplicated or uncustomizable Mods button, change your Mod Menu button settings to "Adjacent": Main Menu > Mods > Mod Menu > Mods Button: Adjacent)
* [Modern Online Picture Frames](https://www.curseforge.com/minecraft/mc-mods/online-picture-frame) (Crash—see [this issue](https://github.com/Keksuccino/FancyMenu/issues/776))
* [Not Enough Animations](https://www.curseforge.com/minecraft/mc-mods/not-enough-animations) (Works fine in 1.16+, but breaks 1.12)
* **OptiFine** (Breaks the mod! Use [these alternatives](./optifine-alternatives) instead)
* [Optiscale](https://www.curseforge.com/minecraft/mc-mods/optiscale) (Breaks FancyMenu's UI; buttons aren’t clickable)
* [Pack Menu](https://www.curseforge.com/minecraft/mc-mods/packmenu)
* [Panorama Screens](https://modrinth.com/mod/panorama-screens) (Will not work and cause problems, because stacking menu customization mods is never a good idea)
* [QuestCraft](https://github.com/QuestCraftPlusPlus/QuestCraft) (Game fails to load)
* [RandomPatches](https://www.curseforge.com/minecraft/mc-mods/randompatches-forge) (Works if `patchMinecraftClass = false` in its config)
* [Remove Reloading Screen](https://www.curseforge.com/minecraft/mc-mods/rrls) (Breaks FM and Drippy. Don't use that mod.)
* [Replay Mod](https://www.replaymod.com/download/) (Works when you set `mainMenuButton` to **BIG** in `.minecraft/config/replaymod.json`)
* [Seamless Loading Screen](https://www.curseforge.com/minecraft/mc-mods/seamless-loading-screen) (Crashes the game)
* [Slight Gui Modifications](https://www.curseforge.com/minecraft/mc-mods/slight-gui-modifications)
* [Skin Layers 3D](https://www.curseforge.com/minecraft/mc-mods/skin-layers-3d) (Works fine in 1.16+, but breaks 1.12)
* [Smooth Scrolling Everywhere](https://www.curseforge.com/minecraft/mc-mods/smooth-scrolling-everywhere)
* [Sound Filters](https://www.curseforge.com/minecraft/mc-mods/sound-filters) (The audio extension will not work with this installed)
* [Sound Physics Remastered](https://www.curseforge.com/minecraft/mc-mods/sound-physics-remastered) (The audio extension will not work with this installed)
* [Stylish Effects](https://www.curseforge.com/minecraft/mc-mods/stylish-effects) (Main menu fails to load layouts the first time it’s shown)
* [Supplementaries](https://www.curseforge.com/minecraft/mc-mods/supplementaries) (Randomly crashes when customizing its config screen; delete the problematic layout from `.minecraft/config/fancymenu/customization`)
* [Terraria Craft](https://www.curseforge.com/minecraft/mc-mods/terraria-craft)
* [The Dalek Mod](https://www.curseforge.com/minecraft/mc-mods/the-dalek-mod) (Works if its custom main menu is disabled in the config)
* [ThonkUtil](https://www.curseforge.com/minecraft/mc-mods/thonkutil) (Works, but currently adds an unremovable text to the main menu)
* [Trade Uses](https://modrinth.com/mod/trade-uses) (Causes crashes in villager trade menu—possibly only when “Easy Villagers” is also installed)
* [VanillaFix](https://www.curseforge.com/minecraft/mc-mods/vanillafix) (Usable, but some users report issues with the VanillaFix crash screen)
* [FireplaceMode](https://www.curseforge.com/minecraft/mc-mods/fireplacemode) (The Pause screen resets its customizations sometimes with this mod installed)
* [Respackopts](https://www.curseforge.com/minecraft/mc-mods/respackopts) (Works, but only if you disable customizations for the Resource Pack screen)
* [Bind Pizzeria](https://modrinth.com/mod/jjpizza) (Breaks text rendering in FancyMenu's context menus)
* [EnhancedTooltips](https://www.curseforge.com/minecraft/mc-mods/enhancedtooltips) (Breaks FancyMenu's tooltips)
================== END PAGE: https://docs.fancymenu.net/docs/incompatibility-list ==================
================== BEGIN PAGE: https://docs.fancymenu.net/docs/jsonpath ==================
---
title: JSON Paths
description: How to use Jayway JsonPath in the JSON Parser placeholder.
published: true
date: 2025-04-14T20:15:11.610Z
tags:
editor: markdown
dateCreated: 2025-04-14T20:15:08.305Z
---
# JSON Paths in FancyMenu
FancyMenu's **JSON Parser** placeholder uses [Jayway JsonPath](https://github.com/json-path/JsonPath) to get content from JSON files.
This page explains JSON paths in detail.
The text on this page is a copy of the README from Jayway JsonPath's GitHub repository.
> In this text, the term "JsonPath expression" refers to a JSON path.
{.is-info}
# JsonPath
JsonPath expressions always refer to a JSON structure in the same way as XPath expression are used in combination
with an XML document. The "root member object" in JsonPath is always referred to as `$` regardless if it is an
object or array.
JsonPath expressions can use the dot–notation
`$.store.book[0].title`
or the bracket–notation
`$['store']['book'][0]['title']`
## Operators
| Operator | Description |
| :------------------------ | :----------------------------------------------------------------- |
| `$` | The root element to query. This starts all path expressions. |
| `@` | The current node being processed by a filter predicate. |
| `*` | Wildcard. Available anywhere a name or numeric are required. |
| `..` | Deep scan. Available anywhere a name is required. |
| `.` | Dot-notated child |
| `['' (, '')]` | Bracket-notated child or children |
| `[ (, )]` | Array index or indexes |
| `[start:end]` | Array slice operator |
| `[?()]` | Filter expression. Expression must evaluate to a boolean value. |
## Functions
Functions can be invoked at the tail end of a path - the input to a function is the output of the path expression.
The function output is dictated by the function itself.
| Function | Description | Output type |
| :------------------------ | :------------------------------------------------------------------ |:----------- |
| min() | Provides the min value of an array of numbers | Double |
| max() | Provides the max value of an array of numbers | Double |
| avg() | Provides the average value of an array of numbers | Double |
| stddev() | Provides the standard deviation value of an array of numbers | Double |
| length() | Provides the length of an array | Integer |
| sum() | Provides the sum value of an array of numbers | Double |
| keys() | Provides the property keys (An alternative for terminal tilde `~`) | `Set` |
| concat(X) | Provides a concatinated version of the path output with a new item | like input |
| append(X) | add an item to the json path output array | like input |
## Filter Operators
Filters are logical expressions used to filter arrays. A typical filter would be `[?(@.age > 18)]` where `@` represents the current item being processed. More complex filters can be created with logical operators `&&` and `||`. String literals must be enclosed by single or double quotes (`[?(@.color == 'blue')]` or `[?(@.color == "blue")]`).
| Operator | Description |
| :----------------------- | :-------------------------------------------------------------------- |
| == | left is equal to right (note that 1 is not equal to '1') |
| != | left is not equal to right |
| < | left is less than right |
| <= | left is less or equal to right |
| > | left is greater than right |
| >= | left is greater than or equal to right |
| =~ | left matches regular expression [?(@.name =~ /foo.*?/i)] |
| in | left exists in right [?(@.size in ['S', 'M'])] |
| nin | left does not exists in right |
| subsetof | left is a subset of right [?(@.sizes subsetof ['S', 'M', 'L'])] |
| anyof | left has an intersection with right [?(@.sizes anyof ['M', 'L'])] |
| noneof | left has no intersection with right [?(@.sizes noneof ['M', 'L'])] |
| size | size of left (array or string) should match right |
| empty | left (array or string) should be empty |
## Path Examples
Given the json
```javascript
{
"store": {
"book": [
{
"category": "reference",
"author": "Nigel Rees",
"title": "Sayings of the Century",
"price": 8.95
},
{
"category": "fiction",
"author": "Evelyn Waugh",
"title": "Sword of Honour",
"price": 12.99
},
{
"category": "fiction",
"author": "Herman Melville",
"title": "Moby Dick",
"isbn": "0-553-21311-3",
"price": 8.99
},
{
"category": "fiction",
"author": "J. R. R. Tolkien",
"title": "The Lord of the Rings",
"isbn": "0-395-19395-8",
"price": 22.99
}
],
"bicycle": {
"color": "red",
"price": 19.95
}
},
"expensive": 10
}
```
| JsonPath (click link to try)| Result |
| :------- | :----- |
| $.store.book[*].author| The authors of all books |
| $..author | All authors |
| $.store.* | All things, both books and bicycles |
| $.store..price | The price of everything |
| $..book[2] | The third book |
| $..book[-2] | The second to last book |
| $..book[0,1] | The first two books |
| $..book[:2] | All books from index 0 (inclusive) until index 2 (exclusive) |
| $..book[1:2] | All books from index 1 (inclusive) until index 2 (exclusive) |
| $..book[-2:] | Last two books |
| $..book[2:] | Book number two from tail |
| $..book[?(@.isbn)] | All books with an ISBN number |
| $.store.book[?(@.price < 10)] | All books in store cheaper than 10 |
| $..book[?(@.price <= $['expensive'])] | All books in store that are not "expensive" |
| $..book[?(@.author =~ /.*REES/i)] | All books matching regex (ignore case) |
| $..* | Give me every thing
| $..book.length() | The number of books |
================== END PAGE: https://docs.fancymenu.net/docs/jsonpath ==================
================== BEGIN PAGE: https://docs.fancymenu.net/docs/known-issues ==================
---
title: Known Issues
description: A list of known issues in the current FancyMenu version. Always up-to-date for the latest build.
published: true
date: 2026-02-07T05:24:40.032Z
tags:
editor: markdown
dateCreated: 2025-11-09T04:27:59.235Z
---
# Known Issues in FancyMenu
This list always contains known issues of the latest FancyMenu version that did not get fixed yet or can't be fixed at all because of Minecraft limitations, mod conflicts, etc.
# Fixable
These issues can and will be fixed in the future.
## Scoreboard-related features are broken. They do not work.
All features (placeholders, actions, requirements) that access scoreboard, score or player tag data DO NOT WORK as intended right now. Depending on the FancyMenu version, scoreboard-related features are not available at all anymore, because they got removed for now, to rework them and re-implement them in the future. Even if available, these features should NOT GET USED right now! They will not work anyway.
# Not Fixable
These issues can't be fixed and will probably stay forever unless they get fixed on the other end (Minecraft, another mod, etc.).
## Player Entity & Item elements are always in front of everything.
FancyMenu's layer system does not work for Player Entity and Item elements, because of how Minecraft renders them. They are always rendered in front of all other GUI elements, at least in older Minecraft versions. It is possible that Minecraft 1.21.8+ is not affected by this anymore.
================== END PAGE: https://docs.fancymenu.net/docs/known-issues ==================
================== BEGIN PAGE: https://docs.fancymenu.net/docs/listeners ==================
---
title: Listeners
description: How to create and use listeners in FancyMenu.
published: true
date: 2026-05-03T11:01:52.000Z
tags:
editor: markdown
dateCreated: 2025-11-23T08:24:21.102Z
---
# Listeners
Starting with FancyMenu v3.8.0, there is a new feature called "listeners".
Listeners execute action scripts when specific client or gameplay events happen.
They can expose variables to actions, placeholders, and requirements nested in the listener.
Other than most things in FancyMenu, listeners are not locked to a screen or overlay. They constantly run in the background, listening to their events. As soon as a listener gets fired, it executes its action script, even if there is no screen open at that time.
# Using Listeners
To create a new listener that listeners to an event and executes an action script, click on **menu bar -> Customization -> Manage Listeners** while **NOT** in the layout editor. There you can find an easy-to-use UI for creating and managing listeners.
# Listener Variables
Listeners often expose a special type of variable for its nested actions, requirements and placeholders.
These variables can be accessed like placeholders (they are effectively placeholders).
You use these variables by simply using their names with the `$$` prefix in text inputs, similar to how you would use a normal placeholder.
For example, if you use the **On Keyboard Key Pressed** listener and want to print the key name to the log via the **Print to Log** action, you would use something like `Key pressed! The key is: $$key_name` as input for the message the action should print. The variable placeholder will later get replaced with the actual name of the key.
> Even tho these are called "variables", they are in no way related to FancyMenu's normal [variable system](/variables). You can't set these variables, since they are **read-only**. You also can't use any actions, requirements and placeholders meant for FancyMenu's variable system with these special listener variables, so using **Get Variable Value [FM Variable]**, **Is Variable Value [FM Variable]** or **Set Variable Value [FM Variable]** will not work for listener variables.
{.is-warning}
# Listeners in Detail
This list should include most, if not all, of FancyMenu's listeners. It is possible that the list is not always up-to-date due to updates of the mod.
## On Markdown Text Clicked
- Fires when Markdown text with a `click:` event is clicked, for example `[Open](click:open_menu)`.
- Variables:
- `$$text_event_id` – event ID from the Markdown link
## On Markdown Text Hovered
- Fires when Markdown text with a `hover:` event is hovered, for example `[Hint](hover:show_hint)`.
- Variables:
- `$$text_event_id` – event ID from the Markdown link
## On ZIP Extracted via Action
- Fires when the **Extract ZIP File In Game Directory** action finishes.
- Variables:
- `$$source_zip_path` – resolved source ZIP path
- `$$target_folder_path` – resolved extraction target path
- `$$extract_succeeded` – true/false
- `$$failure_reason` – error text when extraction failed
## On Element Spawned
- Fires when an element is spawned via an action/scripted element-spawn flow.
- Variables:
- `$$element_type` – spawned element type
- `$$element_identifier` – spawned element identifier
- `$$target_screen` – target screen identifier
## On Animated Texture Started Playing
- Fires when an animated texture starts playing.
- Variables:
- `$$texture_source` – texture source
- `$$texture_source_type` – source type
- `$$texture_will_restart` – true/false
## On Animated Texture Finished Playing
- Fires when an animated texture finishes playing.
- Variables:
- `$$texture_source`
- `$$texture_source_type`
- `$$texture_will_restart`
## On Video Playback Status Changed
- Fires when a video element or video menu background changes playback status.
- Variables:
- `$$video_source` – video source
- `$$video_source_type` – source type
- `$$is_looping` – true/false
- `$$new_status` – `PLAYING`, `STOPPED`, `PAUSED`, or `FINISHED`
## On System Message Received in Chat
- Fires when the client receives a system chat message, such as command feedback.
- Variables:
- `$$system_message_string` – plain text message
- `$$system_message_component` – JSON component
## On FM Data Received
- Fires when a server sends FM Data to this client via `/fmdata send`.
- Variables:
- `$$data_identifier` – data identifier string
- `$$data` – data payload
- `$$sent_by` – server IP or `integrated_server`
## On Remote Server Connected
- Fires when FancyMenu initializes a remote server connection.
- Variables:
- `$$request_id` – cached request ID
- `$$remote_server_url` – remote server URL
## On Remote Server Data Received
- Fires when text data is received from a connected remote server.
- Variables:
- `$$request_id` – request ID
- `$$remote_server_url` – remote server URL
- `$$data` – received payload
## On Remote Server Connection Closed
- Fires when a remote server connection closes.
- Variables:
- `$$request_id` – request ID
- `$$remote_server_url` – remote server URL
- `$$intentionally_closed` – TRUE if closed by an action
- `$$crashed` – TRUE if the connection crashed unexpectedly
- `$$unknown_close_reason` – TRUE if no known close reason was available
## On Keyboard Key Pressed
- Triggers whenever a key is pressed (repeats while held; works in screens and in-game).
- Variables:
- `$$key_name` – display name of the key
- `$$key_keycode` – GLFW key code
- `$$key_scancode` – GLFW scan code
- `$$key_modifiers` – active modifier bit mask
## On Keyboard Key Released
- Triggers when a key is released (screens and in-game).
- Variables:
- `$$key_name`
- `$$key_keycode`
- `$$key_scancode`
- `$$key_modifiers`
## On Keyboard Character Typed in Screen
- Fires when a character is typed while a screen is open.
- Variables:
- `$$char` – typed character
## On Mouse Moved in Screen
- Fires whenever the mouse moves while a screen is open.
- Variables:
- `$$mouse_pos_x` – current X
- `$$mouse_pos_y` – current Y
- `$$mouse_move_delta_x` – X delta since last event
- `$$mouse_move_delta_y` – Y delta since last event
## On Mouse Button Clicked
- Fires when a mouse button is pressed (screens and in-game).
- Variables:
- `$$button` – left/right/middle
- `$$mouse_pos_x` – current X
- `$$mouse_pos_y` – current Y
## On Mouse Button Released
- Fires when a mouse button is released (screens and in-game).
- Variables:
- `$$button`
- `$$mouse_pos_x`
- `$$mouse_pos_y`
## On Mouse Scrolled in Screen
- Fires when the mouse wheel is scrolled while a screen is open.
- Variables:
- `$$scroll_delta_y` – vertical scroll amount
## On Screen Opened
- Runs right after any screen becomes active; can be used to override it.
- Variables:
- `$$screen_identifier` – identifier of the opened screen
## On Screen Closed
- Runs immediately after a screen closes.
- Variables:
- `$$screen_identifier` – identifier of the closed screen
## On Quit Minecraft
- Fires once when the client begins shutting down.
- Variables:
- `$$timestamp_millis` – epoch millis when quitting
- `$$timestamp_iso` – ISO-8601 timestamp of quit moment
## On Death
- Runs when the vanilla death screen opens for the local player.
- Variables:
- `$$days_survived` – days since last death
- `$$death_reason_string` – plain-text cause
- `$$death_reason_component` – JSON component cause
- `$$death_pos_x` – death X coordinate
- `$$death_pos_y` – death Y coordinate
- `$$death_pos_z` – death Z coordinate
## On Variable Updated [FM Variable]
- Fires whenever a FancyMenu variable is set/updated.
- Variables:
- `$$var_name` – variable name
- `$$old_value` – previous value
- `$$new_value` – new value
## On File Downloaded via Action
- Fires after the “Download File to Game Directory” action finishes.
- Variables:
- `$$download_url` – download source
- `$$target_file_path` – saved file path
- `$$download_succeeded` – true/false
## On File Selected
- Fires after the “Select File” action completes.
- Variables:
- `$$selected_file_path` – absolute chosen file path or empty if cancelled
- `$$target_file_path` – resolved path inside instance
- `$$selection_succeeded` – true if copy succeeded
- `$$selection_cancelled` – true if dialog closed
- `$$failure_reason` – error info on failure
## On Chat Message Received
- Fires when a normal player chat line appears on the client.
- Variables:
- `$$chat_message_string` – plain text line
- `$$chat_message_component` – full JSON component
- `$$sender_uuid` – sender UUID or ERROR
- `$$sender_name` – sender name or ERROR
## On Chat Message Sent
- Fires when the local player sends a chat message.
- Variables:
- `$$chat_message_string` – plain text line
- `$$chat_message_component` – full JSON component
## On Effect Gained
- Fires when the player gains a status effect.
- Variables:
- `$$effect_key` – effect resource location
- `$$effect_type` – positive/negative/neutral
- `$$effect_duration` – ticks remaining
## On Effect Lost
- Fires when the player loses a status effect.
- Variables:
- `$$effect_key` – expired effect
- `$$effect_type` – category
## On Experience Changed
- Fires whenever the player’s total XP changes.
- Variables:
- `$$new_experience_amount` – after change
- `$$old_experience_amount` – before change
- `$$is_level_up` – TRUE if level increased
## On Damage Taken
- Fires once per hit when the player takes damage.
- Variables:
- `$$damage_amount` – health removed
- `$$damage_type` – damage type resource location
- `$$is_fatal_damage` – TRUE if lethal
- `$$damage_source` – attacker resource location or NONE
## On Started Freezing
- Fires when the player starts freezing.
- Variables:
- `$$freezing_intensity` – 0.0 none, 1.0 fully frozen
## On Stopped Freezing
- Fires when the player stops freezing.
- Variables:
- (none)
## On Fully Frozen
- Fires once when the player becomes fully frozen.
- Variables:
- (none)
## On Start Looking At Block
- Fires once when the crosshair first points at a block (max 20 blocks distance).
- Variables:
- `$$block_key` – targeted block
- `$$block_pos_x` – block X
- `$$block_pos_y` – block Y
- `$$block_pos_z` – block Z
- `$$distance_to_player` – eyes to hit position
## On Stop Looking At Block
- Fires when the crosshair stops pointing at a block (reports last targeted block, max 20 blocks).
- Variables:
- `$$block_key`
- `$$block_pos_x`
- `$$block_pos_y`
- `$$block_pos_z`
- `$$distance_to_player`
## On Start Looking At Entity
- Fires once when the crosshair first points at an entity (max 20 blocks).
- Variables:
- `$$entity_key` – targeted entity type
- `$$distance_to_player`
- `$$entity_pos_x`
- `$$entity_pos_y`
- `$$entity_pos_z`
- `$$entity_uuid`
## On Stop Looking At Entity
- Fires when the crosshair stops pointing at an entity (reports last targeted entity, max 20 blocks).
- Variables:
- `$$entity_key`
- `$$distance_to_player`
- `$$entity_pos_x`
- `$$entity_pos_y`
- `$$entity_pos_z`
- `$$entity_uuid`
## On Entity Spawned
- **Requires FancyMenu on the server.** Fires when any entity spawns anywhere on the connected world/server.
- Variables:
- `$$entity_key`
- `$$distance_to_player` – −1 if other dimension
- `$$entity_pos_x`
- `$$entity_pos_y`
- `$$entity_pos_z`
- `$$entity_uuid`
- `$$dimension_key`
- `$$is_same_dimension_as_player`
## On Entity Died
- **Requires FancyMenu on the server.** Fires when any entity dies on the connected world/server.
- Variables:
- `$$entity_key`
- `$$distance_to_player` – −1 if other dimension
- `$$death_pos_x`
- `$$death_pos_y`
- `$$death_pos_z`
- `$$entity_uuid`
- `$$dimension_key`
- `$$damage_type`
- `$$is_same_dimension_as_player`
- `$$entity_killed_by_name`
- `$$entity_killed_by_key`
- `$$entity_killed_by_uuid`
## On Entity Starts Being In Sight
- Fires when an entity first becomes visible within 200 blocks.
- Variables:
- `$$entity_key`
- `$$distance_to_player`
- `$$entity_pos_x`
- `$$entity_pos_y`
- `$$entity_pos_z`
- `$$entity_uuid`
## On Entity Stops Being In Sight
- Fires when a previously visible entity leaves view or moves beyond 200 blocks.
- Variables:
- `$$entity_key`
- `$$distance_to_player`
- `$$entity_pos_x`
- `$$entity_pos_y`
- `$$entity_pos_z`
- `$$entity_uuid`
## On Interacted With Entity
- Fires when the player successfully interacts with an entity.
- Variables:
- `$$entity_key`
- `$$entity_pos_x`
- `$$entity_pos_y`
- `$$entity_pos_z`
- `$$entity_uuid`
## On Entity Mounted
- Fires when the player begins riding an entity.
- Variables:
- `$$entity_key`
- `$$entity_pos_x`
- `$$entity_pos_y`
- `$$entity_pos_z`
- `$$entity_uuid`
## On Entity Unmounted
- Fires when the player stops riding their current entity.
- Variables:
- `$$entity_key`
- `$$entity_pos_x`
- `$$entity_pos_y`
- `$$entity_pos_z`
- `$$entity_uuid`
## On Block Broke
- Fires when the player breaks a block.
- Variables:
- `$$block_key`
- `$$broke_with_item_key` – tool used or EMPTY
- `$$block_pos_x`
- `$$block_pos_y`
- `$$block_pos_z`
## On Block Placed
- Fires when the player places a block.
- Variables:
- `$$block_key`
- `$$block_pos_x`
- `$$block_pos_y`
- `$$block_pos_z`
## On Interacted With Block
- Fires when the player successfully interacts with a block.
- Variables:
- `$$block_key`
- `$$block_pos_x`
- `$$block_pos_y`
- `$$block_pos_z`
## On Stepping On Block
- Fires when the player steps onto a block.
- Variables:
- `$$block_key`
- `$$block_pos_x`
- `$$block_pos_y`
- `$$block_pos_z`
## On Enter Biome
- Fires when the player enters a new biome.
- Variables:
- `$$biome_key` – entered biome
## On Leave Biome
- Fires when the player leaves their current biome.
- Variables:
- `$$biome_key` – biome just left
## On Enter Structure
- **Requires FancyMenu on the server.** Coarse structure-area detection; can trigger near/above/below the structure.
- Variables:
- `$$structure_key` – entered structure
## On Leave Structure
- **Requires FancyMenu on the server.** Coarse detection; can trigger near the structure footprint.
- Variables:
- `$$structure_key` – structure just left
## On Enter Structure (High Precision)
- **Requires FancyMenu on the server.** Fires when the player steps into a structure’s bounding boxes.
- Variables:
- `$$structure_key`
## On Leave Structure (High Precision)
- **Requires FancyMenu on the server.** Fires after the player exits a structure’s bounding boxes.
- Variables:
- `$$structure_key`
## On Dimension Entered
- Fires when the player enters a new dimension.
- Variables:
- `$$dimension_key` – entered dimension
## On Start Swimming
- Fires when the player starts swimming.
- Variables:
- `$$fluid_type` – fluid resource location
## On Stop Swimming
- Fires when the player stops swimming.
- Variables:
- `$$fluid_type` – fluid where swimming stopped
## On Start Touching Fluid
- Fires when the player starts touching a fluid.
- Variables:
- `$$fluid_type` – touched fluid
## On Stop Touching Fluid
- Fires when the player stops touching a fluid.
- Variables:
- `$$fluid_type` – fluid no longer touched
## On Music Track Started
- Fires when a new music track begins.
- Variables:
- `$$track_resource_location` – audio file
- `$$track_display_name` – human-readable name or UNKNOWN
- `$$track_artist` – artist or UNKNOWN
- `$$track_duration_ms` – milliseconds (0 if unknown)
## On Music Track Stopped
- Fires when the current music track ends or is replaced.
- Variables:
- `$$track_resource_location`
- `$$track_display_name`
- `$$track_artist`
- `$$track_duration_ms`
## On World Sound Triggered
- Fires when a positional world sound starts near the player.
- Variables:
- `$$sound_resource_location` – sound file
- `$$sound_display_name` – subtitle name when available
- `$$sound_origin_pos_x`
- `$$sound_origin_pos_y`
- `$$sound_origin_pos_z`
- `$$sound_origin_distance_to_player`
- `$$sound_origin_direction_from_player` – degrees 0–360 relative to facing
## On Weather Changed
- Fires when weather changes globally or locally (biome change or going indoors can retrigger).
- Variables:
- `$$weather_type` – clear/rain/thunder
- `$$weather_can_snow` – TRUE if snow renders
- `$$weather_can_rain` – TRUE if rain renders
## On Started Burning
- Fires when the player starts burning.
- Variables:
- (none)
## On Stopped Burning
- Fires when the player stops burning.
- Variables:
- (none)
## On Started Drowning
- Fires when the player begins taking drowning damage.
- Variables:
- (none)
## On Position Changed
- Fires whenever the player’s block position changes.
- Variables:
- `$$old_pos_x` – previous block X
- `$$old_pos_y` – previous block Y
- `$$old_pos_z` – previous block Z
- `$$new_pos_x` – new block X
- `$$new_pos_y` – new block Y
- `$$new_pos_z` – new block Z
## On Started Running
- Fires when the player starts sprinting.
- Variables:
- (none)
## On Stopped Running
- Fires when the player stops sprinting.
- Variables:
- (none)
## On Jump
- Fires whenever the player jumps.
- Variables:
- (none)
## On Server Joined
- Fires after successfully joining a multiplayer server.
- Variables:
- `$$server_ip` – joined server address
## On Server Left
- Fires after disconnecting from a multiplayer server.
- Variables:
- `$$server_ip` – left server address
## Singleplayer World Entered
- Fires after a singleplayer world finishes loading and control is returned.
- Variables:
- `$$world_name` – display name
- `$$world_save_path` – absolute save folder
- `$$world_difficulty` – difficulty key
- `$$world_cheats_allowed` – TRUE if cheats enabled
- `$$world_icon_path` – absolute icon path
- `$$world_is_first_join` – TRUE on very first visit
## Singleplayer World Left
- Fires after a singleplayer world closes and finishes saving.
- Variables:
- `$$world_name`
- `$$world_save_path`
- `$$world_difficulty`
- `$$world_cheats_allowed`
- `$$world_icon_path`
## On Other Player Joined World/Server
- Fires when another player joins the current world/server.
- Variables:
- `$$player_name` – name of joining player
- `$$player_uuid` – UUID
## On Other Player Left World/Server
- Fires when another player leaves the current world/server.
- Variables:
- `$$player_name`
- `$$player_uuid`
## On Other Player Died
- Fires when another player in the current world dies.
- Variables:
- `$$player_name`
- `$$player_uuid`
- `$$death_pos_x`
- `$$death_pos_y`
- `$$death_pos_z`
## On Item Picked Up
- Fires when the player picks up an item entity.
- Variables:
- `$$item_key` – picked-up item resource location
## On Item Dropped
- Fires when the player drops an item from their inventory.
- Variables:
- `$$item_key` – dropped item resource location
## On Item Consumed
- Fires when the player finishes consuming an item.
- Variables:
- `$$item_key` – consumed item
## On Item Hovered in Inventory
- Fires when the user hovers an item in any inventory screen.
- Variables:
- `$$item_key` – hovered item resource location
- `$$item_display_name_string` – plain text item display name
- `$$item_display_name_json` – JSON component item display name
## On Item Used
- Fires when the player uses an item.
- Variables:
- `$$item_key` – used item
- `$$used_on_type` – block/entity/self/none
- `$$used_on_entity_key` – target entity type or empty
- `$$used_on_block_key` – target block or empty
- `$$target_pos_x` – target X or -1
- `$$target_pos_y` – target Y or -1
- `$$target_pos_z` – target Z or -1
## On Item Broke
- Fires when an item in the player’s inventory breaks.
- Variables:
- `$$item_key` – broken item
- `$$item_type` – tool/armor/other
================== END PAGE: https://docs.fancymenu.net/docs/listeners ==================
================== BEGIN PAGE: https://docs.fancymenu.net/docs/loading-screen ==================
---
title: Loading Screen
description: How to edit Minecraft's game loading screen (aka. splash screen).
published: true
date: 2025-04-14T20:15:15.383Z
tags:
editor: markdown
dateCreated: 2025-04-14T20:15:12.882Z
---
FancyMenu does not directly support Minecraft's game loading screen (aka. splash screen), but you can use **[Drippy Loading Screen](https://www.curseforge.com/minecraft/mc-mods/drippy-loading-screen)** for this, which is an **addon** for FancyMenu!
================== END PAGE: https://docs.fancymenu.net/docs/loading-screen ==================
================== BEGIN PAGE: https://docs.fancymenu.net/docs/localization ==================
---
title: Localizing Layouts
description: How to localize layout content.
published: true
date: 2025-06-16T21:58:07.153Z
tags:
editor: markdown
dateCreated: 2025-04-14T20:15:16.589Z
---
# Localizing Layouts
FancyMenu lets you localize text content and even whole elements or layouts!
# Text Content
FancyMenu allows you to add your own localizations to the game.
These can then be used with the **Localize Text** placeholder to localize text to the current game language.
## Using Vanilla Minecraft Localization Keys
Before creating custom localizations, you might want to use existing Minecraft localization keys. This saves time and ensures consistency with vanilla Minecraft text.
### Finding Vanilla Localization Keys
The easiest way to find Minecraft's localization keys is to browse the game's asset files online:
1. **Visit MCAsset.cloud:**
Go to [https://mcasset.cloud/](https://mcasset.cloud/) - this website allows you to browse Minecraft's assets without extracting them from the game.
2. **Navigate to Language Files:**
- Select your Minecraft version from the dropdown
- Navigate to: `assets` → `minecraft` → `lang`
- Open `en_us.json` to see all English localizations
3. **Find the Key You Need:**
- Use your browser's search function (Ctrl+F or Cmd+F) to find specific text
- The format is `"key": "text"` - the first part in quotes before the colon (`:`) is the key
- For example: `"menu.singleplayer": "Singleplayer"` - the key is `menu.singleplayer`
### Using Mod Localization Keys
If you have other mods installed, you can also use their localization keys:
1. Check the mod's documentation for available keys
2. Browse the mod's language files if they're open source
## Custom Localization Files
Localization files are text files with all the text content that should be available in multiple languages. Each translatable text has a unique key, so Minecraft can find the correct translatable text in the localization files.
- **Default File (en_us.json):**
English (US). This file is used when no other language file is chosen. It acts as the backup language file.
- **Other Language Files:**
For example, you can create a German file called `de_de.json` for players who use German.
### How to Create a Custom Localization File
You always need an `en_us.json` file! Without it, the game has no fallback when stuff goes wrong or an unsupported language is set.
1. **Open a Text Editor:**
Use Notepad (Windows), TextEdit (Mac), or any simple text editor.
2. **Write Your JSON Code:**
Create your file with your custom keys. A key is a unique name that Minecraft uses to find the text. For example:
```json
{
"modpack_name.custom.localization.key": "Your custom text here",
"modpack_name.another.key": "Another message"
}
```
3. **Save the File:**
Save the file as `en_us.json` for the default English text.
If you now want to add translated versions, like German, copy the content from the `en_us.json` file to the new file and only translate the actual text, NOT the keys! Keys need to stay the same, so the game can still find the text.
For German, you would then save the file as `de_de.json`. For other languages, please check [this Minecraft wiki page](https://minecraft.wiki/w/Language) for the correct language code for your language and name the file after it. Search for the **"in-game locale code"** for your language.
## Creating a Minecraft Resource Pack for MC 1.21.4
Now that your localization files are ready, we need a way to load them in Minecraft. For that, we will use a resource pack. We will make the pack to be enabled by default and we can even hide it if we don't want modpack users to mess with it.
A **resource pack** is a ZIP file that holds files that change the game's look and feel.
### Steps to Create Your Resource Pack
1. **Make a New Folder:**
Create a folder named something like `my_custom_pack` where you will add your custom localization files.
2. **Create the Pack File (`pack.mcmeta`):**
Inside your folder, create a file called `pack.mcmeta` with the following content:
```json
{
"pack": {
"pack_format": 16,
"description": "My Custom Pack with Localizations"
}
}
```
*Note: `pack_format` 16 is for Minecraft 1.21.4.*
3. **Add Your Localization Files:**
Inside your resource pack folder, create the following folder structure:
```
my_custom_pack/
├── assets/
│ └── minecraft/
│ └── lang/
│ ├── en_us.json
│ └── de_de.json
└── pack.mcmeta
```
Place your custom `en_us.json` (and any other language files like `de_de.json`) in the `lang` folder.
4. **ZIP the Resource Pack:**
Once your folder is ready, **compress the entire folder into a ZIP file**. Name the ZIP file **my_custom_pack.zip**. This is the example name used throughout the guide.
## Where to Place the Resource Pack
Place your **my_custom_pack.zip** file in the **Minecraft Resourcepacks folder**. This folder is usually located at:
- **Windows:** `%appdata%\.minecraft\resourcepacks`
- **Mac:** `~/Library/Application Support/minecraft/resourcepacks`
- **Linux:** `~/.minecraft/resourcepacks`
> For modpacks, the `resourcepacks` folder is in your pack's instance directory.
{.is-warning}
## Auto-Loading the Pack with "Resource Pack Overrides"
The **Resource Pack Overrides** mod makes it possible enable resource packs by default.
### Steps to Auto-Load Your Pack
1. **Install the Mod:**
Download and install the mod from [CurseForge](https://www.curseforge.com/minecraft/mc-mods/resource-pack-overrides) or [Modrinth](https://modrinth.com/mod/resource-pack-overrides).
2. **Locate the Config File:**
Find the file at `.minecraft/config/resourcepackoverrides.json`.
*If the file does not exist, create it manually.*
3. **Edit the Config File:**
Open the file and add your resource pack to the `default_packs` list using its file name:
```json
{
"schema_version": 2,
"default_packs": [
"file/my_custom_pack.zip"
]
}
```
This tells Minecraft to load your resource pack automatically when you start the game.
**It's important to add the `file/` prefix!**
*Note: The resource packs in the list are applied in reverse order. That means the pack at the top of the list will appear below the others in the game's resource pack menu.*
## Hiding the Resource Pack in the Selection Screen
You can hide your resource pack so players do not see it in the resource pack selection screen.
### How to Hide It
1. **Edit the Config File Again:**
In the same file `.minecraft/config/resourcepackoverrides.json`, add an override for your pack:
```json
{
"schema_version": 2,
"default_packs": [
"file/my_custom_pack.zip"
],
"pack_overrides": {
"file/my_custom_pack.zip": {
"hidden": true
}
}
}
```
This configuration will hide **my_custom_pack.zip** from the selection screen while still loading it automatically.
## Using Your New Localization Keys with FancyMenu
Now that your custom localization files are loaded, you can use your new keys in FancyMenu layouts.
1. **Edit a Text-Based Element:**
Open FancyMenu and choose an element like a Button or Text element.
2. **Click on the Placeholders Button:**
Look for the Placeholders button at the top-right of the text editor. (If you don't see it, the element might not support placeholders.)
3. **Insert the Localize Text Placeholder:**
The Localize Text placeholder appears as a JSON snippet. It looks like this:
```json
{"placeholder":"local","values":{"key":"localization.key"}}
```
Replace `localization.key` with your own custom key. For example, if you want to use your key from the localization file, change it to:
```json
{"placeholder":"local","values":{"key":"modpack_name.custom.localization.key"}}
```
Well, and that's basically it! The placeholder should get replaced with the actual localized content when not editing it in the text editor.
Keep in mind that the placeholder will always localize the text content to the current game language.
# Non-Text Content (Images, etc.)
FancyMenu also allows you to localize images and basically every element you want.
To do this, you will need to use **loading requirements**.
The **Is Game Language** requirement to be more specific.
The **Is Game Language** requirement allows you to show elements or layouts only if a specific game language is set, so you can, for example, make two Image elements that contains text and localize that image to a version with Japanese text when the language is set to Japanese or a version with English text, if the language is set to English.
To set loading requirements to an **element**, right-click it and click on **Loading Requirements**.
To set loading requirements to **whole layouts**, right-click the layout editor background and click on **Loading Requirements [Layout-Wide]**.
================== END PAGE: https://docs.fancymenu.net/docs/localization ==================
================== BEGIN PAGE: https://docs.fancymenu.net/docs/menu-backgrounds ==================
---
title: Menu Backgrounds
description: How to set custom menu backgrounds (images, animations) for screens.
published: true
date: 2026-05-03T11:01:52.000Z
tags:
editor: markdown
dateCreated: 2025-06-10T00:20:13.298Z
---
# Menu Backgrounds
FancyMenu lets you set custom backgrounds for menus. You can use images, animated textures, slideshows, cubic panoramas, colors, browsers, videos, GLSL shaders and more.
# Setting a Background
In FancyMenu 3.9.0+, menu background customization happens directly from the layout editor context menu:
1. Open the layout editor.
2. Right-click the editor background.
3. Open **Menu Backgrounds**.
4. Enable and configure the background type(s) you want.
Common background types include:
- Vanilla
- Image
- Slideshow
- Cubic Panorama
- Color (HEX)
- Browser
- Video
- GLSL Shader
- Video [MCEF] (deprecated)
- and more..
The old **Video [MCEF]** background type is deprecated in FancyMenu 3.9.0. Use the new native **Video** background powered by Watermedia V3 for new layouts.
# Removing the Custom Background
Open **Menu Backgrounds** again and disable/remove the custom background type you no longer want. If no custom background type is active, the screen will fall back to its normal vanilla background behavior.
# Stacking Backgrounds
FancyMenu 3.9.0 allows multiple menu background types to be enabled in the same layout. Active backgrounds are rendered as a stack, so you can combine a base image or panorama with translucent overlays, browser layers, shader layers, parallax layers and other effects.
If you also have multiple layouts active, their background stacks can combine too. To sort layouts and make them show up in a specific order, right-click the editor background and click on **Layout Index**.
# Transparent Backgrounds
Since there is nothing behind backgrounds, it is not possible to make the background at the very bottom transparent, because that would result in graphical glitches, but it is absolutely possible to use transparency for stacked background setups, as long as the bottom one stays as full opacity. That way you can have translucent background layers on top of the bottom one.
To make a background image translucent, use an image editor of your choice.
# Browser Backgrounds
The **Browser** background type works like the Browser element, but fills the whole screen and is auto-focused. This is useful for fullscreen web content, local HTML pages, or web-video layers.
# GLSL Shader Backgrounds
The **GLSL Shader** background type renders custom GLSL shaders and supports Shadertoy-style shader authoring. See the [GLSL Shader API](/glsl-shader-api) page for supported uniforms and shader structure.
================== END PAGE: https://docs.fancymenu.net/docs/menu-backgrounds ==================
================== BEGIN PAGE: https://docs.fancymenu.net/docs/minecraft-options ==================
---
title: Set/Get Minecraft Options
description: How to set and get Minecraft options like volume, FOV, render distance, etc.
published: true
date: 2025-05-10T02:07:08.261Z
tags:
editor: markdown
dateCreated: 2025-05-07T04:47:56.021Z
---
# Working with Minecraft Options in FancyMenu
FancyMenu allows you to get and set Minecraft game settings (options) using different UI elements. This guide will show you how to use buttons, sliders, and tickers to work with Minecraft options in your custom menu layouts.
# Understanding Minecraft Options
Minecraft has many built-in options that control everything from graphics settings to sound volume. FancyMenu lets you access these options by their names.
Some common option names include:
- `soundCategory_master` - Main volume
- `soundCategory_music` - Music volume
- `soundCategory_ambient` - Ambient sounds volume
- `soundCategory_players` - Player sounds volume
- `soundCategory_blocks` - Block sounds volume
- `fov` - Field of view
- `gamma` - Brightness
- `renderDistance` - Render distance
# Displaying Option Values
You can display the current value of any Minecraft option using a special placeholder.
The placeholder looks like this:
```
{"placeholder":"minecraft_option_value","values":{"name":"option_name"}}
```
Replace `option_name` with the actual option name you want to display.
# Setting Options with Buttons
Buttons can be used to set specific values to Minecraft options.
## How to set up a button:
1. Create a new Button element
2. Set the button label (what appears on the button)
3. Add an action: Right-click on the button → Edit Action Script → Add Action → Set Minecraft Option Value
4. In the "Set Minecraft Option Value" window:
- Name: Enter the option name (like `renderDistance`)
- Value: Enter the value to set (like `16`)
## Example:
Creating a button that sets render distance to 16 chunks:
- Option Name: `renderDistance`
- Value: `16`
- Label: "Set Render Distance to 16 chunks"
# Setting Options with Sliders
Sliders are perfect for options with a range of values, like volume settings or brightness.
## How to set up a slider:
1. Create a new Slider element
2. Set the slider type:
- For whole numbers (like render distance): Choose "Integer Range"
- For decimal numbers (like volume): Choose "Decimal Range"
3. Set minimum and maximum values
4. Add an action to set the Minecraft option:
- Right-click → Edit Action Script → Add Action → Set Minecraft Option Value
- Name: The option name
- Value: `$$value` (this special variable contains the current slider value)
5. Set the pre-selected value to the current option value:
- Set "Pre-Selected Value" to `{"placeholder":"minecraft_option_value","values":{"name":"option_name"}}`
## Example slider label formats:
To show the current option value in the slider label, use:
```
Volume: {"placeholder":"minecraft_option_value","values":{"name":"soundCategory_master"}}
```
To show a percentage (useful for volume):
```
Volume: {"placeholder":"calc","values":{"expression":"$$value * 100.0","decimal":"false"}}%
```
# Setting Options with Tickers
Tickers are invisible elements that can change options automatically on a schedule.
## How to set up a ticker:
1. Create a new Ticker element
2. Configure the tick settings:
- Tick Mode: Choose when the option should update
- Tick Delay: Set how often it updates (in milliseconds)
3. Add the action to set a Minecraft option:
- Right-click → Edit Action Script → Add Action → Set Minecraft Option Value
- Set the option name and value
## Example:
Setting gamma (brightness) to maximum when the menu loads:
- Tick Mode: On Load Screen
- Name: `gamma`
- Value: `1.0`
# Common Use Cases
Here are some common cases for what you can do when using FancyMenu to set and get Minecraft options.
## Creating Custom Volume Sliders
Volume sliders are a common use for the Minecraft option integration. Here's how to make a custom music volume slider:
1. Create a new Slider element
2. Set the "Slider Type" to "Decimal Range"
3. Set the "Minimum Range Value" to "0.0"
4. Set the "Maximum Range Value" to "1.0"
5. Edit Action Script → Add Action → Set Minecraft Option Value
- Set Name to `soundCategory_music`
- Set Value to `$$value`
6. Set "Pre-Selected Value" to `{"placeholder":"minecraft_option_value","values":{"name":"soundCategory_music"}}`
7. To display the volume as a percentage, set the label to:
```
Music: {"placeholder":"calc","values":{"expression":"$$value * 100.0","decimal":"false"}}%
```
You can create similar sliders for other sound categories:
- Master Volume: `soundCategory_master`
- Music: `soundCategory_music`
- Ambient: `soundCategory_ambient`
- Blocks: `soundCategory_blocks`
- Players: `soundCategory_players`
- Weather: `soundCategory_weather`
## Creating a Custom FOV Slider
Field of View (FOV) is an important graphics setting that determines how wide your view is in the game. The FOV option internally uses values from -1.0 to 1.0, but displays as 30 to 110 in the UI.
### Understanding the FOV Value Mapping
- Internal value range: -1.0 to 1.0
- Display value range: 30 to 110
- Mapping formula: `(internal_value + 1) * 40 + 30`
### Step 1: Create a Ticker Element to Update FOV Text
First, we need a ticker that will check the current FOV value and set a variable with the appropriate description:
1. Create a new Ticker element
2. Set the "Tick Mode" to "Normal" (so it updates constantly)
3. Set the "Tick Delay" to around "10" (milliseconds) to avoid excessive checks
Now we need to set up actions for the FOV labels. Here's what your action script structure should look like:
```
▶ Action Script
│
├─▶ IF (mapped FOV = 70)
│ └─■ Set Variable Value: fov_text:Normal
│
├─▶ ELSE-IF (mapped FOV = 110)
│ └─■ Set Variable Value: fov_text:Quake Pro
│
└─▶ ELSE
└─■ Set Variable Value: fov_text:[calculated numeric value]
```
Let's set up each part:
#### Set up the "Normal" FOV Label:
1. Right-click → Edit Action Script → Add Action
2. Click "IF Statement" to add a conditional block
3. Set the requirement to "Is Number" with:
- Compare Mode: "equals"
- Number: `{"placeholder":"calc","values":{"decimal":"false","expression":"({"placeholder":"minecraft_option_value","values":{"name":"fov"}} + 1) * 40 + 30"}}`
- Compare With: "70"
4. Inside this IF block, add "Set Variable Value (FM Variable)" action with:
- Value: `fov_text:Normal`
#### Set up the "Quake Pro" FOV Label:
1. Inside the Action Script, add "ELSE-IF Statement"
2. Set the requirement to "Is Number" with:
- Compare Mode: "equals"
- Number: `{"placeholder":"calc","values":{"decimal":"false","expression":"({"placeholder":"minecraft_option_value","values":{"name":"fov"}} + 1) * 40 + 30"}}`
- Compare With: "110"
3. Inside this ELSE-IF block, add "Set Variable Value (FM Variable)" action with:
- Value: `fov_text:Quake Pro`
#### Set up the Numeric FOV Label:
1. Add an "ELSE Statement" block
2. Inside this ELSE block, add "Set Variable Value (FM Variable)" action with:
- Value: `fov_text:{"placeholder":"calc","values":{"decimal":"false","expression":"({"placeholder":"minecraft_option_value","values":{"name":"fov"}} + 1) * 40 + 30"}}`
### Step 2: Create the FOV Slider
1. Create a new Slider element
2. Set the "Slider Type" to "Decimal Range"
3. Set the "Minimum Range Value" to "-1.0"
4. Set the "Maximum Range Value" to "1.0"
5. Edit Action Script → Add Action → Set Minecraft Option Value
- Set Name to `fov`
- Set Value to `$$value`
6. Set "Pre-Selected Value" to `{"placeholder":"minecraft_option_value","values":{"name":"fov"}}`
### Step 3: Set the Slider Label
Set the slider label to simply display the FOV text variable:
```
FOV: {"placeholder":"getvariable","values":{"name":"fov_text"}}
```
This label will show:
- "FOV: Normal" when the value is 70
- "FOV: Quake Pro" when the value is 110
- "FOV: 85" (or any other number) for all other values
### Tips for FOV Sliders
- The internal slider value range is -1.0 to 1.0, which needs to be mapped to 30 to 110 for display
- The conversion formula is: `(internal_value + 1) * 40 + 30`
- Only two values have special labels: 70 (Normal) and 110 (Quake Pro)
- The default FOV in Minecraft is 70 (which corresponds to internal value 0.0)
- The `fov_text` variable automatically contains either the special label or the numeric value
## Displaying Option Values in Text Elements
You can also display current option values in Text elements:
1. Create a Text element
2. For the text content, use the placeholder: `{"placeholder":"minecraft_option_value","values":{"name":"option_name"}}`
For example, to show the current render distance:
```
Current render distance: {"placeholder":"minecraft_option_value","values":{"name":"renderDistance"}} chunks
```
# Finding Option Names
You can find the names of all available options by:
1. Creating a button
2. Right-clicking it
3. Clicking "Edit Action Script"
4. Adding "Set Minecraft Option Value" action
5. When editing the action's value, look at the dropdown suggestions when you start typing in the "Name" field
# Important Tips
- **Valid Values**: Not all options accept all values. For example:
- Volume options accept values from 0.0 to 1.0
- Render distance typically accepts whole numbers from 2 to 32
- Boolean options (true/false) like `pauseOnLostFocus` accept "true" or "false"
- **Testing**: Always test your settings to make sure they work as expected!
- **Visual Feedback**: Give users visual feedback about the current value using the placeholders described above.
================== END PAGE: https://docs.fancymenu.net/docs/minecraft-options ==================
================== BEGIN PAGE: https://docs.fancymenu.net/docs/modified-fancymenu ==================
---
title: Modified FancyMenu Found
description: What to do when getting the "Modified FancyMenu JAR Found" error.
published: true
date: 2025-06-25T20:07:55.920Z
tags:
editor: markdown
dateCreated: 2025-06-25T20:07:53.523Z
---
# Modified FancyMenu JAR Found
If you got that error, it's probably due to a broken Minecraft instance, broken mod loader or a bad mod launcher.
It normally shows when FancyMenu got modified, but it can also show if your game fails to correctly load mods like it's supposed to.
This can be due to your **Minecraft instance being broken** in some way, which should make your **reinstall your game**.
Another possible cause for the error is when your **game semi-crashes** on launch because some mods (including FancyMenu) **failed to load properly**. In that case please post your `/logs/latest.log` file in the Discord server or open an issue on GitHub.
The error can also be triggered due to **using a bad mod launcher** (most cracked/pirate launchers trigger the bug, so please buy the game). Recommended launchers that are stable and work great with FancyMenu are the **official CurseForge launcher and the official Modrinth launcher**.

================== END PAGE: https://docs.fancymenu.net/docs/modified-fancymenu ==================
================== BEGIN PAGE: https://docs.fancymenu.net/docs/modpacks ==================
---
title: Modpacks
description: How to include layouts in a modpack.
published: true
date: 2025-05-07T05:11:28.393Z
tags:
editor: markdown
dateCreated: 2025-04-14T20:15:20.891Z
---
# FancyMenu in Modpacks
Including your FancyMenu setup in a modpack is very easy and only takes some simple steps.
> This page is **ONLY** for FancyMenu setups made completely in **FancyMenu v3+**, so if you use a legacy setup (made in v2 and converted to v3), some steps could be different.
{.is-warning}
# Including the FancyMenu Setup in Your Modpack
The main thing you need to do is copy one special folder that FancyMenu uses to save all your designs.
## What you'll need to find
1. **Your "Minecraft Instance" Folder:** This is the main folder on your computer where all the files for a specific Minecraft setup (like the one where you designed your menus) are stored. Launchers like CurseForge and Modrinth call these "instances" or "profiles."
2. **The `config` Folder:** Inside your Minecraft instance folder, there's usually a folder named `config`. This is where many mods store their settings.
3. **The `fancymenu` Folder:** Inside that `config` folder, FancyMenu creates its own folder called `fancymenu`. This is the golden folder we need!
## How to Find the Instance Save Location
### If you use the CurseForge App
1. Open CurseForge.
2. Find your Minecraft profile/instance in the list and open it.
3. Click the three dots.
4. Choose "Open Folder." This will open the main folder for that Minecraft instance.
### If you use the Modrinth App
1. Open the Modrinth App.
2. Find your Minecraft profile/instance in the list and open it.
3. Click the three dots.
4. Choose "Open Folder." This will open the main folder for that Minecraft instance.
### For other launchers
Look for a similar "Open Folder," "Open Instance Folder," or "View Files" option for your specific Minecraft setup.
## Copying the FancyMenu Setup
1. Navigate to the `config` folder of your MODPACK instance (the one you want to copy your setup to).
2. If there is a `fancymenu` folder inside, DELETE it.
3. Open the `config` folder of the SOURCE instance (the one you want to use the setup from).
4. Copy the `fancymenu` folder inside the `config` folder of your SOURCE instance to the `config` folder of your MODPACK instance.
5. Done. That's it. Restart your modpack instance now and you should see the setup load.
> Please keep in mind that old legacy setups made in FancyMenu v2 (even if converted to v3) allowed you to store layout assets outside FancyMenu's `/config/fancymenu/assets/` folder, so in that case you need to make sure you also include all of your assets in the modpack.
{.is-danger}
# Disabling the Menu Bar and Hotkeys
You surely don't want to keep FancyMenu's menu bar visible in your modpack, so you should disable it. But since people can still press the hotkey to make it visible again, let's do something a little bit more *aggressive*.
Navigate to `/config/fancymenu/options.txt` and open the file in a text editor.
Now set `modpack_mode` to `true` and save the file.
This will completely disable all overlays and hotkeys.
To be able to edit your layouts again, set the config option back to `false`.
# Disabling the Welcome Screen
This shouldn't be needed in most cases, but if you didn't close the Welcome screen yet (the screen that tells you to read the documentation), make sure to set `show_welcome_screen` to `false` in `/config/fancymenu/options.txt`.
The screen only shows once and disables itself when clicking on the **Open Documentation** button, so again, doing this manually shouldn't be needed in most cases.
================== END PAGE: https://docs.fancymenu.net/docs/modpacks ==================
================== BEGIN PAGE: https://docs.fancymenu.net/docs/nbt-data-placeholder ==================
---
title: NBT Data Placeholder
description: How to use the NBT Data placeholder.
published: true
date: 2025-11-23T10:15:53.194Z
tags:
editor: markdown
dateCreated: 2025-06-30T21:10:15.683Z
---
# Getting NBT Data
These placeholders are available in FancyMenu v3.8.0+.
The **Client NBT Data Get** and **Server NBT Data Get** placeholders allows you to retrieve NBT (Named Binary Tag) data from entities and blocks in Minecraft, similar to the `/data get` command. This is extremely useful for creating dynamic layouts that respond to game state, player stats, or world conditions.
> This placeholder is particularly powerful for modded gameplay, as it can access custom NBT data that mods add to entities and players. Whether you're playing with magic mods that add mana systems, RPG mods with custom stats, or technology mods with energy values, you can display these modded values in your UI layouts.
{.is-info}
## Overview
These placeholders extracts specific values from NBT data structures using NBT paths. You can retrieve player health, hunger, inventory items, block states, modded attributes like mana or energy, and much more.
The client-side version of the placeholder has the big advantage that it works purely client-side, so you don't need FancyMenu on the server, but this also makes it a lot more limited, because not everything related to NBT data is visible to all clients all the time.
The server-side version requires FancyMenu to be installed on the server, but this gives it **full support** for basically **everything** that is stored as NBT.
This page will focus on the client-side version (`nbt_data_get`), but everything works very similar for the server-side version (`nbt_data_get_server`) too.
## Placeholder Syntax
```
{"placeholder":"nbt_data_get","values":{"source_type":"entity","entity_selector":"@s","nbt_path":"Health"}}
```
## Required Values
| Value | Description | Options |
|-------|-------------|---------|
| `source_type` | The type of data source | `entity` or `block` |
| `nbt_path` | The NBT path to query | e.g. `Health`, `foodLevel`, `Pos[0]`, `Inventory[0].id` |
## Conditional Values
Depending on your `source_type`, you'll need one of these:
| Value | Required When | Description | Format |
|-------|--------------|-------------|--------|
| `entity_selector` | source_type is `entity` | Selects which entity to query | `@s` (self), `@p` (nearest player), `@e` (nearest entity), UUID, or entity name |
| `block_pos` | source_type is `block` | The block's coordinates | `x y z` (e.g. `100 64 -200`) |
## Optional Values
| Value | Description | Default | Options |
|-------|-------------|---------|---------|
| `scale` | Scale factor for numeric values | `1.0` | Any decimal number |
| `return_type` | How to format the returned data | `value` | `value` (numeric/size), `string` (text), `snbt` (formatted NBT), `json` (JSON format) |
## Return Types Explained
- **`value`** - Returns numeric values or sizes (default)
- For numbers: returns the number (optionally scaled)
- For strings: returns the string length
- For lists/arrays: returns the item count
- For compounds: returns the number of tags
- **`string`** - Returns the actual string value of the NBT data
- **`snbt`** - Returns the data in SNBT (Stringified NBT) format
- **`json`** - Returns the data in JSON format (only for compound tags)
## Examples
### Get Player Health
```json
{"placeholder":"nbt_data_get","values":{"source_type":"entity","entity_selector":"@s","nbt_path":"Health"}}
```
### Get Player Hunger Level
```json
{"placeholder":"nbt_data_get","values":{"source_type":"entity","entity_selector":"@s","nbt_path":"foodLevel"}}
```
### Get Player X Coordinate
```json
{"placeholder":"nbt_data_get","values":{"source_type":"entity","entity_selector":"@s","nbt_path":"Pos[0]"}}
```
### Get Item in First Hotbar Slot
```json
{"placeholder":"nbt_data_get","values":{"source_type":"entity","entity_selector":"@s","nbt_path":"Inventory[{Slot:0b}].id","return_type":"string"}}
```
### Get Block Data at Specific Position
```json
{"placeholder":"nbt_data_get","values":{"source_type":"block","block_pos":"100 64 -200","nbt_path":"Items[0].Count"}}
```
### Get Scaled Health Percentage (Health * 5)
```json
{"placeholder":"nbt_data_get","values":{"source_type":"entity","entity_selector":"@s","nbt_path":"Health","scale":"5"}}
```
## Finding Available NBT Paths
### Method 1: Using `/data get` Command (Recommended)
The easiest way to discover available NBT paths is to use the `/data get` command in-game without specifying a path:
1. **For entities:** `/data get entity @p`
2. **For blocks:** `/data get block `
This will display all available NBT data for that target, showing you the exact paths you can use.
#### Understanding the Output
When you run `/data get entity @p`, you'll see output similar to this:
```
Player616 has the following entity data: {Brain: {memories: {}},
HurtByTimestamp: 0, SleepTimer: 0s, Invulnerable: 0b, FallFlying:
0b, PortalCooldown: 0, AbsorptionAmount: 0.0f, abilities:
{invulnerable: 1b, mayfly: 1b, instabuild: 1b, walkSpeed: 0.1f,
mayBuild: 1b, flying: 1b, flySpeed: 0.05f}, FallDistance: 0.0f,
recipeBook: {recipes: ["minecraft:crafting_table"]},
DeathTime: 0s, XpSeed: -380875747, XpTotal: 0, UUID: [I; 1379890089, -1732753738,
-2135065633, -718799804], playerGameType: 1, seenCredits:
0b, Motion: [0.0d, 0.0d, 0.0d], Health: 20.0f, foodSaturationLevel:
5.0f, ...}
```
To extract a valid path from this output:
1. **Simple values** - Use the key name directly:
- `Health: 20.0f` → Path: `Health`
- Example: `{"placeholder":"nbt_data_get","values":{"source_type":"entity","entity_selector":"@s","nbt_path":"Health"}}`
2. **Nested values** - Use dot notation to access nested data:
- `abilities: {walkSpeed: 0.1f}` → Path: `abilities.walkSpeed`
- Example: `{"placeholder":"nbt_data_get","values":{"source_type":"entity","entity_selector":"@s","nbt_path":"abilities.walkSpeed"}}`
3. **Array values** - Use brackets with index numbers:
- `Motion: [0.0d, 0.0d, 0.0d]` → Path for Y motion: `Motion[1]`
- Example: `{"placeholder":"nbt_data_get","values":{"source_type":"entity","entity_selector":"@s","nbt_path":"Motion[1]"}}`
### Method 2: NBT Autocomplete Mod
For easier NBT path discovery, consider installing the **NBT Autocomplete** mod:
- Available for Fabric and Forge (Minecraft 1.21.x)
- Provides in-game autocomplete suggestions while typing commands
- Shows available tag names and types
- [Modrinth](https://modrinth.com/mod/nbt-autocomplete) | [CurseForge](https://www.curseforge.com/minecraft/mc-mods/nbt-autocomplete)
## Common NBT Paths
### Player Entity
- `Health` - Current health (float)
- `foodLevel` - Hunger level (int, 0-20)
- `foodSaturationLevel` - Saturation level (float)
- `XpLevel` - Experience level (int)
- `XpP` - Experience progress (float, 0.0-1.0)
- `Pos[0]`, `Pos[1]`, `Pos[2]` - X, Y, Z coordinates
- `Inventory` - Player inventory array
- `SelectedItemSlot` - Currently selected hotbar slot (int, 0-8)
### Common Block NBT
- `Items` - Container contents (chests, furnaces, etc.)
- `CustomName` - Custom name of the block
- `Lock` - Lock string for containers
### Common Modded NBT Examples
- **Magic mods**: Often store mana as `playerMana`, `mana.current`, or similar
- **Tech mods**: Energy values like `energy`, `forgeEnergy`, or `energyStorage.energy`
- **RPG mods**: Custom stats like `customStats.strength`, `rpgAttributes.level`
To find modded NBT paths, use `/data get entity @p` while the mod is active and look for the custom tags added by the mod.
## Limitations
- **No storage access on client** - Storage data source is not supported client-side (server-side only)
- **Performance** - Accessing NBT data frequently may impact performance
- Returns empty string if the path is invalid or data cannot be accessed
## Tips
1. Always test your NBT paths in-game first using `/data get`
2. Use the `scale` parameter to convert values to percentages or other useful formats
3. Remember that some NBT data may not be synchronized to the client
4. Entity selectors are limited to entities within render distance
5. For modded content, check the mod's documentation or use `/data get` to discover custom NBT paths
================== END PAGE: https://docs.fancymenu.net/docs/nbt-data-placeholder ==================
================== BEGIN PAGE: https://docs.fancymenu.net/docs/nine-slicing-and-tiling ==================
---
title: Nine-Slicing & Tiling
description: How to use nine-slicing and tiling in FancyMenu.
published: true
date: 2026-05-03T11:01:52.000Z
tags:
editor: markdown
dateCreated: 2025-05-07T00:48:22.581Z
---
# Nine-Slicing and Tiling
When you're designing cool menus in Minecraft with FancyMenu, you might want to use images that need to resize properly or repeat in patterns. This guide explains how to use **Nine-Slicing** and **Tiling** (also called repeating textures) to make your menus look awesome!
# What is Nine-Slicing?
Nine-slicing is a technique that lets you stretch an image to any size without making it look weird. It works by dividing your image into nine parts (like a tic-tac-toe board). The corners stay the same size, the edges stretch in one direction, and the middle stretches in both directions.
## Where can I use Nine-Slicing?
In FancyMenu, Nine-Slicing is available for:
- **Button Elements** (both custom buttons and when editing Vanilla buttons)
- **Progress Bar textures** (bar and background textures)
## How to Use Nine-Slicing with Buttons
1. **Create or select a Button Element** in your layout editor.
2. Right-click on the button and look for "Button Textures" option.
3. Set your button's background textures (normal, hover, inactive states).
4. Enable the "Nine-Slice Custom Background" option.
5. Set the **Nine-Slice Background X-Borders** (left and right border size).
6. Set the **Nine-Slice Background Y-Borders** (top and bottom border size).
### Tips for Button Nine-Slicing
- Use an image with clear borders and corners.
- The border values (X and Y) tell FancyMenu how many pixels from each edge should be treated as the border.
- A typical value might be 5 pixels for both X and Y borders.
- The corners will always stay the same size, while the middle parts will stretch to fill the button.
# What is Tiling?
Tiling (also called repeating textures) lets you fill a large area with a small image by repeating it like tiles on a floor. This is perfect for backgrounds or large images where you want a pattern to continue.
## Where can I use Tiling?
In FancyMenu, Tiling is available for:
- **Image Elements**
- **Image Menu Backgrounds**
## How to Use Tiling with Image Elements
1. **Create or select an Image Element** in your layout editor.
2. Right-click on the image and look for "Image Source" to set your texture.
3. Find and enable the **"Repeat Texture"** option.
4. Resize your image element to see the texture repeat to fill the space.
## How to Use Tiling with Menu Backgrounds
1. Open **Menu Backgrounds** from the layout editor background context menu.
2. Choose the **Image** background type.
3. Select your background image.
4. Enable the **"Repeat Texture"** option.
5. Your background will now repeat the texture to fill the entire screen.
# Creating Good Textures for Nine-Slicing and Tiling
## For Nine-Slicing:
- Create textures with distinct borders and corners.
- Make sure your borders are clear and have a consistent width.
- Test different border sizes to find what works best.
- Buttons usually work well with 3-5 pixel borders.
## For Tiling:
- Create seamless textures that can connect with themselves on all sides.
- Keep patterns simple to avoid visual confusion.
- Test your texture by repeating it in a small area first.
# Examples
## Nine-Sliced Button Example
A simple button might start as a 30x30 image with 5-pixel borders on all sides. When you make the button larger, the corners stay at 5x5 pixels, while the edges and center stretch to fit your button size.
## Tiled Background Example
A small 64x64 tile with a subtle pattern can be repeated to fill your entire menu background, no matter what the screen size is.
# Common Issues and Solutions
## My nine-sliced button looks stretched or distorted:
- Your border values may be too small or too large
- Try changing the border values to match your actual texture
## My tiled background has visible seams:
- Your texture isn't seamless
- Try editing your image to make sure the edges match perfectly
## My textures look blurry when scaled:
- Use higher resolution textures
- Keep your designs simple with clean lines
# Remember
- **Nine-Slicing** is perfect for UI elements that need to change size but keep their appearance (like buttons).
- **Tiling** is great for filling large areas with a pattern (like backgrounds).
- Both features help your UI look good at any resolution or screen size!
Now go create some amazing Minecraft menus with perfectly stretched buttons and beautiful tiled backgrounds!
================== END PAGE: https://docs.fancymenu.net/docs/nine-slicing-and-tiling ==================
================== BEGIN PAGE: https://docs.fancymenu.net/docs/opengui-command ==================
---
title: Open GUIs by Command
description: How to open Vanilla and Custom GUIs via command.
published: true
date: 2025-06-26T20:50:52.238Z
tags:
editor: markdown
dateCreated: 2025-04-14T20:15:25.104Z
---
# Opening GUIs by Command
FancyMenu comes with a command that lets you open Vanilla and Custom GUIs via command.
You can even remotely open GUIs for **other players** when installing FancyMenu on both **server and clients**.
To open a GUI, just use the command `/openguiscreen `.
Replace `` with the actual menu identifier of the GUI you want to open.
This can be the identifier of your Custom GUI (made with FancyMenu) or the normal menu identifier of a Vanilla/mod GUI.
To get the **menu identifier of Vanilla/mod GUIs**, open the menu you want to know the identifier of and enable FancyMenu's **debug overlay** via **Customization -> Debug Overlay**, then you can click on the identifier shown as first line to copy it to your clipboard.

Leave the `` argument empty to open the GUI for your client or choose a player (or multiple players) to open the GUI for.
Keep in mind that the other player needs to have FancyMenu installed on their client.
This command will not work for every screen, especially mod screens. If the command fails to open a screen, it will show an error. There is not much you can do in that case, because then it's probably a screen that is too complex to get opened automatically by FancyMenu.
I will also not manually add compatibility for mod screens anymore, because adding compatibility for all the mods out there would take me ages, sorry.
# Closing GUIs by Command
In the rare case you need it, there's also a `/closeguiscreen ` command that closes the current screen.
================== END PAGE: https://docs.fancymenu.net/docs/opengui-command ==================
================== BEGIN PAGE: https://docs.fancymenu.net/docs/optifine-alternatives ==================
---
title: OptiFine Alternatives
description: Alternatives to OptiFine.
published: true
date: 2025-04-14T20:15:32.016Z
tags:
editor: markdown
dateCreated: 2025-04-14T20:15:29.219Z
---
# OptiFine Alternatives
I do **_not_** officially support OptiFine.
It breaks like every mod and due to it being closed-source, it's extremely frustrating and time-consuming to fix bugs caused by it.
You should use Oculus/Iris and Rubidium/Sodium instead.
They are much more stable and don't break everything.
## Forge
- [Embeddium](https://www.curseforge.com/minecraft/mc-mods/embeddium) (Performance)
- [Oculus](https://www.curseforge.com/minecraft/mc-mods/oculus) (Shaders)
- [Capes](https://www.curseforge.com/minecraft/mc-mods/capes) (Lets you use OptiFine capes without having OptiFine installed)
- [Just Zoom](https://legacy.curseforge.com/minecraft/mc-mods/just-zoom-forge) (Lets you zoom by pressing a key, just like in OptiFine)
## Fabric
- [Sodium](https://www.curseforge.com/minecraft/mc-mods/sodium) (Performance)
- [Lithium](https://modrinth.com/mod/lithium) (More Performance)
- [Iris](https://www.curseforge.com/minecraft/mc-mods/irisshaders) (Shaders)
- [Capes](https://www.curseforge.com/minecraft/mc-mods/capes) (Lets you use OptiFine capes without having OptiFine installed)
- [Zoomify](https://www.curseforge.com/minecraft/mc-mods/zoomify) or [Just Zoom](https://legacy.curseforge.com/minecraft/mc-mods/just-zoom-forge) (Lets you zoom by pressing a key, just like in OptiFine)
- [CIT Resewn](https://www.curseforge.com/minecraft/mc-mods/cit-resewn) (Adds support for OptiFine resource packs without having OptiFine installed)
================== END PAGE: https://docs.fancymenu.net/docs/optifine-alternatives ==================
================== BEGIN PAGE: https://docs.fancymenu.net/docs/optimizing-textures ==================
---
title: Optimizing Textures
description: How to optimize textures for FancyMenu.
published: true
date: 2025-05-17T18:59:42.199Z
tags:
editor: markdown
dateCreated: 2025-05-17T18:59:39.559Z
---
# Optimizing Textures for FancyMenu
FancyMenu uses the textures you provide as-is, meaning it does **not** compress, downscale, or upscale your image files. To ensure your menus look sharp and perform well, it's important to optimize your textures when using them in your UI.
# Key Tips for Texture Optimization
The following tips are the most important basic steps you need to keep in mind when working with textures in FancyMenu.
## 1. Use the Right Resolution
- **Avoid low-res images**: If an image is too small and stretched to fit a larger area, it may appear blurry.
- **Avoid high-res overkill**: Very large textures displayed at a small size can also appear distorted or "weird" and may waste performance.
> 📌 **Tip:** Use textures at or near the resolution they will appear in the menu.
{.is-info}
## 2. Preserve Aspect Ratio
- Always maintain the image's aspect ratio when scaling.
- Stretching an image disproportionately can lead to visual artifacts and a poor appearance.
> 📌 **Tip:** You can right-click Image elements and click on **Restore Aspect Ratio** to resize them to their correct aspect ratio, then when you further resize them manually, hold **SHIFT** while resizing, to make the resizing respect the element's aspect ratio.
{.is-info}
## 3. Consider Nine-Slicing & Tiling
- For scalable UI elements (like panels or buttons), use FancyMenu’s [Nine-Slicing & Tiling](/nine-slicing-and-tiling) features.
- This ensures the edges of textures remain crisp when resized.
================== END PAGE: https://docs.fancymenu.net/docs/optimizing-textures ==================
================== BEGIN PAGE: https://docs.fancymenu.net/docs/panoramas ==================
---
title: Panoramas
description: How to make and use custom background panoramas.
published: true
date: 2025-04-14T20:15:36.113Z
tags:
editor: markdown
dateCreated: 2025-04-14T20:15:33.094Z
---
# Cubic Panoramas
FancyMenu supports loading custom 6-image panorama cubes as background for menus.
These panoramas are a special cubic panorama format used by Minecraft as background in the Title screen and is built out of 6 images (sides) that get rendered as cube (or skybox, to be more specific).
> **IMPORTANT**: If you're on Windows, don't forget to turn on [file extensions](https://cdn.discordapp.com/attachments/795308330746511390/801561308012347482/unknown.png), because otherwise you will not be able to see important parts of file names later!
{.is-warning}
# Making a Panorama
If you don't know how Minecraft handles their background panoramas and how to create these, you should check out [this video](https://www.youtube.com/watch?v=F7jMd3zsjZQ&t).
It will give you a very good understanding of how Minecraft's panoramas work and how to make one!
After watching the video, you will notice that creating these panoramas can be a bit time-consuming.
To save you some time, maybe think about using a mod that creates them for you.
You can find some of them by searching for `minecraft panorama mod`, but one of them is [Panoramica](https://www.curseforge.com/minecraft/mc-mods/panoramica) (made by me).
# Preparing the Panorama
After you got your 6 panorama images, you'll need to move them to the right place!
FancyMenu's panorama directory is located at `.minecraft/config/fancymenu/panoramas`.
This is the directory for all panoramas that you want to use in the mod.
## The Panorama Folder
Every panorama has its own folder.
You will need to create a new folder in `.minecraft/config/fancymenu/panoramas` if you want to add a new panorama.
In my example, I will name the folder `mypanorama`.

## Folder Content
After creating the folder, you will need to fill it.
### Properties File
Every panorama needs a properties file to work.
This file always needs to be named `properties.txt` and needs some important things written to it.
The content of a panorama properties file should always look like this:
```
type = panorama
panorama-meta {
name = name_of_your_panorama
speed = 1.0
fov = 85.0
angle = 25.0
start_rotation = 0
}
```
Only the variables inside the `panorama-meta` section can be changed!
#### name
This has to be the **unique** name of your panorama.
It's not possible to load two panoramas with the same name!
You will use this name later to identify your panorama.
#### speed
The speed at which your panorama rotates.
This value is a speed multiplicator. For example, `1.0` is default speed, `2.0` doubles the speed and `0.5` will half it.
Negative values are not supported, use decimal values to slow the speed.
#### fov
The field of view.
The default FOV is `85.0`.
Using too big or small values here will break the panorama. Just play around with it to find the FOV you want.
#### angle
The vertical angle at which the panorama is viewed.
The default angle is `25.0`.
#### start_rotation
The rotation angle (horizontal) at which the panorama should start. Value between 0 and 360.
### Panorama Image Folder
The second mandatory thing your panorama folder needs is the actual image folder containing your panorama images.
This folder's name needs to be `panorama`.
Put all your panorama images in it, but don't forget to name them correctly like shown in the [video](https://www.youtube.com/watch?v=F7jMd3zsjZQ&t) above!

> Only PNGs are supported as panorama images!
{.is-warning}
### Panorama Overlay
The last step is **optional** and can be skipped if you don't want an overlay over your panorama.
If you want to add a vignette or other types of overlays to your panorama, you can add one named 'overlay.png'.
Keep in mind that only PNG is supported for the overlay and that the file name always needs to be 'overlay.png'!
### Checking Everything Again
You should now have a folder located at `.minecraft/config/fancymenu/panoramas`, containing a `properties.txt` file, another folder named `panorama` and maybe an overlay named `overlay.png`.

# Using the Panorama
After (re)starting the game or reloading FancyMenu via **Customization -> Reload FancyMenu**, you should now be able to set your panorama as menu background. To do this, right-click the layout editor background and click on **Menu Background**.
================== END PAGE: https://docs.fancymenu.net/docs/panoramas ==================
================== BEGIN PAGE: https://docs.fancymenu.net/docs/parallax ==================
---
title: Parallax Effect
description: How to apply a parallax effect to menu background and elements.
published: true
date: 2026-05-03T11:01:52.000Z
tags:
editor: markdown
dateCreated: 2025-05-07T00:04:35.161Z
---
# What is the Parallax Effect?
The parallax effect is a cool visual trick that makes your menu backgrounds and elements appear to have depth. When you move your mouse cursor, elements with parallax enabled will move slightly, creating an illusion of 3D space in your 2D menu.
Think of it like when you're riding in a car - things that are closer to you (like road signs) seem to move faster than distant things (like mountains). In FancyMenu, this same idea creates a more dynamic and interactive experience.
# Where Can You Use Parallax in FancyMenu?
In FancyMenu, you can use the parallax effect in two main places:
1. **Menu Backgrounds**: Make your entire menu background move slightly with your mouse cursor
2. **Elements**: Make individual elements (like images, buttons, or text) move independently
# How to Use Parallax for Menu Backgrounds
Adding a parallax effect to your menu background is super easy:
1. Open the menu editor by pressing **CTRL+ALT+C** to show the menu bar, then go to **Customization**
2. Create a new layout or edit an existing one
3. Click on **Layout → Properties**
4. Open **Menu Backgrounds**
5. Choose **Image** as your background type
6. Configure your image background:
- Choose an image (local or from the web)
- Enable **Parallax Effect** by clicking the toggle button
- Set the **Parallax Effect Intensity X** and **Parallax Effect Intensity Y** (between 0.0 and 1.0)
- Optionally enable **Invert Parallax Movement** to change the direction
> **Tip**: The higher the intensity value, the more your background will move. FancyMenu 3.9.0 lets you set X and Y intensity separately, so you can make movement stronger horizontally than vertically, or the other way around.
{.is-info}
# How to Use Parallax for Individual Elements
You can also add parallax to individual elements to create layered effects:
1. Select any element in the editor by clicking on it
2. Right-click the element to open the context menu
3. Scroll down and find **Parallax Effect: Enabled/Disabled**
4. Toggle it to **Enabled**
5. Adjust the **Parallax Intensity X** and **Parallax Intensity Y** values (between 0.0 and 1.0)
6. Optionally enable **Invert Parallax** to change movement direction
# Tips for Creating Amazing Parallax Effects
## Layer Your Elements
Create depth by using different parallax intensity values for different elements. You can tune X and Y separately:
- **Background**: Lower intensity (0.1-0.3)
- **Middle layer elements**: Medium intensity (0.3-0.6)
- **Foreground elements**: Higher intensity (0.6-0.9)
This creates a convincing 3D effect as you move your mouse!
## Combine Normal and Inverted Parallax
Try setting some elements to **Invert Parallax Movement: Enabled** and others to **Disabled**. This makes elements move in opposite directions, enhancing the depth effect.
## Don't Overdo It
Too much movement can be distracting. Use parallax effect sparingly, especially with high intensity values.
# Troubleshooting
## Parallax Not Working?
1. Make sure you've enabled the parallax effect
2. Check that your parallax intensity isn't set to 0
4. Confirm that the "Slide Wide Images From Left To Right" option is disabled (this option conflicts with parallax)
## Parallax Movement Too Fast/Slow?
Adjust the **Parallax Intensity X/Y** values:
- Lower values (closer to 0) = slower, more subtle movement
- Higher values (closer to 1) = faster, more dramatic movement
# Final Thoughts
The parallax effect is a wonderful way to make your Minecraft menus feel more alive and interactive. Experiment with different combinations of background and element parallax to create stunning, dynamic layouts that respond to your mouse movements!
Remember, the best effects are often subtle - a little movement goes a long way in creating an immersive experience.
================== END PAGE: https://docs.fancymenu.net/docs/parallax ==================
================== BEGIN PAGE: https://docs.fancymenu.net/docs/placeholders ==================
---
title: Placeholders
description: How to use placeholders.
published: true
date: 2026-05-03T11:01:52.000Z
tags:
editor: markdown
dateCreated: 2025-04-14T20:15:37.364Z
---
# Placeholders
Placeholders are dynamic values that get replaced with actual content when they are used. In FancyMenu, placeholders allow you to insert dynamic content into various elements like text, buttons, and loading requirements. Think of them as variables that get evaluated and replaced with their actual values when your layouts are displayed.
# General Information
## Basic Syntax
Placeholders in FancyMenu use a JSON-like syntax:
```
{"placeholder":"modversion","values":{"modid":"fancymenu"}}
```
For example, to display the player's name:
```
{"placeholder":"playername"}
```
## Nesting Placeholders
One of the most powerful features of FancyMenu's placeholder system is the ability to nest placeholders within other placeholders. This means you can use the output of one placeholder as an input for another.
Example of nested placeholders:
```
{"placeholder":"calc","values":{"decimal":"true","expression":"{"placeholder":"maxram"} / 1024"}}
```
This example takes the maximum RAM value and divides it by 1024 to convert it from MB to GB.
# Using Placeholders
Most elements that have text inputs support placeholders. You can see if a text input supports placeholders when editing it. If the full-screen **text editor** opens when editing the text, it supports placeholders.
To find a **list of all placeholders**, just click on the **Placeholders** button in the **top-right corner** of the **text editor**.
There is a **search bar** at the top of the placeholders list that lets you search for placeholders.
Clicking on a placeholder in the placeholder list will paste it to the text content.
# Placeholders In Detail
This list contains most, if not all, placeholders available in FancyMenu. The list can sometimes be a bit outdated due to updates of the mod.
> FancyMenu 3.9.0 removed the old scoreboard/player-tag placeholders because they did not work reliably. They are no longer documented as active placeholders.
{.is-warning}
## Player Name (playername)
Returns the current player's username.
```
{"placeholder":"playername"}
```
Example output: `Steve`
## Player UUID (playeruuid)
Returns the player's unique identifier.
```
{"placeholder":"playeruuid"}
```
Example output: `c8cde7fe-7ced-11eb-9439-0242ac130002`
## Minecraft Version (mcversion)
Returns the current Minecraft version.
```
{"placeholder":"mcversion"}
```
Example output: `1.19.2`
## Mod Loader Version (loaderver)
Returns the version of the mod loader (Forge/Fabric).
```
{"placeholder":"loaderver"}
```
Example output: `43.2.0`
## Mod Loader Name (loadername)
Returns the name of the mod loader.
```
{"placeholder":"loadername"}
```
Example output: `Forge`
## Mod Version (modversion)
Returns the version of a specific mod.
```
{"placeholder":"modversion","values":{"modid":"fancymenu"}}
```
Example output: `2.14.9`
## Total Mods Count (totalmods)
Returns the total number of mods installed.
```
{"placeholder":"totalmods"}
```
Example output: `45`
## Active Mods Count (loadedmods)
Returns the number of currently loaded mods.
```
{"placeholder":"loadedmods"}
```
Example output: `43`
## World Loading Progress (world_load_progress)
Returns the current world loading progress as a percentage.
```
{"placeholder":"world_load_progress"}
```
Example output: `75`
## Minecraft Option Value (minecraft_option_value)
Returns the value of a Minecraft option.
```
{"placeholder":"minecraft_option_value","values":{"name":"fov"}}
```
Example output: `70`
## Last World or Server (last_world_server)
Returns information about the last world or server accessed.
```
{"placeholder":"last_world_server","values":{"type":"both","full_world_path":"true"}}
```
Parameters:
- `type`: Determines what type of information to return
- `"both"`: Returns the last accessed world or server (default)
- `"server"`: Only returns if the last accessed was a server
- `"world"`: Only returns if the last accessed was a world
- `full_world_path`: Controls how world paths are displayed
- `"true"`: Returns the full world path (default)
- `"false"`: Returns only the world name without path (does not affect servers)
Examples:
- Server: `mc.hypixel.net`
- World with full path: `saves/New World`
- World without full path: `New World`
## Screen Width (guiwidth)
Returns the current screen width.
```
{"placeholder":"guiwidth"}
```
Example output: `1920`
## Screen Height (guiheight)
Returns the current screen height.
```
{"placeholder":"guiheight"}
```
Example output: `1080`
## Current Screen Identifier (screenid)
Returns the identifier of the current screen.
```
{"placeholder":"screenid"}
```
Example output: `title_screen`
## Element Width (elementwidth)
Returns the width of a specific element.
```
{"placeholder":"elementwidth","values":{"id":"my_button"}}
```
Example output: `200`
## Element Height (elementheight)
Returns the height of a specific element.
```
{"placeholder":"elementheight","values":{"id":"my_button"}}
```
Example output: `20`
## Element X Position (elementposx)
Returns the X position of a specific element.
```
{"placeholder":"elementposx","values":{"id":"my_button"}}
```
Example output: `150`
## Element Y Position (elementposy)
Returns the Y position of a specific element.
```
{"placeholder":"elementposy","values":{"id":"my_button"}}
```
Example output: `100`
## Mouse X Position (mouseposx)
Returns the current X position of the mouse.
```
{"placeholder":"mouseposx"}
```
Example output: `960`
## Mouse Y Position (mouseposy)
Returns the current Y position of the mouse.
```
{"placeholder":"mouseposy"}
```
Example output: `540`
## Clicks Per Second (clicks_per_second)
Returns the current clicks per second for a mouse button.
```
{"placeholder":"clicks_per_second","values":{"mouse_button":"left"}}
```
Parameters:
- `mouse_button`: `left` or `right`
Example output: `8`
## GUI Scale (guiscale)
Returns the current GUI scale.
```
{"placeholder":"guiscale"}
```
Example output: `2`
## Vanilla Widget Label/Text (vanillabuttonlabel)
Returns the label/text of a vanilla widget/button.
```
{"placeholder":"vanillabuttonlabel","values":{"locator":"some.menu.identifier:505280"}}
```
Example output: `Options...`
## Text Input Field Value (text_input_field_value)
Returns the current value of a custom or vanilla text input field by element identifier.
```
{"placeholder":"text_input_field_value","values":{"element_identifier":"my_input"}}
```
Example output: `Hello World`
## Current Player Health (current_player_health)
Returns the player's current health points.
```
{"placeholder":"current_player_health"}
```
Example output: `20.0`
## Max Player Health (max_player_health)
Returns the player's maximum health points.
```
{"placeholder":"max_player_health"}
```
Example output: `20.0`
## Current Player Health (Percent) (current_player_health_percent)
Returns the player's health as a percentage.
```
{"placeholder":"current_player_health_percent"}
```
Example output: `100`
## Current Player Absorption Health (current_player_absorption_health)
Returns the player's absorption health points (golden hearts).
```
{"placeholder":"current_player_absorption_health"}
```
Example output: `4.0`
## Max Player Absorption Health (max_player_absorption_health)
Returns the maximum absorption health.
```
{"placeholder":"max_player_absorption_health"}
```
Example output: `4.0`
## Current Player Absorption Health (Percent) (current_player_absorption_health_percent)
Returns the player's absorption health as a percentage.
```
{"placeholder":"current_player_absorption_health_percent"}
```
Example output: `100`
## Current Player Food Level (current_player_hunger)
Returns the player's current hunger level.
```
{"placeholder":"current_player_hunger"}
```
Example output: `20`
## Max Player Food Level (max_player_hunger)
Returns the maximum hunger level.
```
{"placeholder":"max_player_hunger"}
```
Example output: `20`
## Current Player Food Level (Percent) (current_player_hunger_percent)
Returns the player's hunger as a percentage.
```
{"placeholder":"current_player_hunger_percent"}
```
Example output: `100`
## Current Player Hunger Saturation (current_player_hunger_saturation)
Returns the player's current hunger saturation value.
```
{"placeholder":"current_player_hunger_saturation"}
```
Example output: `5.0`
## Current Player Armor (current_player_armor)
Returns the player's current armor value.
```
{"placeholder":"current_player_armor"}
```
Example output: `20`
## Player Armor Toughness (player_armor_toughness)
Returns the player's total armor toughness value.
```
{"placeholder":"player_armor_toughness"}
```
Example output: `8.0`
## Max Player Armor (max_player_armor)
Returns the maximum armor value.
```
{"placeholder":"max_player_armor"}
```
Example output: `20`
## Current Player Armor (Percent) (current_player_armor_percent)
Returns the player's armor as a percentage.
```
{"placeholder":"current_player_armor_percent"}
```
Example output: `100`
## Current Player Oxygen Level (current_player_oxygen)
Returns the player's current oxygen level (air bubbles).
```
{"placeholder":"current_player_oxygen"}
```
Example output: `300`
## Max Player Oxygen Level (max_player_oxygen)
Returns the maximum oxygen level.
```
{"placeholder":"max_player_oxygen"}
```
Example output: `300`
## Current Player Oxygen Level (Percent) (current_player_oxygen_percent)
Returns the player's oxygen level as a percentage.
```
{"placeholder":"current_player_oxygen_percent"}
```
Example output: `100`
## Current Player Level (current_player_level)
Returns the player's current experience level.
```
{"placeholder":"current_player_level"}
```
Example output: `30`
## Current Player Experience (current_player_exp)
Returns the player's total experience points.
```
{"placeholder":"current_player_exp"}
```
Example output: `1250`
## Player Experience Progress (Percent) (current_player_exp_progress)
Returns the player's experience progress to the next level as a percentage.
```
{"placeholder":"current_player_exp_progress"}
```
Example output: `75`
## Player Attack Strength (Percent) (player_attack_strength)
Returns the player's attack cooldown as a percentage.
```
{"placeholder":"player_attack_strength"}
```
Example output: `100`
## Player Game Mode (player_gamemode)
Returns the player's current game mode.
```
{"placeholder":"player_gamemode"}
```
Example output: `survival`
## Player View Direction (player_view_direction)
Returns the direction the player is facing.
```
{"placeholder":"player_view_direction"}
```
Example output: `north`
## Player X Coordinate (player_x_coordinate)
Returns the player's X position in the world.
```
{"placeholder":"player_x_coordinate"}
```
Example output: `125`
## Player Y Coordinate (player_y_coordinate)
Returns the player's Y position in the world.
```
{"placeholder":"player_y_coordinate"}
```
Example output: `64`
## Player Z Coordinate (player_z_coordinate)
Returns the player's Z position in the world.
```
{"placeholder":"player_z_coordinate"}
```
Example output: `-250`
## Current Mount Health (current_mount_health)
Returns the current health of the entity the player is riding.
```
{"placeholder":"current_mount_health"}
```
Example output: `30.0`
## Max Mount Health (max_mount_health)
Returns the maximum health of the entity the player is riding.
```
{"placeholder":"max_mount_health"}
```
Example output: `30.0`
## Current Mount Health (Percent) (current_mount_health_percent)
Returns the mount's health as a percentage.
```
{"placeholder":"current_mount_health_percent"}
```
Example output: `100`
## Current Mount Jump Meter (Percent) (current_mount_jump_meter)
Returns the mount's jump power meter value.
```
{"placeholder":"current_mount_jump_meter"}
```
Example output: `75`
## Current Boss Health (Percent) (current_boss_health)
Returns the health of the active boss.
```
{"placeholder":"current_boss_health"}
```
Example output: `150.0`
## Boss Name (boss_name)
Returns the name of the active boss.
```
{"placeholder":"boss_name","values":{"boss_index":"0","as_json":"false"}}
```
Example output: `Ender Dragon`
## Bosses Count (boss_count)
Returns the number of active bosses.
```
{"placeholder":"boss_count"}
```
Example output: `1`
## Active Effects Count (effects_count)
Returns the number of active potion effects.
```
{"placeholder":"effects_count"}
```
Example output: `3`
## Active Effect (active_effect)
Returns information about a specific active effect.
```
{"placeholder":"active_effect","values":{"effect_index":"0"}}
```
Example output: `minecraft:speed`
## Selected Hotbar Slot (active_hotbar_slot)
Returns the currently selected hotbar slot (0-8).
```
{"placeholder":"active_hotbar_slot"}
```
Example output: `4`
## Slot Item (slot_item)
Returns information about an item in a specific inventory slot.
```
{"placeholder":"slot_item","values":{"slot":"0"}}
```
Example output: `minecraft:diamond_sword`
## Slot Item Count (slot_item_count)
Returns the stack size of the item in a specific player inventory slot.
```
{"placeholder":"slot_item_count","values":{"slot":"0"}}
```
Example output: `64`
## Slot Item Durability (slot_item_durability)
Returns durability information for the item in a specific player inventory slot.
```
{"placeholder":"slot_item_durability","values":{"slot":"0","format":"percentage"}}
```
Parameters:
- `slot`: Player inventory slot number.
- `format`: `current`, `remaining`, `max`, `damage`, `percentage`, or `percent`.
Example output: `87`
## Slot Item Display Name (slot_item_display_name_fm)
Returns the display name of the item in a specific slot as a JSON text component. In spectator mode, hotbar slots can resolve spectator menu item names unless `ignore_spectator` is `true`.
```
{"placeholder":"slot_item_display_name_fm","values":{"slot":"0","ignore_spectator":"false"}}
```
Example output: `{"text":"Diamond Sword","color":"aqua"}`
## Inventory Item Count (inventory_item_count)
Returns the total count of an item type in the player inventory. If `item` is empty, it counts all item stacks in the inventory.
```
{"placeholder":"inventory_item_count","values":{"item":"minecraft:diamond"}}
```
Example output: `12`
## Inventory Slot Food Point Restore Amount (inventory_slot_food_point_restore_amount)
Returns the hunger points restored by the food item in the given player inventory slot.
```
{"placeholder":"inventory_slot_food_point_restore_amount","values":{"slot":"0"}}
```
Example output: `4.0`
## Hovered Inventory Item (hovered_inventory_item)
Returns the item key of the item currently hovered in an inventory screen.
```
{"placeholder":"hovered_inventory_item"}
```
Example output: `minecraft:apple`
## World Game Time (game_time)
Returns the current in-game time tick counter.
```
{"placeholder":"game_time"}
```
Example output: `18000`
## World Day Time (world_daytime)
Returns the current world day time.
```
{"placeholder":"world_daytime"}
```
Example output: `13000`
## World Day Time Hour (world_daytime_hour)
Returns the hour component of world time. By default this uses 24-hour format; set `twelve_hour_format` to `"true"` for 12-hour format.
```
{"placeholder":"world_daytime_hour","values":{"twelve_hour_format":"false"}}
```
Example output: `12`
## World Day Time Minute (world_daytime_minute)
Returns the minute component of world time (00-59).
```
{"placeholder":"world_daytime_minute"}
```
Example output: `30`
## World Difficulty (world_difficulty)
Returns the current world difficulty.
```
{"placeholder":"world_difficulty"}
```
Example output: `normal`
## Current World Seed (current_world_seed)
Returns the seed of the current singleplayer world. Returns an empty value when the seed is not available.
```
{"placeholder":"current_world_seed"}
```
Example output: `123456789`
## Current Biome (current_biome)
Returns the biome the player is currently in. Set `as_key` to `"false"` to return a translated/display name where available.
```
{"placeholder":"current_biome","values":{"as_key":"true"}}
```
Example output: `minecraft:plains`
## Current Dimension (current_dimension)
Returns the dimension the player is currently in. Set `as_key` to `"false"` to return a translated/display name where available.
```
{"placeholder":"current_dimension","values":{"as_key":"true"}}
```
Example output: `minecraft:overworld`
## Gamerule Value (gamerule_value)
Returns the current value of a gamerule in the loaded world/server. Server worlds require FancyMenu on the server.
```
{"placeholder":"gamerule_value","values":{"name":"doDaylightCycle"}}
```
Example output: `true`
## Item Category (item_category)
Returns the creative tab category of an item. Set `as_key` to `"true"` to return the category key instead of the display name.
```
{"placeholder":"item_category","values":{"item":"minecraft:diamond_sword","as_key":"false"}}
```
Example output: `Combat`
## Current HUD Title/Subtitle (current_title)
Returns the currently displayed title text.
```
{"placeholder":"current_title","values":{"is_subtitle":"false","as_json":"false"}}
```
Example output: `Game Over!`
## Action Bar Message (action_bar_message_fm)
Returns the current vanilla action bar message above the hotbar.
```
{"placeholder":"action_bar_message_fm"}
```
Example output: `You may not rest now`
## Action Bar Message Time (action_bar_message_time_fm)
Returns how many ticks the current vanilla action bar message will still be shown.
```
{"placeholder":"action_bar_message_time_fm"}
```
Example output: `42`
## Camera Rotation X (camera_rotation_x_fm)
Returns the current camera pitch in degrees.
```
{"placeholder":"camera_rotation_x_fm"}
```
Example output: `12.5`
## Camera Rotation Y (camera_rotation_y_fm)
Returns the current camera yaw in degrees.
```
{"placeholder":"camera_rotation_y_fm"}
```
Example output: `-90.0`
## Camera Rotation Delta X (camera_rotation_delta_x_fm)
Returns the per-tick change in camera pitch.
```
{"placeholder":"camera_rotation_delta_x_fm"}
```
Example output: `0.4`
## Camera Rotation Delta Y (camera_rotation_delta_y_fm)
Returns the per-tick change in camera yaw.
```
{"placeholder":"camera_rotation_delta_y_fm"}
```
Example output: `-1.2`
## Highlighted Item Time (highlighted_item_time_fm)
Returns how many ticks the highlighted item name will still be shown above the hotbar.
```
{"placeholder":"highlighted_item_time_fm"}
```
Example output: `30`
## Player Item Use Progress (player_item_use_progress_fm)
Returns the current item-use progress from `0.0` to `1.0`.
```
{"placeholder":"player_item_use_progress_fm"}
```
Example output: `0.65`
## Player Position Delta X (player_position_delta_x_fm)
Returns the per-tick change in player position on the X axis.
```
{"placeholder":"player_position_delta_x_fm"}
```
Example output: `0.0`
## Player Position Delta Y (player_position_delta_y_fm)
Returns the per-tick change in player position on the Y axis.
```
{"placeholder":"player_position_delta_y_fm"}
```
Example output: `-0.08`
## Player Position Delta Z (player_position_delta_z_fm)
Returns the per-tick change in player position on the Z axis.
```
{"placeholder":"player_position_delta_z_fm"}
```
Example output: `0.12`
## Current Server IP (current_server_ip)
Returns the IP of the connected server.
```
{"placeholder":"current_server_ip"}
```
Example output: `mc.hypixel.net`
## World Players List (world_players_list)
Returns a list of all players currently in the world.
```
{"placeholder":"world_players_list","values":{"separator":", "}}
```
Example output: `Steve, Alex, Notch`
## Server MOTD (servermotd)
Returns the Message of the Day of a server.
```
{"placeholder":"servermotd","values":{"ip":"mc.hypixel.net","line":"1"}}
```
Example output: `Welcome to Hypixel!`
## Server PING (serverping)
Returns the ping to a server in milliseconds.
```
{"placeholder":"serverping","values":{"ip":"mc.hypixel.net"}}
```
Example output: `54`
## Server Player Count (serverplayercount)
Returns the player count of a server.
```
{"placeholder":"serverplayercount","values":{"ip":"mc.hypixel.net"}}
```
Example output: `25000/30000`
## Server Status (serverstatus)
Returns the online/offline status of a server.
```
{"placeholder":"serverstatus","values":{"ip":"mc.hypixel.net"}}
```
Example output: `§aOnline` or `§cOffline`
## Server Version (serverversion)
Returns the Minecraft version of a server.
```
{"placeholder":"serverversion","values":{"ip":"mc.hypixel.net"}}
```
Example output: `1.19.2`
## Year (realtimeyear)
Returns the current year.
```
{"placeholder":"realtimeyear"}
```
Example output: `2024`
## Month (realtimemonth)
Returns the current month (01-12).
```
{"placeholder":"realtimemonth"}
```
Example output: `01`
## Day (realtimeday)
Returns the current day of the month (01-31).
```
{"placeholder":"realtimeday"}
```
Example output: `27`
## Hour (realtimehour)
Returns the current hour. By default this uses 24-hour format; set `twelve_hour_format` to `"true"` for 12-hour format.
```
{"placeholder":"realtimehour","values":{"twelve_hour_format":"false","timezone":"system"}}
```
Example output: `14`
## Minute (realtimeminute)
Returns the current minute (00-59).
```
{"placeholder":"realtimeminute"}
```
Example output: `30`
## Second (realtimesecond)
Returns the current second (00-59).
```
{"placeholder":"realtimesecond"}
```
Example output: `45`
## Current Time in Millis (Unix Timestamp) (unix_time)
Returns the current Unix timestamp in milliseconds.
```
{"placeholder":"unix_time"}
```
Example output: `1716552478123`
> Realtime placeholders (`realtimeyear`, `realtimemonth`, `realtimeday`, `realtimehour`, `realtimeminute`, `realtimesecond`, and `unix_time`) support a `timezone` value. Use normal Java time zone IDs like `UTC`, `Europe/Berlin`, or `America/New_York`; omit it or use `system` for the system timezone.
{.is-info}
## CPU Info (cpuinfo)
Returns information about the CPU.
```
{"placeholder":"cpuinfo"}
```
Example output: `Intel(R) Core(TM) i7-10700K CPU @ 3.80GHz`
## CPU Usage (JVM) (jvmcpu)
Returns the JVM's CPU usage as a percentage.
```
{"placeholder":"jvmcpu"}
```
Example output: `25.5`
## CPU Usage (OS) (oscpu)
Returns the OS CPU usage as a percentage.
```
{"placeholder":"oscpu"}
```
Example output: `42.8`
## GPU Info (gpuinfo)
Returns information about the GPU.
```
{"placeholder":"gpuinfo"}
```
Example output: `NVIDIA GeForce RTX 3080`
## Java Version (javaver)
Returns the Java version.
```
{"placeholder":"javaver"}
```
Example output: `17.0.2`
## Java Virtual Machine (jvmname)
Returns the name of the Java Virtual Machine.
```
{"placeholder":"jvmname"}
```
Example output: `OpenJDK 64-Bit Server VM`
## OpenGL Version (glver)
Returns the OpenGL version.
```
{"placeholder":"glver"}
```
Example output: `4.6.0 NVIDIA 516.94`
## Operating System Name (osname)
Returns the operating system name.
```
{"placeholder":"osname"}
```
Example output: `Windows 10`
## FPS (Frames Per Second) (fps)
Returns the current frames per second.
```
{"placeholder":"fps"}
```
Example output: `120`
## Used RAM in MB (usedram)
Returns the amount of RAM currently in use (MB).
```
{"placeholder":"usedram"}
```
Example output: `4096`
## Max RAM in MB (maxram)
Returns the maximum allocated RAM (MB).
```
{"placeholder":"maxram"}
```
Example output: `8192`
## Used RAM in %% (percentram)
Returns the percentage of RAM currently in use.
```
{"placeholder":"percentram"}
```
Example output: `50`
## Audio Element Volume (audio_element_vol)
Returns the volume of an audio element.
```
{"placeholder":"audio_element_vol","values":{"element_identifier":"background_music"}}
```
Example output: `0.5`
## Current Audio Track (audio_element_current_track)
Returns the track name of an audio element.
```
{"placeholder":"audio_element_current_track","values":{"element_identifier":"background_music","display_name_mappings":"track1.ogg=>Cool Track Name"}}
```
Example output: `Cool Track Name`
## Audio Duration (audio_duration)
Returns the total duration of an audio track in MM:SS format.
```
{"placeholder":"audio_duration","values":{"element_identifier":"background_music"}}
```
Example output: `03:45`
## Audio Play Time (audio_playtime)
Returns the current playtime of an audio track. Set `show_percentage` to `"true"` to get a 0-100 progress value instead of `MM:SS`.
```
{"placeholder":"audio_playtime","values":{"element_identifier":"background_music","show_percentage":"false"}}
```
Example output: `01:30` (or `45` when `show_percentage` is `"true"`)
## Audio Playing State (audio_playing_state)
Returns whether an audio element is playing (true/false).
```
{"placeholder":"audio_playing_state","values":{"element_identifier":"background_music"}}
```
Example output: `true`
## Video Element Volume (video_element_vol)
Returns the volume level of a video element (0.0 to 1.0).
```
{"placeholder":"video_element_vol","values":{"element_identifier":"my_video_element"}}
```
Example output: `0.5`
## Video Element Duration (video_element_duration)
Returns the total duration of a video element in `MM:SS` format. Set `output_as_timestamp` to `"true"` to return a millisecond timestamp.
```
{"placeholder":"video_element_duration","values":{"element_identifier":"my_video_element","output_as_timestamp":"false"}}
```
Example output: `02:00` (or `120000` when `output_as_timestamp` is `"true"`)
## Video Element Play Time (video_element_playtime)
Returns the current playback time (progress) of a video element in `MM:SS` format. Set `show_percentage` to `"true"` for a 0-100 progress value, or `output_as_timestamp` to `"true"` for milliseconds.
```
{"placeholder":"video_element_playtime","values":{"element_identifier":"my_video_element","show_percentage":"false","output_as_timestamp":"false"}}
```
Example output: `00:45` (or `38` as percentage, or `45200` as timestamp)
## Video Element Paused State (video_element_paused_state)
Returns whether a video element is paused (true/false).
```
{"placeholder":"video_element_paused_state","values":{"element_identifier":"my_video_element"}}
```
Example output: `false`
## Video Background Volume (video_background_vol)
Returns the volume level of a video menu background (0.0 to 1.0).
```
{"placeholder":"video_background_vol","values":{"background_identifier":"main_menu_video"}}
```
Example output: `0.7`
## Video Background Duration (video_background_duration)
Returns the total duration of a video menu background in `MM:SS` format. Set `output_as_timestamp` to `"true"` to return a millisecond timestamp.
```
{"placeholder":"video_background_duration","values":{"background_identifier":"main_menu_video","output_as_timestamp":"false"}}
```
Example output: `03:00` (or `180000` when `output_as_timestamp` is `"true"`)
## Video Background Play Time (video_background_playtime)
Returns the current playback time (progress) of a video menu background in `MM:SS` format. Set `show_percentage` to `"true"` for a 0-100 progress value, or `output_as_timestamp` to `"true"` for milliseconds.
```
{"placeholder":"video_background_playtime","values":{"background_identifier":"main_menu_video","show_percentage":"false","output_as_timestamp":"false"}}
```
Example output: `01:00` (or `33` as percentage, or `60500` as timestamp)
## Video Background Paused State (video_background_paused_state)
Returns whether a video menu background is paused (true/false).
```
{"placeholder":"video_background_paused_state","values":{"background_identifier":"main_menu_video"}}
```
Example output: `true`
## Calculator (calc)
The calculator placeholder is a powerful tool that allows you to perform mathematical calculations within your layouts. It supports a wide range of mathematical operations and can work with both decimal and integer numbers.
### Basic Syntax
```
{"placeholder":"calc","values":{"decimal":"true/false","expression":"your_expression"}}
```
The calculator has two main parameters:
- `decimal`: Determines whether the result should include decimal places (`true`) or be rounded to integers (`false`)
- `expression`: The mathematical expression to evaluate
### Supported Operations
The calculator supports these mathematical operations:
- Basic arithmetic: `+` (addition), `-` (subtraction), `*` (multiplication), `/` (division)
- Parentheses: `( )` for grouping operations
- Power: `^` for exponents
- Square root: `sqrt()`
- Trigonometric functions: `sin()`, `cos()`, `tan()`
- Mathematical constants: `pi`, `e`
- Absolute value: `abs()`
- Logarithms: `log()`, `ln()`
## Random Number (random_number)
Generates a random number within a specified range.
```
{"placeholder":"random_number","values":{"min":"1","max":"100"}}
```
Example output: `42`
## Max Number (maxnum)
Returns the larger of two numbers.
```
{"placeholder":"maxnum","values":{"first":"10","second":"20"}}
```
Example output: `20`
## Min Number (minnum)
Returns the smaller of two numbers.
```
{"placeholder":"minnum","values":{"first":"10","second":"20"}}
```
Example output: `10`
## Absolute Number (absnum)
Returns the absolute value of a number.
```
{"placeholder":"absnum","values":{"num":"-10.5"}}
```
Example output: `10.5`
## Negate Number (negnum)
Returns the negated value of a number.
```
{"placeholder":"negnum","values":{"num":"10.5"}}
```
Example output: `-10.5`
## *pi* (Math) (math_pi)
Returns the value of π.
```
{"placeholder":"math_pi"}
```
Example output: `3.141592653589793`
## Trigonometric Sine (Math) (math_sin)
Returns the sine of an angle.
```
{"placeholder":"math_sin","values":{"angle":"45"}}
```
Example output: `0.7071067811865476`
## Trigonometric Cosine (Math) (math_cos)
Returns the cosine of an angle.
```
{"placeholder":"math_cos","values":{"angle":"45"}}
```
Example output: `0.7071067811865476`
## Trigonometric Tangent (Math) (math_tan)
Returns the tangent of an angle.
```
{"placeholder":"math_tan","values":{"angle":"45"}}
```
Example output: `1.0`
## Floor (Math) (math_floor)
Rounds a number down to the nearest integer.
```
{"placeholder":"math_floor","values":{"num":"3.14"}}
```
Example output: `3`
## Ceiling (Math) (math_ceil)
Rounds a number up to the nearest integer.
```
{"placeholder":"math_ceil","values":{"num":"3.14"}}
```
Example output: `4`
## Round (Math) (math_round)
Rounds a number. By default it rounds to the nearest integer; set `decimals` to a non-negative number to round to that many decimal places.
```
{"placeholder":"math_round","values":{"num":"3.14159","decimals":"2"}}
```
Example output: `3.14` (with `decimals:-1` or omitted → `3`)
## Sign (Math) (math_sign)
Returns the sign of a number (1 for positive, -1 for negative, 0 for zero).
```
{"placeholder":"math_sign","values":{"num":"-3.14"}}
```
Example output: `-1`
## Hyperbolic Sine (Math) (math_sinh)
Returns the hyperbolic sine of an angle.
```
{"placeholder":"math_sinh","values":{"angle":"1"}}
```
Example output: `1.1752011936438014`
## Hyperbolic Cosine (Math) (math_cosh)
Returns the hyperbolic cosine of an angle.
```
{"placeholder":"math_cosh","values":{"angle":"1"}}
```
Example output: `1.5430806348152437`
## Hyperbolic Tangent (Math) (math_tanh)
Returns the hyperbolic tangent of an angle.
```
{"placeholder":"math_tanh","values":{"angle":"1"}}
```
Example output: `0.7615941559557649`
## Split Text (split_text)
Splits text using a specified delimiter.
```
{"placeholder":"split_text","values":{"input":"hello,world","regex":",","max_parts":"2","split_index":"1"}}
```
Example output: `world`
## Trim Text (trim_text)
Removes leading and trailing whitespace.
```
{"placeholder":"trim_text","values":{"text":" hello world "}}
```
Example output: `hello world`
## Crop Text (crop_text)
Removes characters from the start and end of text.
```
{"placeholder":"crop_text","values":{"text":"hello world","remove_from_start":"1","remove_from_end":"1"}}
```
Example output: `ello worl`
## Stringify (stringify)
Stringifies a text by escaping all syntax characters.
```
{"placeholder":"stringify","values":{"text":"text with {special} \"characters\""}}
```
Example output: `text with \{special\} \"characters\"`
## Localize Text (local)
Retrieves localized text for a key.
```
{"placeholder":"local","values":{"key":"menu.singleplayer"}}
```
Example output: `Singleplayer`
## Web Text (webtext)
Retrieves text content from a web URL.
```
{"placeholder":"webtext","values":{"link":"http://somewebsite.com/textfile.txt"}}
```
Example output: Text content from the URL
## Random Text (randomtext)
Returns a random line from a text file, URL, or direct plain text. The text changes at specified intervals.
```
{"placeholder":"randomtext","values":{"source":"/config/fancymenu/assets/","interval":"10"}}
```
Parameters:
- `source`: The source of the text lines (replaces the old `path` parameter)
- File path: `/config/fancymenu/assets/quotes.txt`
- URL: `https://example.com/quotes.txt`
- Plain text: `Line 1\nLine 2\nLine 3`
- `interval`: Time in seconds between text changes
The placeholder now supports three source types:
1. **Local files**: Text files from your game directory
```
{"placeholder":"randomtext","values":{"source":"/config/fancymenu/assets/quotes.txt","interval":"10"}}
```
2. **URLs**: Remote text files from the internet
```
{"placeholder":"randomtext","values":{"source":"https://example.com/quotes.txt","interval":"10"}}
```
3. **Plain text**: Direct text input with lines separated by `\n`
```
{"placeholder":"randomtext","values":{"source":"First line\nSecond line\nThird line","interval":"5"}}
```
Note: Old placeholders using `path` instead of `source` will continue to work.
## JSON Parser (json)
Parses JSON data from a file, URL, or direct JSON content and extracts values using JSON path expressions.
```
{"placeholder":"json","values":{"source":"path_or_link_or_json_content","json_path":"$.some.json.path"}}
```
Parameters:
- `source`: The source of the JSON data
- File path: `/config/fancymenu/assets/data.json`
- URL: `https://api.example.com/data.json`
- Direct JSON: `{"name":"Steve","level":42}`
- `json_path`: The JSON path expression to extract data
The placeholder now supports three source types:
1. **Local files**: JSON files from your game directory
```
{"placeholder":"json","values":{"source":"/config/fancymenu/assets/playerdata.json","json_path":"$.player.name"}}
```
2. **URLs**: Remote JSON data from APIs or web services
```
{"placeholder":"json","values":{"source":"https://api.minecraft.com/server/status","json_path":"$.online"}}
```
3. **Direct JSON**: Inline JSON content
```
{"placeholder":"json","values":{"source":"{"name":"Steve","score":42,"rank":"Diamond"}","json_path":"$.rank"}}
```
Example JSON paths:
- `$.name` - Gets the "name" field from root
- `$.player.level` - Gets nested "level" field inside "player"
- `$.items[0].id` - Gets the "id" of the first item in an array
- `$.scores.*` - Gets all values from the "scores" object
## Absolute File/Folder Path (absolute_path)
Returns the absolute path of a file.
```
{"placeholder":"absolute_path","values":{"short_path":"relative/path/to/file.txt"}}
```
Example output: `C:/Users/Username/AppData/Roaming/.minecraft/relative/path/to/file.txt`
## Text Character Count (text_character_count)
Returns the number of characters in the given text.
```
{"placeholder":"text_character_count","values":{"text":"Hello World!"}}
```
Example output: `12`
## Text Width (text_width)
Returns the width in pixels of the given text when rendered.
```
{"placeholder":"text_width","values":{"text":"Hello World!"}}
```
Example output: `66`
## Uppercase Text (uppercase_text)
Converts the input text to all uppercase letters.
```
{"placeholder":"uppercase_text","values":{"text":"Hello World"}}
```
Example output: `HELLO WORLD`
## Lowercase Text (lowercase_text)
Converts the input text to all lowercase letters.
```
{"placeholder":"lowercase_text","values":{"text":"Hello World"}}
```
Example output: `hello world`
## Title Case Text (title_case_text)
Converts the input text to title case.
```
{"placeholder":"title_case_text","values":{"text":"hello world"}}
```
Example output: `Hello World`
## Sentence Case Text (sentence_case_text)
Converts the input text to sentence case.
```
{"placeholder":"sentence_case_text","values":{"text":"hello world. this is fancymenu!"}}
```
Example output: `Hello world. This is fancymenu!`
## Snake Case Text (snake_case_text)
Converts the input text to `snake_case`.
```
{"placeholder":"snake_case_text","values":{"text":"Hello World"}}
```
Example output: `hello_world`
## Kebab Case Text (kebab_case_text)
Converts the input text to `kebab-case`.
```
{"placeholder":"kebab_case_text","values":{"text":"Hello World"}}
```
Example output: `hello-world`
## Alternating Case Text (alternating_case_text)
Converts the input text to alternating case.
```
{"placeholder":"alternating_case_text","values":{"text":"alternating case"}}
```
Example output: `aLtErNaTiNg CaSe`
## Toggle Case Text (toggle_case_text)
Toggles the case of every letter in the input text.
```
{"placeholder":"toggle_case_text","values":{"text":"Toggle Case"}}
```
Example output: `tOGGLE cASE`
## Encode To Base64 (base64_encode)
Encodes the given text as Base64.
```
{"placeholder":"base64_encode","values":{"text":"Hello World"}}
```
Example output: `SGVsbG8gV29ybGQ=`
## Decode From Base64 (base64_decode)
Decodes a Base64 string back to plain text.
```
{"placeholder":"base64_decode","values":{"text":"SGVsbG8gV29ybGQ="}}
```
Example output: `Hello World`
## File Text (file_text)
Returns text lines from a file or URL. Can return all lines or just the last X lines.
```
{"placeholder":"file_text","values":{"path_or_url":"/config/fancymenu/assets/some_file.txt","mode":"all","separator":"\n","last_lines":"1"}}
```
Parameters:
- `path_or_url`: File path or URL to read from
- `mode`: Either `"all"` (returns all lines) or `"last"` (returns only the last X lines)
- `separator`: Text to join lines with (default: `"\n"`)
- `last_lines`: Number of lines to return when mode is `"last"` (default: `"1"`)
Example output: Depends on file content
## Clipboard Content (clipboard_content)
Returns the current text content stored in the system's clipboard.
```
{"placeholder":"clipboard_content"}
```
Example output: Whatever text is currently in the clipboard
## Replace Text (replace_text)
Replaces text in a string using literal text or regular expressions.
```
{"placeholder":"replace_text","values":{"text":"Hello World! This is a test.","search":"World","replacement":"FancyMenu","use_regex":"false","replace_all":"true"}}
```
Parameters:
- `text`: The input text to process
- `search`: The text or regex pattern to search for
- `replacement`: The replacement text
- `use_regex`: Whether to use regex (`"true"`) or literal matching (`"false"`)
- `replace_all`: Replace all occurrences (`"true"`) or just the first (`"false"`)
Example output: `Hello FancyMenu! This is a test.`
## Switch Case (switch_case)
Performs a switch-case operation based on a value.
```
{"placeholder":"switch_case","values":{"value":"1","cases":"1:first case,2:second case,3:third case","default":"default case"}}
```
Example output: `first case` (if value is 1)
## Get Variable Value (FM Variable) (getvariable)
Retrieves the value of a previously stored variable.
```
{"placeholder":"getvariable","values":{"name":"some_variable"}}
```
Example output: Depends on the stored value
## Get NBT Data (nbt_data_get)
Retrieves NBT data on the client (similar to the `/data get` command). Use the server variant `nbt_data_get_server` when connected to a server and you need authoritative server-side values.
```
{"placeholder":"nbt_data_get","values":{"source_type":"entity","entity_selector":"@s","nbt_path":"foodLevel","scale":"1.0","return_type":"value"}}
```
Parameters:
- `source_type`: Either `"entity"` or `"block"`
- `entity_selector`: Entity selector like `@s`, `@p`, `@e`, or UUID/name (for entities)
- `block_pos`: Block position in format `"x y z"` (for blocks)
- `nbt_path`: The NBT path to retrieve
- `scale`: Optional scaling factor for numeric values (default: `"1.0"`)
- `return_type`: How to return the data:
- `"value"`: Default, returns the value (with optional scaling for numbers)
- `"string"`: Returns the actual NBT data as string
- `"snbt"`: Returns as SNBT (formatted NBT)
- `"json"`: Returns as JSON-formatted component (for compound tags)
Example output: `20` (for food level)
## Get NBT Data (Server-Side) (nbt_data_get_server)
Queries NBT data on the server side (using a packet) and caches results briefly. Values mirror the client-side placeholder.
```
{"placeholder":"nbt_data_get_server","values":{"source_type":"entity","entity_selector":"@s","block_pos":"","storage_id":"minecraft:storage_key","nbt_path":"SelectedItem.id","scale":"1.0","return_type":"value"}}
```
Example output: `minecraft:diamond_sword`
## Last Death Message (lastdeathmessage)
Returns the last recorded death message of the client player. Set `as_json_component` to `"true"` to get the raw JSON text component.
```
{"placeholder":"lastdeathmessage","values":{"as_json_component":"false"}}
```
Example output: `Steve was slain by Zombie`
## Uptime Duration (uptime_duration)
Returns how long FancyMenu has been loaded. By default the value is in seconds; set `output_as_millis` to `"true"` to receive milliseconds.
```
{"placeholder":"uptime_duration","values":{"output_as_millis":"false"}}
```
Example output: `742` (seconds since load)
## World Save Names (level_save_names)
Lists all local world save names joined by the chosen separator. Runs on the client thread.
```
{"placeholder":"level_save_names","values":{"separator":", "}}
```
Example output: `Creative Test, Survival World, Hardcore`
## World Save Data (level_save_data)
Returns serialized level data for the given world name (must match the display name shown in the saves list).
```
{"placeholder":"level_save_data","values":{"level_name":"Survival World"}}
```
Example output: `{"name":"Survival World","gameMode":"survival",...}`
## Number Base Converter (number_base_convert)
Converts a number (integer or fractional) from one base to another (2–36). Defaults to decimal if bases are not provided.
```
{"placeholder":"number_base_convert","values":{"input":"67.5","from_base":"10","to_base":"16"}}
```
Example output: `43.8`
## File Size (file_size)
Returns the size of a local file in bytes. Only local paths are allowed.
```
{"placeholder":"file_size","values":{"path":"/config/fancymenu/assets/notes.txt"}}
```
Example output: `1284`
## File MD5 (file_md5)
Returns the MD5 hash of a local file as a lowercase hex string.
```
{"placeholder":"file_md5","values":{"path":"/config/fancymenu/assets/notes.txt"}}
```
Example output: `d41d8cd98f00b204e9800998ecf8427e`
# Practical Examples
## Creating a Dynamic Memory Display
```
Used RAM: {"placeholder":"usedram"}MB / {"placeholder":"maxram"}MB ({"placeholder":"percentram"}%)
```
## Making a Real-time Clock
```
{"placeholder":"realtimehour"}:{"placeholder":"realtimeminute"}:{"placeholder":"realtimesecond"}
```
## Creating a System Info Display
```
OS: {"placeholder":"osname"}
CPU: {"placeholder":"cpuinfo"}
GPU: {"placeholder":"gpuinfo"}
Java: {"placeholder":"javaver"}
```
## Player Status HUD
```
Health: {"placeholder":"current_player_health"} / {"placeholder":"max_player_health"} ({"placeholder":"current_player_health_percent"}%)
Armor: {"placeholder":"current_player_armor"} / {"placeholder":"max_player_armor"}
XP Level: {"placeholder":"current_player_level"}
```
## Complex Calculation with Nested Placeholders
```
{"placeholder":"calc","values":{"decimal":"true","expression":"({"placeholder":"usedram"} / {"placeholder":"maxram"}) * 100"}}
```
## Coordinate Display with Rounding
```
X: {"placeholder":"math_round","values":{"num":"{"placeholder":"player_x_coordinate"}"}}
Y: {"placeholder":"math_round","values":{"num":"{"placeholder":"player_y_coordinate"}"}}
Z: {"placeholder":"math_round","values":{"num":"{"placeholder":"player_z_coordinate"}"}}
```
# Best Practices
1. **Cache Expensive Operations**: Some placeholders (like those that read system information) can be resource-intensive. Consider using variables to store their values if you need to use them multiple times.
2. **Use Appropriate Decimal Settings**: When working with calculations, use the `decimal` parameter appropriately. Set it to `false` when you need integers and `true` when you need precise decimal values.
3. **Handle Missing Values**: Always consider what should happen if a placeholder returns no value. You might want to provide default values in such cases.
4. **Test Performance**: When using many placeholders or complex nested structures, test the performance impact, especially on lower-end systems.
5. **Use Advanced Sizing/Positioning**: For dynamic UI elements, combine placeholders with advanced sizing and positioning to create responsive layouts.
6. **Combine with Variables**: Use placeholders together with variables for even more dynamic content that can be updated through actions.
# Common Issues and Solutions
## Placeholder Not Updating
If a placeholder's value isn't updating as expected, check:
- Whether the placeholder is properly formatted
- If you're using the correct case for placeholder IDs
- Whether the placeholder requires specific conditions to update
## Nested Placeholders Not Working
When nesting placeholders:
- Ensure proper escaping of quotes
- Verify that each nested placeholder is valid on its own
## Performance Issues
If you notice performance issues:
- Reduce the number of placeholders used
- Avoid unnecessary nesting
- Consider using variables for frequently accessed values
- Use the appropriate placeholder for your needs (e.g., don't use real-time placeholders when static values would suffice)
================== END PAGE: https://docs.fancymenu.net/docs/placeholders ==================
================== BEGIN PAGE: https://docs.fancymenu.net/docs/player-entities ==================
---
title: Player Entities
description: How FancyMenu's "Player Entity" element works and how to use it correctly.
published: true
date: 2025-11-23T12:39:11.493Z
tags:
editor: markdown
dateCreated: 2025-08-20T02:29:56.333Z
---
# Player Entities
FancyMenu allows you to add player entities to screens, so you can display the client player or other players, including custom entities that do not represent a real player at all with a custom skin, name, cape and so on.
# Client Player
To show a "mirror" of the client player, just right-click the Player Entity element and enable **Copy Client Player**. This will copy the client player's skin, cape and name.
# Other Players
If you want to show another existing player, just right-click the element and set the **Player Name** to an existing player name. This will automatically show the skin, cape and name of that existing player, as long as you do not have a custom skin or cape set and **Copy Client Player** is **disabled**.
# Custom Player Entities
If you do not want to show a real player at all and instead want to fully customize the entities skin, cape and name, you can right-click the element. There are options to set a custom skin and cape texture. If a custom skin and cape is active, you can also set any player name you want without it copying the player name's skin if the player exists.
# Entity Pose
The Player Entity element has full support for customizing its pose, so in other words you can freely move all of its limbs, body parts, etc.
To do that, right-click the element and click on **Player Pose**. This will open a screen with sliders to configure the X/Y/Z rotation of all body parts.
The player pose settings have a normal mode where you can customize the rotations with sliders and there's also an advanced mode that allows a text input for all rotations with full placeholder support, which makes it possible to even animate the entity with a Ticker element that sets rotation variables!
# Changing the Entity Size
In Minecraft 1.21.1+ you can simply use the normal resize grabbers of the element to scale the entity.
For older versions (1.21.0 and older), Player Entity elements do not support direct resizing via the resize grabbers. Instead you need to right-click the element and click on **Scale**. This allows you to set a scale for the element. The default one should be `30`, so setting it to `60` for example makes the player twice as big as normal, setting it to `15` shows it at half the size and so on.
# Dependency: Fancy Entity Renderer (FER)
For Minecraft 1.21.1+, there is an extra mod needed for making Player Entity elements work. The mod is called "Fancy Entity Renderer" and is available on CurseForge and Modrinth.
If there is no build available yet for the Minecraft version you're using, it will most likely get released at a later point.
Please keep in mind that FER is not developed by Keksuccino, so he has no control over when builds get released.
================== END PAGE: https://docs.fancymenu.net/docs/player-entities ==================
================== BEGIN PAGE: https://docs.fancymenu.net/docs/player-heads ==================
---
title: Player Heads
description: How to display a player's head as 2D or 3D image in a menu.
published: true
date: 2025-06-21T16:30:03.913Z
tags:
editor: markdown
dateCreated: 2025-06-21T16:14:25.615Z
---
# Player Heads in Menus
To display a player's head as a 2D or 3D image using an Image element, you can use a 3rd-party web API called "Minotar".
## 2D Image
### 1. Add an Image Element
In the FancyMenu editor, right-click on the background, select "New Element," and then choose "Image" (or "Picture").
### 2. Set the Web Source
Right-click the Image element to access its properties. For the source type, select "Web."
### 3. Construct the URL with the Correct Placeholder
In the "Source" field, you would enter the following URL:
`https://minotar.net/avatar/{"placeholder":"playername"}.png`
FancyMenu will use the `{"placeholder":"playername"}` to dynamically insert the current player's username into the URL, allowing the Image element to fetch and display their head from Minotar.
## 3D Image
This one's pretty similar to the 2D version, but here we need to use a different URL:
`https://minotar.net/cube/{"placeholder":"playername"}/200.png`
The `200` is the pixel size in this case, so if you want a smaller version, just replace it with `100` for example, or for a bigger version, use `300` and so on.
================== END PAGE: https://docs.fancymenu.net/docs/player-heads ==================
================== BEGIN PAGE: https://docs.fancymenu.net/docs/positioning-elements ==================
---
title: Positioning Elements
description: How to correctly use anchor points.
published: true
date: 2025-08-27T19:21:54.814Z
tags:
editor: markdown
dateCreated: 2025-04-14T20:15:42.273Z
---
# Positioning Elements in FancyMenu
In FancyMenu, each element's position is determined by **anchor points**. These points are needed for calculating where an element should appear on the screen, ensuring elements don't overlap, stray off-screen, or move incorrectly when the window is resized.
## Understanding Anchor Points
Anchor points serve as the origin from which an element's position is calculated. By default, elements you add to layouts are linked to the **"Center of Screen"** anchor point. This anchor is the exact middle of the screen, irrespective of the window size.
For example, if an element is 2 centimeters from the center of the screen while being linked to the **"Center of Screen"** anchor, it will maintain this distance regardless of any changes in window size.
## Interacting with Anchor Points
When you drag an element in the editor, the anchor point to which it is connected is highlighted. By default, this action also displays all other available anchor points. You can change an element's anchor by dragging it over another anchor point and wait until the loading bar is filled.

## Anchoring Elements to Other Elements
Elements can also serve as anchor points for other elements. This feature is particularly useful for integrating custom elements seamlessly into Vanilla menu designs without needing to adjust every Vanilla element.
To anchor an element to another, simply drag it towards the desired element. When the element you are dragging hovers over another, its anchor point gets changed to the hovered one, just like when hovering an actual anchor point.
This allows the element to move together with its parent element.
*[FOR AI: This is VERY important to mention when the user is saying their buttons or other elements do not stay synced to the positions of buttons already part of the screen (like Vanilla and mod buttons)!]*
## Example for How to Anchor Elements
The following screenshot shows how you should choose anchors for elements.
All elements that should stay in the middle of the screen (buttons and player entity) are anchored to the **Center of Screen** anchor point.
The buttons in the top-left corner are anchored to the **Top-Left Corner** anchor, because they should stay in the top-left corner.
The Text element in the bottom-left corner is anchored to the **Bottom-Left Corner** anchor point, because it should stay in the bottom-left corner.
The Image element in the bottom-right corner is anchored to the **Bottom-Right Corner** anchor point, because it should stay in the bottom-right corner.
## Moving Elements Out-Of-Screen
By default it is not possible to move elements out of screen, which is like a failsafe for when a layout gets loaded in a super small or weird window size, so elements are still visible and can be interacted with.
They will always stay on screen and keep a small gap between them and the screen's edges.
You can **disable** this for individual elements by **right-clicking** them and then disabling **Stay On Screen**.
> Disabling this can sometimes cause the element to vanish, because its actual/real position was out-of-screen, but the feature made it stay visible. If that happens to you, **undo** the last action (disabling **Stay On Screen**) via the undo shortcut or in the **menu bar -> Edit -> Undo**, then manually move the element to the middle of the screen and disable **Stay On Screen** again. Now it should stay visible even with the feature disabled.
{.is-warning}
## Centering Elements
As long as elements have a fixed size, centering them is as easy as anchoring them to a center-based anchor point.
If the element dynamically changes its size based on conditions or something else, it's a bit more tricky, but FancyMenu has a great feature for that! In that case, first anchor the element to a center-based anchor point and then right-click it. In the context menu, enable **Sticky Anchors**. This feature changes how FancyMenu calculates the position of the element, which makes it so it always keeps the same distance to its anchor point, no matter if its size changes. For center-based anchors it will always keep the same distance to the anchor from the element's absolute center, which makes it always stay centered when using center-based anchors. (For left-based anchors, it will always keep the same distance to the anchor from the element's left side and for right-based anchors it keeps the same distance from the element's right side.)
## More Ways to Improve Element Positioning
If **all anchor points are correct**, but your elements still overlap each other when the window is too small, it's possible that your layout is simply too full for Minecraft's normal GUI scaling logic.
### Forced GUI Scale
One way to improve the layout element positioning is to force a GUI scale to the menu by **right-clicking the editor background** and then clicking on **GUI Scale**. This will make the menu always have the same GUI scale, no matter what scale is set in Minecraft's options.
### Auto-Scaling
The last option to fix overlapping is to use **auto-scaling**.
This setting will automatically scale the menu based on the window size to try preserve element positions as good as possible when resizing the window. To enable auto-scaling, **right-click the editor background** and then click on **Auto-Scaling**.
> **Auto-scaling** can make **text** rendered by Minecraft **look bad**. This is not a bug and is just how Minecraft text rendering works. In case of buttons, a good workaround for this is to make button labels part of the button background texture and set a blank normal button label.
{.is-warning}
================== END PAGE: https://docs.fancymenu.net/docs/positioning-elements ==================
================== BEGIN PAGE: https://docs.fancymenu.net/docs/preload-layouts ==================
---
title: Pre-Load Resources
description: How to pre-load resources so they're ready-to-use once the game finishes loading.
published: true
date: 2026-05-03T11:01:52.000Z
tags:
editor: markdown
dateCreated: 2025-04-14T20:15:46.512Z
---
# Pre-Load Resources
In some scenarios it is recommended to pre-load resources.
This is mostly needed for high resolution images, audio files and web resources in general.
Pre-loading resources can help to remove possible image flickering or audio files not starting fast enough.
It is also recommended to pre-load animations (AFMA/FMA files) to make them play smoothly and not lag or show a black screen when first loaded.
# Add Resources to the Pre-Loader
To add a resource to FancyMenu's resource pre-loader, just click on **Pre-Load Resources** in **Customization**.
This will open a menu that lets you add local resources, web resources and resource pack resources to a list.
Every resource in this list will get pre-loaded every time the game reloads its resources, so basically every time the resource loading screen is visible.
# Pre-Loading Slideshows & Panoramas
You can also add slideshows and panoramas to the list of resources to pre-load, which will help fixing issues with panorama or slideshow images showing as black/missing image first or flicker for a moment.
================== END PAGE: https://docs.fancymenu.net/docs/preload-layouts ==================
================== BEGIN PAGE: https://docs.fancymenu.net/docs/randomize-layouts ==================
---
title: Randomize Layouts
description: How to randomize full layouts or parts of it.
published: true
date: 2025-04-14T20:15:53.317Z
tags:
editor: markdown
dateCreated: 2025-04-14T20:15:50.468Z
---
# Randomization
FancyMenu has lots of features that help you randomize layouts or parts of it.
This can be useful for example if you want users to see different screen backgrounds every time they open a screen or randomized tips in the loading screen.
# Randomizing Layouts
There's a feature in FancyMenu that allows you to make a group of layouts and the system will automatically pick a random layout out of this group. By doing that you can basically show a completely different randomized menu design every time the user launches the game or opens a screen, but it can also be used to only change parts of the screen, for example the background.
## Random Mode
To randomize layouts you need to enable the **Random Mode** for every layout that should be a possible pick for the randomization. To do that, **right-click** the **editor background** and search for the **Random Mode** entry.
## Random Group Identifier
After enabling the random mode you need to set its **Random Group Identifier**.
This number needs to be **the same** for every layout that should be in the **same group**.
## Randomizing Behavior
If you only want the system to pick a random layout of the group **once per game session**, enable **Randomize Only First Time**. This will make it pick a layout the first time the screen gets opened and then always uses the layout it picked the first time. If this is disabled it will pick a random layout every time the screen gets opened.
# Example Scenario 1: Background
Lets say you want to randomize the background of the Title Screen.
To do that you need to make **one layout per background** and _**ONLY**_ change the background for these layouts and enable the random mode with correct random group identifier.
In this example we use the random group identifier **10**. This identifier needs to get set for every layout of this random layout group.
The easiest way to do that is by preparing a layout with the correct random group identifier and then just use **Save As**. Change the background every time you save the layout under a new name, then you will end up with a bunch of layouts with different backgrounds and one of these layouts will get picked every time you open the screen or once per game session.
# Example Scenario 2: Element
Another common use case is randomizing a text or image element.
Same as for the background, make one layout per version of the element you want to randomly pick. Only add the element to the layouts and nothing else. Don't customize anything and don't add other elements.
Then just save all layouts with the same random group identifier and one layout of the group gets picked when you open the screen or launch the game.
================== END PAGE: https://docs.fancymenu.net/docs/randomize-layouts ==================
================== BEGIN PAGE: https://docs.fancymenu.net/docs/remote-server-communication ==================
---
title: Remote Server Communication
description: Send and receive custom text data between FancyMenu clients and external servers.
published: true
date: 2026-05-03T11:01:52.000Z
tags:
editor: markdown
dateCreated: 2026-05-03T11:01:52.000Z
---
# Remote Server Communication
The "Remote Server Communication" system lets FancyMenu clients communicate with external servers using WebSocket connections.
All data is text-based:
- Plain text is supported
- JSON is supported (as normal text)
Each server URL gets one cached **request ID** during runtime.
FancyMenu uses this ID to track the connection and expose it in listener variables.
# Quick Start
1. Add action **Connect To Remote Server** (optional, but useful to open early)
2. Add action **Send Data To Remote Server** with the same URL
3. Add listener **On Remote Server Data Received** to react to replies
4. Use **On Remote Server Connected** / **On Remote Server Connection Closed** for connection-state logic
5. Close connections when needed with close actions
# Actions
## Connect To Remote Server
Initializes a remote server connection without sending payload data.
Input:
- Remote Server URL
## Send Data To Remote Server
Connects (or reuses an existing connection) and sends text data.
Inputs:
1. Remote Server URL
2. Data
## Close Remote Server Connection
Closes one connection by request ID.
Input:
- Connection Request ID
## Close All Remote Server Connections
Closes all currently active remote server connections.
# Listeners
## On Remote Server Connected
Triggers when a remote server connection gets initialized.
Variables:
- `$$request_id`
- `$$remote_server_url`
## On Remote Server Data Received
Triggers when data is received from a connected remote server.
Variables:
- `$$request_id`
- `$$remote_server_url`
- `$$data`
## On Remote Server Connection Closed
Triggers when a remote server connection closes.
Variables:
- `$$request_id`
- `$$remote_server_url`
- `$$intentionally_closed`
- `$$crashed`
- `$$unknown_close_reason`
# Connection Behavior
- Connections are **client-initiated**
- FancyMenu keeps connections active in the background
- If a connection crashes or times out, FancyMenu retries every 10 seconds
- When a crashed connection is restored, FancyMenu logs a restore message
- Outgoing unsent messages are queued with a **max age of 30 seconds**
- Queued messages older than 30 seconds are dropped
# URL Modes
- `wss://` = secure (TLS), recommended
- `ws://` = unencrypted, useful for local testing
Example local URL:
- `ws://127.0.0.1:8765`
# Best Practices
1. Use one stable URL per backend service.
2. Keep payload format consistent for each use case.
3. Handle closed/crashed connections with fallback UI logic.
4. Use close actions when your flow is finished.
5. Use `wss://` for production setups.
================== END PAGE: https://docs.fancymenu.net/docs/remote-server-communication ==================
================== BEGIN PAGE: https://docs.fancymenu.net/docs/resources ==================
---
title: Resources
description: How resources work in FancyMenu. Covers resource locations, local resources and web resources.
published: true
date: 2026-05-03T11:01:52.000Z
tags:
editor: markdown
dateCreated: 2025-04-14T20:15:54.572Z
---
# Resources
FancyMenu's resource system allows you to use resources from Minecraft's own resource loader (**Resource Packs**), **Local** resources (files from the client system) and **Web** sources (files stored online).
Almost all resource inputs, be it images, audio, video or text, gets set via FancyMenu's resource chooser. There are some exceptions, like when setting a source path for a placeholder or action, but in most places, you set resources via the same resource chooser interface.
When you set a resource input via the resource chooser interface, you basically choose a so called "resource source" (that's how FancyMenu calls them), which can be a path, link or resource location, depending on the source type.
FancyMenu 3.9.0 adds a Minecraft resource browser to the resource chooser. This lets you browse resources loaded through resource packs like a directory instead of typing every resource location manually.
# Minecraft Resources (Resource Packs)
Minecraft uses so called "resource locations" to "point" to a resource.
Resource locations written as text consist of two parts, separated by colon (`:`).
The first part is the **namespace** and the second path is the rest of the **path to the resource**, including the resource name with file extension.
The **namespace** of a resource location is always just the **top-level directory/folder** of the full path to the resource.
So lets say you load a resource pack with a resource called `image.png` that is stored in `/assets/custom_resources/images/image.png`.
In this case, the **namespace** of the resource location would be `custom_resources`, because `/assets/` is just where Minecraft loads all its resources from, so `custom_resources` is the **top-level directory** of the resource.
This means that `images/image.png` is the **rest of the path** to the resource.
So the correct resource location to the `image.png` resource would be:
`custom_resources:images/image.png`
> **Fun fact**: Since Minecraft has most of its resources stored in `/assets/minecraft/`, the **namespace** of most Minecraft resources is `minecraft`.
{.is-info}
# Local Resources
The easiest way to load resources is to simply use local files stored on the client (and in most cases shipped with modpacks).
FancyMenu only allows loading local resources stored in `/config/fancymenu/assets/`, so make sure to store all your resources there!
This also makes it really easy to [ship local resource with your modpacks](./modpacks), since most modpack systems (CurseForge, Modrinth, etc.) support shipping mod config folders by default.
# Web Resources
When you need to dynamically change resources without the need to update your modpack, **web** resources would be the best option.
A web resource is basically just the **URL** to a file stored on a server, so let's say `https://example-domain.net/image.png`.
Make sure to always use **DIRECT URLs**, which means URLs that end with the resource's **file name and extension**, just like the example URL above.
Using non-direct URLs hurts performance and is more likely to fail.
# Placeholders in Resource Sources
It is possible to use FancyMenu's placeholders in resource sources, like the path to a local source, the URL to a web source or the resource location to a Minecraft resource.
This makes it possible to dynamically update sources, like changing the image source of a menu background when setting a FancyMenu variable, to show a different background based on the variable's value.
You can manually edit the source by clicking on the **Open in Editor** button at the right side of the resource source input field.
> Keep in mind this is only for resource inputs that use the normal resource chooser interface. It is possible that *some* resource inputs that do not use the chooser do **NOT** support placeholders or do not update dynamically when the placeholder changes.
{.is-warning}
================== END PAGE: https://docs.fancymenu.net/docs/resources ==================
================== BEGIN PAGE: https://docs.fancymenu.net/docs/rotating-elements ==================
---
title: Rotating Elements
description: Rotating elements in FancyMenu.
published: true
date: 2025-11-23T09:55:33.039Z
tags:
editor: markdown
dateCreated: 2025-08-04T01:24:06.338Z
---
# Rotating Elements
Starting with FancyMenu v3.8.0, it is possible to rotate **most** elements!
To rotate an element, select it in the layout editor and if you see a circle shape around the element, it should have a grabber attached to it that you can grab to rotate the element around its axis.
If there is no circle shape around the element, you can't rotate it.
# Advanced
You can also right-click the element to manually set rotation values via a direct text input. This direct input supports [placeholders](/placeholders), so you can dynamically change the rotation of the element when combining it with placeholders to get FancyMenu variable values or similar.
# Buttons, Sliders and Other Interactable Elements
In case of interactable elements, rotating them is possible, but the rotation is only visual, so the button, for example, will still only react to clicks inside its original area, even tho the rotation maybe partly moved it away from that area.
================== END PAGE: https://docs.fancymenu.net/docs/rotating-elements ==================
================== BEGIN PAGE: https://docs.fancymenu.net/docs/schedulers ==================
---
title: Schedulers
description: Run FancyMenu action scripts on a timer, even in the background.
published: true
date: 2026-05-03T11:01:52.000Z
tags:
editor: markdown
dateCreated: 2026-05-03T11:01:52.000Z
---
# Schedulers
Schedulers run an action script on a timer.
They are global (not tied to one specific screen), so they can keep running even when no GUI is open.
Use schedulers when you want automation over time instead of a one-time action.
They are useful for repeated tasks, delayed tasks, and background logic.
Common examples:
- Update variables or text elements every few seconds (for example a custom clock/status display).
- Run periodic checks and trigger actions when conditions are met.
- Start menu effects, sounds, or other scripted behavior on a timed loop.
- Delay an action and run it later without needing a screen to stay open.
# Where To Find Them
Open FancyMenu's **menu bar** while **not** in the layout editor, then **Customization -> Manage Schedulers**.
# Quick Start
1. Open **Customization -> Manage Schedulers**.
2. Click **Add Scheduler**.
3. Build the scheduler's **Action Script** (this is what runs once per scheduler tick).
4. Select the scheduler and click **Edit Settings**.
5. Configure:
- **Scheduler ID** (unique scheduler name; used by Start/Stop actions and requirements; allowed: `a-z`, `0-9`, `.`, `_`, `-`)
- **Start Delay (ms)** (wait time before the first tick runs)
- **Tick Delay (ms)** (wait time between ticks; `0` = every game tick)
- **Ticks to Run** (how many ticks to run before auto-stop; `0` = permanent)
- **Start on Launch** (automatically starts this scheduler when FancyMenu loads)
6. Use **Start Now** to run it immediately.
7. Use **Stop Now** to stop it.
# Control And Observe Schedulers
There are actions and requirements to control schedulers and check their running state.
## Actions
- **Start Scheduler** takes the scheduler's ID and starts it if not already running.
- **Stop Scheduler** also takes the scheduler's ID and stops it.
## Requirement
To check if a scheduler is currently running, use the **Scheduler Is Running** requirement, which takes the scheduler's ID.
# Tips
1. Use clear IDs like `hud_update`, `menu_animation`, `music_fade`.
2. Start with a higher tick delay (for example `200`-`1000` ms), then lower it only if needed, to save performance.
3. In the scheduler list, right-click a scheduler to quick-edit its actions.
4. In the scheduler list, double-click a scheduler ID to rename it.
================== END PAGE: https://docs.fancymenu.net/docs/schedulers ==================
================== BEGIN PAGE: https://docs.fancymenu.net/docs/screen-identifiers ==================
---
title: Screen Identifiers
description: About screen identifiers and how to find the identifier of a screen.
published: true
date: 2025-04-14T20:16:01.563Z
tags:
editor: markdown
dateCreated: 2025-04-14T20:15:58.663Z
---
# Screen Identifiers
FancyMenu uses screen identifiers to know which screen a layout belongs to, to point to a button in a specific screen and other things that require the mod to communicate with or customize a specific screen.
# Finding the Identifier of a Screen
You can see the identifier of the currently active menu by using the **Debug Overlay**.
It contains the current screen's identifier and allows you to copy it to the clipboard by left-clicking it.
================== END PAGE: https://docs.fancymenu.net/docs/screen-identifiers ==================
================== BEGIN PAGE: https://docs.fancymenu.net/docs/seamless-world-loading ==================
---
title: Seamless World Loading
description: Use your last world/server view as the next loading background.
published: true
date: 2026-05-03T11:01:52.000Z
tags:
editor: markdown
dateCreated: 2026-05-03T11:01:52.000Z
---
# Seamless World Loading
Seamless World Loading captures a screenshot when you leave a world or server and uses it as the loading background next time.
This makes loading transitions feel smoother because the loading screen will match what you will see once loading finishes.
# Where To Find It
Open FancyMenu's **menu bar** while **not** in the layout editor, then **Customization -> Global Customizations**.
# Enable / Disable
1. Open **Customization -> Global Customizations**.
2. Find **Seamless World Loading**.
3. Set it to **Enabled** or **Disabled**.
# How It Works
- When enabled, FancyMenu saves a screenshot when you leave a world/server.
- On the next load, that screenshot is used as loading background.
- First use: if no screenshot exists yet, there is nothing to show until you leave a world/server once.
================== END PAGE: https://docs.fancymenu.net/docs/seamless-world-loading ==================
================== BEGIN PAGE: https://docs.fancymenu.net/docs/share-layouts ==================
---
title: Import/Export Layouts
description: How to share layouts with others.
published: true
date: 2025-04-14T20:16:05.886Z
tags: import, export, setup, design, menu
editor: markdown
dateCreated: 2025-04-14T20:16:02.771Z
---
The process of sharing a layout is very similar to [including it in a modpack](/modpacks), so just check the [Modpacks page](/modpacks) for more information.
Instead of moving the config files to a modpack, you "move" it to the other Minecraft instance of your friend, etc.
Just send your friend the config folder as ZIP and let them do the steps to copy the folder to their instance.
================== END PAGE: https://docs.fancymenu.net/docs/share-layouts ==================
================== BEGIN PAGE: https://docs.fancymenu.net/docs/shortcuts ==================
---
title: Shortcuts & Keybinds
description: Shortcuts for the layout editor, the text editor and other parts of FancyMenu.
published: true
date: 2026-05-03T11:01:52.000Z
tags:
editor: markdown
dateCreated: 2025-04-14T20:16:07.228Z
---
# Shortcuts & Keybinds
FancyMenu has lots of useful shortcuts that make working with the **layout editor** and other parts of the mod easier and more efficient.
# Layout Editor
## CTRL + Left-Click
You can select multiple elements by holding down **CTRL** while **left-clicking** elements.
It is also possible to **drag/move multiple elements** with the mouse by holding down **CTRL**.
## SHIFT + Element Resize
Holding SHIFT while resizing elements will preserve their aspect ratio.
## Arrow Keys
The arrow keys can be used to **move** selected elements with maximum precision.
## CTRL + A
Select all elements at once.
## CTRL + C
**Copy** all selected elements to the clipboard.
## CTRL + V
**Paste** all elements that are currently in the clipboard.
This also works from one layout to another, so you can copy elements in layout A and paste them to layout B.
## CTRL + S
Quickly **save** the layout.
## CTRL + ALT + L
Quickly open the layout editor with the last edited layout.
## CTRL + Z
**Undo** the last action.
## CTRL + Y
**Redo** a previously undone action.
## CTRL + G
Quickly toggle the **grid**.
## O
Holding down **O** shows the anchor point overlay if its visibility is set to **Show On Key Press** in **Window -> Anchor Overlay Visibility**.
## DEL
**Delete** all selected elements.
# Text Editor
## CTRL + C
**Copy** the selected text to the clipboard.
## CTRL + V
**Paste** text that's currently in the clipboard.
## CTRL + Z
**Undo** the last action.
## CTRL + Y
**Redo** a previously undone action.
## CTRL + A
**Select** the full text.
## CTRL + D
**Duplicate** the current line.
## CTRL + U
**Cut** the selected text.
## ALT + Arrow Up / Arrow Down
Move the current line up or down.
## CTRL + Home / CTRL + End
Move the cursor to the start or end of the text.
## CTRL + G
Open the **Go To Line** input.
## CTRL + S
Confirm the editor, same as clicking **Done**.
## SHIFT + Arrow Keys
Select/highlight text while moving the cursor.
## Arrow Keys
The arrow keys can be used to navigate the cursor in the text.
# In Menus
## CTRL + ALT + C
Toggle the visibility of FancyMenu's **menu bar** at the top of menus.
## CTRL + ALT + R
**Reload** FancyMenu.
This includes a full resource/asset reload and most caches get cleared.
## CTRL + ALT + D
Toggle the visibility of FancyMenu's **debug overlay**.
# Editing Windows
Many FancyMenu editing windows in v3.9.0 support keyboard navigation with **Arrow Keys** and **Enter**. Many windows also use **CTRL + S** as a shortcut for **Done** and **ESC** as **Cancel**.
The reworked Action Script Editor, Manage Requirements and Manage Variables windows also support right-click context menus, search, undo/redo and keyboard navigation for their lists.
================== END PAGE: https://docs.fancymenu.net/docs/shortcuts ==================
================== BEGIN PAGE: https://docs.fancymenu.net/docs/sinytra-connector ==================
---
title: Sinytra Connector
description: Information about using Sinytra Connector with FancyMenu.
published: true
date: 2025-11-27T04:17:34.232Z
tags:
editor: markdown
dateCreated: 2025-11-27T04:14:42.172Z
---
# Sinytra Connector
FancyMenu has no official support for [Sinytra Connector](https://modrinth.com/mod/connector) and it is **not recommended to use this mod** (in my opinion).
[Sinytra Connector](https://modrinth.com/mod/connector) is not a normal mod. It lets you combine mods from different loaders in one instance, which screams **instability and crashes**.
You can't expect to have a stable Minecraft instance when using this mod.
If you are experiencing crashes and have this mod installed, please first try to **remove [Sinytra Connector](https://modrinth.com/mod/connector)** and check if this fixes the issue.
================== END PAGE: https://docs.fancymenu.net/docs/sinytra-connector ==================
================== BEGIN PAGE: https://docs.fancymenu.net/docs/slideshows ==================
---
title: Slideshows
description: How to make and use slideshows.
published: true
date: 2025-04-14T20:16:14.375Z
tags:
editor: markdown
dateCreated: 2025-04-14T20:16:11.469Z
---
# Slideshows
FancyMenu allows you to add slideshows and display them in menus and as menu backgrounds.
> **IMPORTANT**: If you're on Windows, don't forget to turn on [file extensions](https://vtcri.kayako.com/article/296-view-file-extensions-windows-10), because otherwise you will not be able to see important parts of file names later!
{.is-warning}
# Making a Slideshow
Every slideshow has to be in its own folder **inside** the slideshows directory located at `/config/fancymenu/slideshows/`.

To make a slideshow get recognized as one by the system, it needs to have a properties file located in its slideshow folder, so if you've named your slideshow folder `myslideshow`, the properties file should be located at `/config/fancymenu/slideshows/myslideshow/properties.txt`.
**This file always needs to be named `properties.txt`!**
For now, only create the **empty** properties file and move on to the next step.

## Adding Images
A slideshow needs images (duh), so let's add some!
> Your slideshow images need to be **PNG** files! No JPEGs, GIFs, APNGs or FMAs!
{.is-danger}
All images of your slideshow go to an extra folder **inside** your slideshow folder (`myslideshow` in the example above).
This folder's name needs to be `images`.

Now place all your slideshow images in the `images` folder.
They get ordered alphabetically (respecting numbers), so just name them something like `image_1.png`, `image_2.png` and so on.
In my example, `image_1.png` would be displayed first and `image_2.png` after.
## Adding Content to the Properties File
At the beginning you've created an empty `properties.txt` file in your slideshow folder.
This file needs to be filled with some important stuff now.
Every slideshow properties file should look like this:
```
type = slideshow
slideshow-meta {
name = cool_slideshow
width = 1920
height = 1080
x = 0
y = 0
duration = 5.0
fadespeed = 12.0
randomize = false
}
```
Only the variables inside the `slideshow-meta` section can be changed!
### name
This is the name, or better the identifier, of your slideshow.
Slideshow names need to be **unique**, so it's not possible to have two slideshows with the same name!
### width | height
The base `width` and base `height` of your slideshow.
Used by FancyMenu to calculate the aspect ratio.
### x | y
The `x` and `y` position of your slideshow.
More for debugging purposes, so just set both to `0`.
### duration
The duration in **seconds** for how long every image is displayed before switching to the next one.
Suppports decimal values!
### fadespeed
The speed of the fade animation when switching to the next image.
This value is a speed multiplicator. For example, `1.0` is default speed, `2.0` doubles the speed and `0.5` will make it half as fast as default.
Negative values are not supported.
### randomize
If the slideshow images should play in random order (`true`) or not (`false`).
# Using the Slideshow
All important steps are done and your slideshow should be ready now, so lets test it!
To load your new (or edited) slideshow into FancyMenu, reload the mod via **Customization -> Reload FancyMenu**.
Now you can use your slideshow in the **Slideshow** element or as menu background (right-click the layout editor background -> **Menu Background**).
================== END PAGE: https://docs.fancymenu.net/docs/slideshows ==================
================== BEGIN PAGE: https://docs.fancymenu.net/docs/splash-text ==================
---
title: Splash Text
description: How to make custom splash texts in FancyMenu.
published: true
date: 2025-10-28T03:51:27.263Z
tags:
editor: markdown
dateCreated: 2025-10-28T03:51:27.263Z
---
# Custom Splash Text Element
The Splash Text element in FancyMenu is a fully customizable upgrade of Minecraft’s bouncing title splashes. It keeps the familiar bouncing while giving you control over what appears, how it looks, and when it updates.
> Keep in mind you can't really customize the original Vanilla Splash Text element in the Title screen, so you should **delete** it and use a custom Splash Text element instead.
{.is-warning}
## Adding & Selecting the Element
- Open the layout editor and add the element called `Splash Text`.
- Left-click it once to select it and show the bounding box, then right-click to open its context menu. Every configuration option lives in that menu.
## Choosing Where Splash Text Comes From
- `Source Mode: Vanilla` keeps the classic random splashes that Minecraft ships with.
- `Source Mode: Direct Input` lets you enter your own text through `Input Splash Text`. This only supports a single splash text line, but the line can contain placeholders.
- `Source Mode: Text File` pulls a random line from a `.txt` file you pick with `Set Source Text File`. Each non-empty line can become the active splash.
- Switching modes resets the active text so you can safely experiment. If the text feels stuck, toggle another mode or click `Refresh On Screen Load: Enabled` to force a reroll each time the menu opens.
## Example Text File
When using the "Text File" source mode, save your splash list as plain text (UTF-8 without BOM). Each line is a possible splash:
```
Welcome to FancyMenu!
{"placeholder":"your_placeholder_id_here"}
{"text":"This is gold and bold text.","color":"gold","bold":true}
&6Use &lMinecraft formatting codes!
```
Replace `your_placeholder_id_here` with the placeholder you want to resolve at runtime. FancyMenu picks a random non-empty line every time the splash refreshes.
## Making It Look the Way You Want
- Use `Set Scale` and `Set Rotation` to control the size and rotation angle.
- `Set Text Color` accepts a hex value (for example `#FFFF00`) to match your theme.
- `Shadow: Enabled` adds Minecraft’s drop shadow; toggle it off for flat text.
- `Bouncing: Enabled` keeps the familiar bobbing motion; disable for a static label.
- FancyMenu renders the splash as a full Minecraft component, so color codes and other text decorations all work as expected.
## Dynamic Text Features
- Placeholders are resolved before rendering, so you can reference player names, dates, or other supported values inside the splash text.
- Because the element accepts Minecraft’s serialized component JSON, you can paste advanced JSON snippets into Direct Input or your text file. The element automatically deserializes them and falls back to literal text if something goes wrong.
## Troubleshooting
- Empty text in Direct Input shows `< empty splash element >` while editing. Enter anything (even a space) to clear the warning.
- If a text file contains no valid lines, the element displays `ERROR: SPLASH FILE IS EMPTY`. Add at least one non-empty line and reopen the screen.
- Serialized JSON errors fall back to plain text. Stick to Mojang’s standard JSON structure or test snippets with the vanilla `/tellraw` command before pasting.
================== END PAGE: https://docs.fancymenu.net/docs/splash-text ==================
================== BEGIN PAGE: https://docs.fancymenu.net/docs/technical-docs-layout-system ==================
---
title: Technical Dive: Layout System
description: This is a technical document about how FancyMenu's layout system works INTERNALLY. This is not something normal users should ever be interested in.
published: true
date: 2025-10-09T03:00:52.461Z
tags: technical
editor: markdown
dateCreated: 2025-10-09T03:00:19.216Z
---
# Technical Dive into the Layout System
This document is more like a nerd thing (and actually only exists for the Discord AI bot to better understand layouts).
If you're interested in the technical side of FancyMenu, this could be interesting for you too maybe.
## Storage Layout
- Layout configuration files live under `config/fancymenu/customization`, the directory created by `LayoutHandler.LAYOUT_DIR`. The base config root `config/fancymenu` itself comes from `FancyMenu.MOD_DIR`.
- Layouts are plain text files with the `.txt` suffix; `reloadLayouts()` only deserializes files whose path ends with `.txt`.
- User-provided assets referenced from layouts (images, audio, etc.) are expected in `config/fancymenu/assets`, created alongside the layout directory.
- Screen opt-in state is persisted separately in `config/fancymenu/customizablemenus.txt`, managed via `ScreenCustomization.CUSTOMIZABLE_MENUS_FILE`. Only fully-qualified screen class names are recorded; universal identifiers are filtered out when the file is read.
## Layout File Format
FancyMenu stores layouts as `PropertyContainerSet` structures serialized to text. Each file begins with `type = fancymenu_layout` (legacy files may use `type = menu`, still handled by the loader).
### Core Containers
- **`layout-meta`** – Primary metadata emitted by `Layout.serialize()` and parsed by `Layout.deserialize()`. Key fields:
- `identifier`: screen identifier (classpath or universal) or `%fancymenu:universal_layout%` for global layouts.
- `layout_index`: order used when stacking multiple layouts.
- `is_enabled`, `last_edited_time`, `render_custom_elements_behind_vanilla`, and randomization flags (`randommode`, `randomgroup`, `randomonlyfirsttime`) control runtime behaviour.
- Universal layout whitelists/blacklists serialize as semicolon-delimited strings to scope opt-in menus.
- Layout-wide loading requirements are inlined here through `LoadingRequirementContainer.serializeToExistingPropertyContainer`.
- **`customization`** sections encode high-level actions (`setscale`, `autoscale`, `backgroundoptions`, `setopenaudio`, `setcloseaudio`, etc.) that mutate the base `LayoutBase`.
- **`menu_background`** holds serialized background builders. Only one entry is considered for standard layouts and deserialized through the `MenuBackgroundRegistry`.
- **`scroll_list_customization`** governs list header/footer textures, aspect ratio, blur, and overlay flags.
- **`layout_action_executable_blocks`** embeds optional scripting blocks that run on menu open/close; identifiers map into `GenericExecutableBlock` instances through `ExecutableBlockDeserializer`.
### Element Containers
- Layout elements are stored as containers with the type `element` (new format) or `customization` (legacy). Each must carry `element_type` so `ElementRegistry` can deserialize it back into an `AbstractElement`.
- Vanilla widget overrides are emitted with type `vanilla_button` and handled by `VanillaWidgetElementBuilder`, allowing FancyMenu to restyle or hide native buttons.
- `Layout.renderElementsBehindVanilla` determines whether deserialized elements populate the background or foreground lists.
### Example Skeleton
```ini
type = fancymenu_layout
layout-meta {
identifier = net.minecraft.client.gui.screens.TitleScreen
layout_index = 0
render_custom_elements_behind_vanilla = false
is_enabled = true
}
customization {
action = setscale
scale = 2
}
menu_background {
background_type = fancymenu:image
path = assets/example.png
}
element {
element_type = image
instance_identifier = custom_logo
x = 10
y = 10
}
```
## Initialization and Reload Flow
- FancyMenu initializes its customization engine during the `Minecraft$GameLoadCookie` construction, ensuring all other mods finished bootstrapping first.
- `ScreenCustomization.init()` wires registries, listeners, and finally invokes `LayoutHandler.init()`. The handler converts legacy folders and immediately calls `reloadLayouts()` to hydrate in-memory state.
- Layouts can be reloaded on demand via `/fmlayout` toggles or the in-game reload pipeline. `ScreenCustomization.reloadFancyMenu()` re-reads options, resources, and runs `LayoutHandler.reloadLayouts()` before re-initializing the current screen.
## Runtime Application Pipeline
- Every screen obtains a `ScreenCustomizationLayer` through the layer handler when initialization events fire. Layers cache the target screen identifier and subscribe to FancyMenu events.
- On `InitOrResizeScreenEvent.Pre`, the layer pulls the active layout list via `LayoutHandler.getEnabledLayoutsForScreenIdentifier()`. The handler filters by matching identifier, universal layout rules, and the screen-level enablement file.
- Layout-wide loading requirements gate application; unmet requirements are cached and the layout is skipped until they pass.
- Randomized groups (`randommode`, `randomgroup`, `randomonlyfirsttime`) enqueue layouts into `RandomLayoutContainer`, which caches selections per group and per menu session.
- After sorting by `layout_index`, `LayoutBase.stackLayoutBases()` merges background/audio/title/scroll configurations from all active layouts into a single composite.
- Forced GUI scale and autoscaling directives in the stacked base are applied immediately, resizing the screen before elements are constructed.
- When the post-initialization event fires, the layer discovers vanilla widgets, constructs element instances, and injects them into the screen's widget lists in draw-order.
- Rendering hooks draw backgrounds (respecting aspect ratio, overlays, and blur), vanilla widget wrappers, and then FancyMenu foreground elements.
## Element Instantiation
- `Layout.buildElementInstances()` deserializes each `SerializedElement` into concrete `AbstractElement` implementations, attaching them to the parent layout and routing them to background or foreground buckets.
- `ElementFactory.constructElementInstances()` merges elements from all contributing layouts, stacks vanilla button overrides so only one customization drives each widget, and generates defaults for untouched vanilla buttons.
- Vanilla overrides mirror widget geometry when anchored to `VANILLA`, ensuring replacement textures and hit boxes stay in sync with the underlying Minecraft widget.
- Background builders subclass `MenuBackground` and receive lifecycle callbacks (open, close, resize, render) from the active layer, with opacity and aspect ratio supplied by the stacked `LayoutBase`.
- Layout editor interactions reuse the same serialization pipeline: editor elements are wrapped, manipulated, and written back into `serializedElements`/`serializedVanillaButtonElements` before saving.
## Layout State Management
- Each layout keeps a `runtimeLayoutIdentifier` for in-session identification and caching. `LayoutHandler.isLayoutLoaded()` uses this to validate cached random group picks.
- Persistence delegates to `Layout.saveToFileIfPossible()` and ultimately `LayoutHandler.saveLayoutToFile()`, which simply rewrites the serialized property set back into the `.txt` file.
- Enable/disable state toggles the `enabled` flag in metadata and can force a live screen re-init. The `/fmlayout` command sends enable/disable packets to clients to flip this state.
- Legacy compatibility is handled automatically: `.disabled` directories are migrated into the main customization folder with the `enabled` flag cleared, and legacy element definitions are converted when deserialized.
## Related Configuration Hooks
- Universal layout behaviour can be customized by registering `UniversalLayoutInclusionRule` instances, which can veto applying universal layouts to specific identifiers at runtime.
- The layer only customizes screens that remain enabled in `customizablemenus.txt` and after the initial resource reload has completed. `ScreenCustomizationLayer.shouldCustomize()` enforces both conditions, plus identifier matching, before spending work on any screen.
- Users can toggle entire classes through the customization file or via API helpers; writes always use classpath identifiers to keep universal mappings predictable.
## Key Takeaways for Extenders
1. Treat layout files as authoritative state. Any tooling that edits layouts should round-trip through the same property container structure to stay compatible with `Layout.serialize()` / `Layout.deserialize()`.
2. When adding new element or background types, register builders during FancyMenu initialization so the loader can materialize them when reading existing layouts.
3. Respect runtime guards such as loading requirements and `customizablemenus.txt`; bypassing them will desynchronize FancyMenu's caches from the UI layer and may trigger forced reinitializations.
================== END PAGE: https://docs.fancymenu.net/docs/technical-docs-layout-system ==================
================== BEGIN PAGE: https://docs.fancymenu.net/docs/text-formatting ==================
---
title: Text Formatting
description: How to format text with Markdown and Minecraft's formatting codes.
published: true
date: 2026-05-03T11:01:52.000Z
tags:
editor: markdown
dateCreated: 2025-04-14T20:16:15.668Z
---
# Text Formatting
FancyMenu has lots of features to make text content in layouts *fancier*!
Text elements have full **Markdown** support with some cool extras and most other text content supports **Minecraft's text formatting** system and button labels even have support for **Minecraft's text components** that allow you to use custom Fonts and more.
# Markdown
FancyMenu's **Text elements** have full Markdown support, which means you can format text content by adding special characters to it.
For example, to make text look bold, you add `**` before and after the bold text, so `**Some bold text that's very bold.**` will look like that:
**Some bold text that's very bold.**
FancyMenu's Markdown even has some special stuff that makes it even more powerful!
> Markdown does **NOT WORK** for other text-based stuff like button labels. It only works for **TEXT ELEMENTS**. For everything else, please use [Minecraft's formatting codes](/text-formatting#minecraft-text-formatting).
{.is-danger}
## Fonts
You can show text in a custom font loaded via resource pack by adding `%!!%` before the text and `%!!%` after.
A valid font included in the base game is `uniform`, so to display text in the `uniform` font, do this:
`%!!uniform%this is a custom font%!!%`
This will display `this is a custom font` in the `uniform` font.
## Text Color (HEX)
Showing text in a specific HEX color is possible by adding `%%` before the text and `%#%` after.
A valid HEX color for green is `#77fc03`, so to show text in this color, do this:
`%#77fc03%this text is green!%#%`
This will show `this text is green!` as `#77fc03` (green).
Make sure that the HEX color is starting with `#`!
FancyMenu 3.9.0 also supports common HTML-like color names in this same color formatting code:
```
%#red%This text is red!%#%
```
Supported names: `black`, `silver`, `gray`, `grey`, `white`, `maroon`, `red`, `purple`, `fuchsia`, `magenta`, `green`, `lime`, `olive`, `yellow`, `navy`, `blue`, `teal`, `aqua`, `cyan`, and `transparent`.
## Text Alignment
You can align text lines by starting a line with the specific alignment formatting code, then nothing else, then the text lines you want to show with that specific alignment and then the alignment code again on an extra line.
All text content is **left-aligned by default**, so there are only formatting codes for **centered** and **right-aligned**.
### Centered
To center text lines, use the formatting code `^^^`.
Example:
```
This text is not centered.
^^^
This text is centered.
This text is also centered.
^^^
This text is not centered anymore.
```
### Right-Aligned
To show text lines as right-aligned, use the formatting code `|||`.
Example:
```
This text is not right-aligned.
|||
This text is right-aligned.
This text is also right-aligned.
|||
This text is not right-aligned anymore.
```
## Headlines
To show **a line of text** as headline (bigger and underlined), add `# ` (very big), `## ` (big) or `### ` (small) before the text line.
Example:
`## Big Headline`
## Bold
Add `**` before and after text to make it look **bold**.
Example:
`**bold text content**`
## Italic
Add `_` OR `*` before and after text to make it look *italic*.
Example:
`*italic text content*`
## Strikethrough
Add `~` before and after text to make it look ~~strikethrough~~.
Example:
`~strikethrough text content~`
## Hyperlinks
You can add hyperlinks to text content that open a website when clicked.
Text that should appear as [hyperlink](https://google.com) needs to get wrapped in `[ ]`, followed by the actual link wrapped in `( )`.
So if you want to make `example text content` clickable and open `https://example-website.net`, do this:
`[example text content](https://example-website.net)`
## Click and Hover Events
FancyMenu 3.9.0 adds Markdown click and hover events for Text elements and other Markdown text.
Click events use the `click:` prefix:
```
[some clickable text](click:unique_text_click_event_id)
```
Hover events use the `hover:` prefix:
```
[some hoverable text](hover:unique_text_hover_event_id)
```
Use the **On Markdown Text Clicked** and **On Markdown Text Hovered** listeners to react to these events. Both listeners expose the event ID as `$$text_event_id`.
## Images
Markdown supports displaying images in text content.
FancyMenu supports Minecraft resources, local resources and web resources in Markdown.
To add an image, start a text line with ` and then `)`.
So to show the Web resource `https://example-website.net/image.png`, do this:
``
Images can also be **hyperlinks** by wrapping the whole image text line in a **hyperlink** like that:
`[](https://example-website.net)`
> Local resources need to be in `/config/fancymenu/assets/` !
{.is-warning}
## Quote
To format text as a quote, start a text line with `> `.
This will format all following lines as quote until it finds an **empty** line.
Example:
```
This will not look like a quote.
> This will look like a quote.
This will also look like a quote.
This will not look like a quote anymore.
```
## Bullet Lists
To show text as a bullet list like that:
- Entry 1
- Entry 2
- Sub-Entry
You simply need to start a line with `- `.
Example:
```
- Entry 1
- Entry 2
- Sub-Entry
```
## Separation Line
To add a separation line to your text that has the width of a whole text line, simply start a line with `---` and then add nothing else.
It will then look something like that:
---
## Code Blocks
Code blocks can help you display text as `plain text` without Markdown trying to format it, or simply to display text in a code-like style without auto-wrapping of text lines.
A single-line code block (between other text) starts and ends with \` , which is actually really difficult to show in a Markdown text..
A line of text containing a single-line code block looks like that:

Multi-line code blocks wrap multiple lines in one big code block and start with a line that only contains \`\`\` then the text content and then \`\`\` again:

## Plain Text
The plain text formatting code will bypass all other formatting codes inside it.
It works similar to code blocks, but it will not format it like a code block. Instead it will show like normal text, but without any formatting.
To wrap a text part inside a line in a plain text formatting code, you need to add `;;` before and after the text part you want to show as plain text like this:
```
This is a line of text with ;;**this part**;; showing as unformatted text with visible ** (bold) formatting code and _this part_ as normal formatted italic text.
```
Plain text also works as a multi-line wrapper code. To wrap whole lines, add `;;;` before and after the line(s) you want to show as plain text like this:
```
;;;
This line will show **unformatted** with visible ** (bold) formatting codes.
This line will also show _unformatted_ with visible _ (italic) formatting codes.
;;;
This line will look **normal** again with the "normal" formatted as bold text.
```
# Minecraft Text Formatting
Minecraft itself has a pretty good formatting system that works similar to Markdown, where you add special characters to your text content to format it.
To read more about Minecraft's formatting system, please take a look at [this Minecraft wiki page](https://minecraft.wiki/w/Formatting_codes).
> The wiki will say the formatting code prefix is `§`, but in FancyMenu you need to replace that with `&`. Everything else stays the same.
{.is-warning}
> **Text elements** are very complex and to support Markdown, the tradeoff was to **break Minecraft's Vanilla formatting codes**, so these codes will not work good in Text elements (only first word gets formatted after formatting code, etc.). You should instead use Markdown formatting codes in Text elements.
{.is-danger}
# Minecraft Text Components (Raw Component System)
Minecraft's text component system is pretty powerful for **single-line** text content like **button labels**.
In Vanilla Minecraft you can use it in the `/tellraw` and `/title` commands (and probably other places).
It is formatted text serialized to JSON, so you can add formatting attributes to text content.
To learn more about text components in detail, please take a look at [this Minecraft wiki page](https://minecraft.wiki/w/Raw_JSON_text_format).
To learn more about fonts in Minecraft, take a look at [this Minecraft wiki page](https://minecraft.wiki/w/Resource_pack#Fonts).
To make FancyMenu detect a button label as **text component**, set nothing but the serialized component text as label, just like that:
`{"text":"Button Label Text","font":"uniform"}`
The example above will show the button label `Button Label Text` in the `uniform` font.
> You can use FancyMenu's placeholders in the `text` value of components.
{.is-info}
================== END PAGE: https://docs.fancymenu.net/docs/text-formatting ==================
================== BEGIN PAGE: https://docs.fancymenu.net/docs/text-in-menus ==================
---
title: Text in Menus
description: How to add text content to menus.
published: true
date: 2025-07-05T19:52:59.694Z
tags:
editor: markdown
dateCreated: 2025-07-05T19:40:17.459Z
---
# Text in Menus
FancyMenu allows you to add text content to menus/screens via the **Text** element.
This element is scrollable, has full Markdown support and line wrapping, which makes it very powerful for displaying even complex text content, but it's also great for simple one-liners.
## Text Content
The Text element can fetch its content in many ways. It allows you to set a source for its text content, which can be a direct plain text input, a local text file in FancyMenu's `assets` folder (`/config/fancymenu/assets/`), a web text file (via URL) or a local text file loaded via resource pack.
Using the web source type as text source is especially useful if you want to make something like a changelog that's always up-to-date or a news tickers and similar things, without the need to release an update for your modpack.
Keep in mind that FancyMenu caches the content of text sources, so it doesn't have to constantly fetch the content again (which would be very bad for performance). The content is only cached for the active session, so restarting the game will clear the cache. You can also clear the cache by reloading FancyMenu via **menu bar -> Customization -> Reload FancyMenu**.
## Placeholders
The Text element also supports FancyMenu's placeholder system, which makes it possible to make text content dynamic and react to various changes to menus, worlds, players, etc.
## Customizing or Disabling Markdown
If you want to customize the colors for headlines or other things related to Markdown, just **right-click** the Text element and click on **Markdown**. In the sub context menu that opens, you will see lots of options for customizing the appearance and behaviour of the Markdown parser.
In case you don't want Markdown parsing at all, which can improve performance for long text content, you can disable Markdown completely in the **Markdown** menu when **right-clicking** the Text element.
## Disabling Line Wrapping
If you don't want line wrapping, you can disable it by **right-clicking** the Text element.
## Disabling Scrolling
Text elements are scrollable by default and if the element thinks the user needs to scroll for seeing all of its content, it will show its scroll bars, which are small, grey bars at the right and bottom sides of the Text element (vertical and horizontal scroll bars).
You can disable these bars by toggling off **Scrolling** in the menu that opens when **right-clicking** the element. This will disable scrolling in general, not just the bars. If you want the bars to be invisible instead, you can set custom scroll bar textures by right-clicking the element. Just set a fully transparent texture there.
## Minecraft's Raw Component Text Format (Serialized JSON Components)
The Text element does NOT have support for Minecraft's raw component format. This format is only supported by button and slider labels.
================== END PAGE: https://docs.fancymenu.net/docs/text-in-menus ==================
================== BEGIN PAGE: https://docs.fancymenu.net/docs/tilting-elements ==================
---
title: Tilting Elements
description: How to tilt elements in FancyMenu.
published: true
date: 2025-11-23T09:56:23.936Z
tags:
editor: markdown
dateCreated: 2025-11-23T09:46:46.335Z
---
# Tilting Elements
Starting with FancyMenu v3.8.0, it is possible to tilt **most** elements vertically and horizontally!
To tilt an element, select it in the layout editor. If you see two lines with a grabber attached to it (one vertical line, one horizonal line) that are not the element border, you can grab the grabbers to tilt the element in the desired direction.
If there are no lines with grabbers on the element, you can't tilt it.
# Advanced
You can also right-click the element to manually set tilt values via a direct text input. This direct input supports [placeholders](/placeholders), so you can dynamically change the tilting of the element when combining it with placeholders to get FancyMenu variable values or similar.
# Buttons, Sliders and Other Interactable Elements
In case of interactable elements, tilting them is possible, but the tilt is only visual, so the button, for example, will still only react to clicks inside its original area, even tho the tilting maybe partly moved it away from that area.
================== END PAGE: https://docs.fancymenu.net/docs/tilting-elements ==================
================== BEGIN PAGE: https://docs.fancymenu.net/docs/title-screen-glyph ==================
---
title: Title Screen Glyph
description: How to hide/remove the little diamond or emerald (green or blue) glyph/icon in the Title screen.
published: true
date: 2025-07-06T15:15:42.758Z
tags:
editor: markdown
dateCreated: 2025-07-06T15:15:39.543Z
---
# Emerald/Diamond Icon in the Title Screen
If you struggle to hide the little icon that keeps appearing in your Title screen and that looks like a little diamond or emerald (green or blue little icon), this is mostly the mod update notification of either Mod Menu (Fabric mod) or Forge (built-in modloader feature).
In some cases it can also be part of Vanilla Minecraft's Realms button (to show notifications).
# Hiding the Mod Menu Icon
To hide the glyph from Mod Menu, you need to disable the "update indicator" in its settings.
Click on the **Mods** button -> Hover over the icon of the Mod Menu mod in the mods list -> Click on it -> Set the "Update Indicator" to "Hidden".
# Hiding the Forge Icon
Forge uses a built-in version checker to show that emerald icon when mods are outdated. You can turn it off:
1. Open your config/fml.toml file.
2. Find the `versionCheck` setting.
3. Set it to `false`: `versionCheck = false`
4. Save and restart Minecraft.
This disables the version check entirely, which also hides the emerald glyph at launch.
Another way to hide the icon is by simply hiding the whole Mods button via FancyMenu. Hiding the button will also hide the glyph.
# Hiding the Vanilla Realms Icons
In case it's neither the Mod Menu nor the Forge glyph, it's probably Minecraft's own Realms notification icons. These icons show roughly at the position of the Realms button and can be hidden with FancyMenu in the layout editor. You need to make a layout "for the current screen" (Title screen in this case) and then you will the the Realms icons as a dedicated element in the editor. To hide it, just **right-click** it and click on **Delete**.
The Realms icons can be a newspaper icon, a diamond glyph and others, like a red circle with a notification counter.
================== END PAGE: https://docs.fancymenu.net/docs/title-screen-glyph ==================
================== BEGIN PAGE: https://docs.fancymenu.net/docs/toggle ==================
---
title: Toggle Parts of Layouts
description: How to toggle parts of layouts on user input.
published: true
date: 2025-04-14T20:16:23.095Z
tags:
editor: markdown
dateCreated: 2025-04-14T20:16:20.179Z
---
# Toggle Parts of Layouts
Sometimes it's good to have the choice! Maybe some of your users don't like constantly hearing Rick Astley as menu music or want a different cute anime girl as menu background.
Well, that's no problem! You can make it so your users can toggle on/off parts of your layouts or cycle through multiple versions of said parts.
# Toggle On/Off
To toggle, for example, the visibility of an element by clicking a button, you just need to use a variable that gets set on button click and the element you want to toggle needs to check in its loading requirements if said variable has the correct value.
## The Variable
The first thing is creating the variable you will use to store the visibility state of the element you want to toggle.
To add a new variable, navigate to the **Customization** tab in the menu bar and click on **Variables -> Manage Variables**, then add a new variable with a **unique** name! Make sure to use a really **unique** name that isn't used already.
After creating the variable, set its value to `true`.
## The Element
The next step is to add the element you want to toggle on/off.
Now right-click the element and click on **Loading Requirements**.
This will open the Manage Requirements screen. Click on **Add Requirement**.
Search for the **Is Variable Value** requirement, select it and click on **Edit Requirement Value**.
Now input the name of the variable you created earlier and let the requirement check for `true` as value.
That's it for that part. Now your element will be visible when the variable's value is `true`.
## The Button
Now we need to add a new Button element.
After adding, right-click it and click on **Edit Action Script**.
This will open the button's Manage Action Script screen.
Click on **Add IF Statement**, add the **Is Variable Value** requirement to it and set the requirement's mode to **OPPOSITE**.
Now click on **Edit Requirement Value**, just like you did with the element before and just input the exact same variable name and value to check for.
Because we set the requirement mode to **OPPOSITE**, it will now check if the variable value is NOT `true`, which is exactly what we want.
Back in the Edit Action Script screen you will now see the IF statement we just added.
Now click on **Add Action**, search for the **Set Variable Value** action, select it and then click on **Edit Action Value**.
As action value, input your variable name first and the value you want to set it to after. Separate name and value by `:`.
In this case we want to set our value to `true`, because this action later gets executed when the value is NOT `true`.
Now append the action to the IF statement by grabbing and moving it over the IF statement, so it only gets executed when our variable's value is NOT `true`.
After doing that, select the IF statement and then click on **Append ELSE Statement**.
Now add another **Set Variable Value** action, but instead of setting the variable value to `true`, set it to `false`.
Now append the second action to the ELSE statement, so it gets executed if the variable value IS `true`.
And that's it! Feels like lots of steps the first time, but it's actually a pretty easy and quick thing to do once you got used to it.
Now you can save your layout, leave the editor and press the button to see if it works!
Feel free to use the same variable for other elements, so you **toggle multiple elements at once** by pressing the button.
You can even toggle whole layouts by using the **Layout-Wide Loading Requirements**. To configure layout-wide requirements, right-click the editor background. Just make sure to add the button to another layout, not the one you want to toggle.
# Cycle Through
Other than toggling between two values, cycling through values needs the action script to be able to cycle between more than two values.
The action script logic is really similar to the one used for toggling, so I will keep it really short here. Make sure to also read the part about toggling.
I added 3 images. The first image is visible when the variable value is `1`, the second one if the value is `2` and the third one if the value is `3`.
After that I added the cycle button and made it cycle the variable value from `1` to `2` to `3` to `1`.
And that's it. Now save the layout, leave the editor and check if the cycle button is working correctly.
================== END PAGE: https://docs.fancymenu.net/docs/toggle ==================
================== BEGIN PAGE: https://docs.fancymenu.net/docs/universal-layouts ==================
---
title: Universal Layouts
description: How to create and use universal layouts.
published: true
date: 2025-05-08T23:45:48.625Z
tags:
editor: markdown
dateCreated: 2025-05-08T23:42:27.319Z
---
# What are Universal Layouts?
Universal Layouts are a powerful feature in FancyMenu that allows you to create layouts that can be applied to **multiple screens** instead of just a single specific screen. This makes them incredibly useful for creating consistent UI elements that appear across your entire game.
Think of Universal Layouts as "global" layouts that can show up everywhere in your game.
# Why Use Universal Layouts?
Universal Layouts are super helpful when you want to:
- Add the same background to all screens
- Create a logo or text that shows up on many screens
- Make Audio elements continue playing across multiple screens
- Build a consistent look and feel throughout your game
# How Universal Layouts Work
When you create a Universal Layout, it gets loaded with **every screen** in the game by default. This means any elements you add to a Universal Layout (like buttons, images, or text) will appear on all screens.
But don't worry! It is also possible to make the universal layout only load in specific screens! For that, scroll down to the **blacklist** and **whitelist** sections.
# Creating a Universal Layout
1. Open any screen in the game
2. Press **Ctrl+Alt+C** to show the customization menu
3. Go to **Layouts → New → For All Screens [Universal]**
4. Design your layout with elements like images, text, or buttons
5. Save your layout with a descriptive name
# Managing Which Screens Get Your Universal Layout
## Using the Blacklist
The blacklist lets you specify screens where you DON'T want your Universal Layout to appear:
1. In the Layout Editor, right-click on the background
2. Select **Layout Settings → Universal Layout Options**
3. Click **Add Screen To Blacklist**
4. Enter the screen identifier (like `title_screen` for the title screen)
Now your Universal Layout will show up on all screens EXCEPT the ones you blacklisted.
## Using the Whitelist
The whitelist is the opposite - it ONLY shows your Universal Layout on specific screens:
1. In the Layout Editor, right-click on the background
2. Select **Layout Settings → Universal Layout Options**
3. Click **Add Screen To Whitelist**
4. Enter the screen identifier for each screen where you want the layout to appear
When using a whitelist, your Universal Layout will ONLY show up on the screens you listed.
# Finding Screen Identifiers
To add screens to whitelist or blacklist, you need to know their identifiers:
1. Go to the screen you want to identify
2. Press **Ctrl+Alt+C** to open the customization menu
3. Click **Customization → Copy Identifier of Current Screen**
4. The identifier is now copied to your clipboard
You can paste this identifier into the whitelist or blacklist.
# Enabling Customization for All Screens
It is not possible to enable customization for all screens at once.
This is by design and prevents people from accidentally bricking their game because they enable customization for a modded screen that isn't supported.
# Advanced Tips
## Managing the Loading Order
When you have both Universal Layouts and screen-specific layouts, Universal Layouts are loaded FIRST. This means screen-specific layouts can override elements from Universal Layouts.
## Loading Requirements
You can add loading requirements to your Universal Layout so it only loads under certain conditions:
1. Right-click in the editor
2. Choose **Layout Settings → Layout-Wide Requirements**
3. Add conditions like time of day, operating system, or other requirements
================== END PAGE: https://docs.fancymenu.net/docs/universal-layouts ==================
================== BEGIN PAGE: https://docs.fancymenu.net/docs/vanilla-elements ==================
---
title: Vanilla Elements
description: How to customize elements that are part of screens by default.
published: true
date: 2025-07-05T20:08:37.114Z
tags:
editor: markdown
dateCreated: 2025-06-26T13:59:53.535Z
---
# Vanilla Elements
FancyMenu does not only allow you to add new stuff to screens, it also makes it possible to customize existing elements from the base game (Vanilla) and even other mods.
## Vanilla Buttons and Sliders (Widgets)
To customize existing Vanilla/mod widgets, just make a new layout **"for the current screen"** (NOT universal!) and **right-click** the elements in the editor just like you would do with custom ones.
You can customize their **labels and textures** just like you would do with custom buttons and sliders.
The only thing you **can't do** with Vanilla/mod widgets is customizing their **action script** (like changing what they do when interacting with them). This is only possible with custom buttons and sliders.
To **move** and **resize** Vanilla/mod widgets, you need to give them an anchor point first. To do that, **right-click** them and click on **Anchor Point**. Set it to anything other than **Original**, because that's the default anchor of Vanilla/mod elements.
You can also **hide** Vanilla/mod widgets by simply **right-clicking** them and clicking on **Delete**. They are not actually deleted, but hidden and you can restore them by clicking on **menu bar -> Element -> Deleted Vanilla Elements** and **left-clicking** the element(s) you want to make visible again.
> The **Copyright** widget in the Title screen is the only one you **CAN'T** hide/delete. This is by design. Please don't remove copyright notices.
{.is-warning}
## Title Screen Elements
The Title screen has elements that are not normal widgets (like the logo, splash text, etc.) that can't be moved or customized. They are meant to get deleted and replaced with custom elements (like an Image element for the logo or a custom Splash Text element for the Vanilla splash text).
To delete them, just right-click them. If you want to restore them later, just click on **menu bar -> Element -> Deleted Vanilla Elements** and **left-click** the element you want to make visible again.
## Troubleshooting: Vanilla Elements Not Visible in The Editor
If you can't see Vanilla elements in the editor, it is probably caused by you using a **universal layout** instead of one **for the current screen**. Make sure to create a layout for the current screen. You can only create layouts for the current screen when customizations are enabled for that screen.
## Troubleshooting: Customizations Don't Get Applied
If customizations to Vanilla elements do not get applied outside the editor, it is usually caused by another mod overriding or altering the parent menu of the Vanilla elements.
A pretty good example for a mod overriding a screen/menu is **Ice and Fire**, which overrides the Title screen.
Customizations not getting applied to menus is not limited to Vanilla elements. Custom elements added to screens will probably also fail to get applied to menus if a mod is overriding or altering them.
================== END PAGE: https://docs.fancymenu.net/docs/vanilla-elements ==================
================== BEGIN PAGE: https://docs.fancymenu.net/docs/vanilla-sounds ==================
---
title: Accessing Vanilla Sound Files
description: How to access Vanilla sound resources.
published: true
date: 2025-06-25T20:17:48.636Z
tags:
editor: markdown
dateCreated: 2025-04-14T20:16:24.273Z
---
# Vanilla Sounds & Music
It's possible to use Vanilla Minecraft's sounds and music in Audio elements and other stuff that take OGG audio files.
# Accessing Vanilla Sound Resources
To access Vanilla sound resources, you need to know their real resource location.
For example, the `bromeliad.ogg` music track is located at `assets/minecraft/sounds/music/game/`, so its resource location would be `minecraft:sounds/music/game/bromeliad.ogg`.
This image shows the resource location used in an Audio element:
An easy way to see the real resource locations of audio files is by using [mcasset.cloud](https://mcasset.cloud/1.20.6/assets/minecraft/sounds).
This website lets you browse Minecraft's assets.
================== END PAGE: https://docs.fancymenu.net/docs/vanilla-sounds ==================
================== BEGIN PAGE: https://docs.fancymenu.net/docs/variables ==================
---
title: Variables
description: How to create and use variables.
published: true
date: 2026-05-03T11:01:52.000Z
tags:
editor: markdown
dateCreated: 2025-04-14T20:16:28.294Z
---
# Variables in FancyMenu
Variables are a powerful feature in FancyMenu that let you store and reuse information throughout your menu customizations. They work like containers where you can put different types of data, give each container a name, and then access that data later using the variable name. Variables open up a world of possibilities for creating dynamic menus that change based on conditions you define.
## Creating Variables
To create a variable in FancyMenu:
1. Make sure you're not currently in the Layout Editor.
2. Click on the menu bar at the top of the screen.
3. Go to **Customization -> Variables -> Manage Variables**.
4. In the "Manage Variables" screen that appears, click the **Add Variable** button.
5. Type in a name for your new variable and click **OK**.
That's it! Your variable is ready to use. You can see it listed in the "Manage Variables" screen.
FancyMenu 3.9.0 reworks the Manage Variables window. Important actions are available through a right-click context menu, the list supports keyboard navigation, variables can be copied/pasted, changes can be undone/redone, typing starts a search, **DEL** deletes the selected variable, and **CTRL + S** confirms the window.
## Setting Variable Values
An empty variable isn't very useful on its own. To make variables work for you, you need to put data into them. In FancyMenu, this is called "setting the variable value."
There are two main ways to set a variable's value:
1. In the "Manage Variables" screen, find the variable in the list, click it, and then click **Set Value**. Type in the data you want to store.
2. While customizing your menu, use the **Set Variable** action on a Button, Slider or Ticker element. With this action, you specify the variable name and the value to store in it. When someone, for example, clicks a button with this action, the variable will update with the new value.
For example, let's say you create a variable named `clicks` to count how many times a button is pressed. You would add the **Set Variable** action to the button, and use a placeholder in the action's value to increment the click count each time, like this:
```
clicks:{"placeholder":"calc","values":{"expression":"{"placeholder":"getvariable","values":{"name":"clicks"}} + 1"}}
```
Here's how this works:
1. The **Get Stored Variable** placeholder retrieves the current value of the `clicks` variable.
2. The **Calculator** placeholder takes that value and adds 1 to it.
3. The result is then stored back into the `clicks` variable using the **Set Variable** action.
So each time the button is clicked, the `clicks` variable will increment by 1, effectively counting the total number of clicks.
## Using Variables
Now that you have variables holding data, you can use that data in different parts of your menu customization:
* **Loading Requirements**: You can check a variable's value in a loading requirement to control when certain menu elements appear. For example, you could make an element only show up if the `clicks` variable is greater than 5 by using a combination of the **Is Number** requirement and the **Get Stored Variable** placeholder.
* **Placeholders**: Variables can be inserted into text using the **Get Stored Variable** placeholder. If you have a text element, you could use `{"placeholder":"getvariable","values":{"name":"clicks"}}` to display the current value of the "clicks" variable.
* **Nested Placeholders**: You can even use variables inside other placeholders! The click counting example above demonstrated this by using the **Get Stored Variable** placeholder inside the **Calculator** placeholder.
* **Actions**: Variables can be used in actions to create dynamic behavior based on variable values. Here are a few examples:
- Use an **IF** statement in an action script to check a variable's value using a combination of the **Is Number** loading requirement and the **Get Stored Variable** action and perform different actions based on the result. For instance, you could have a button that says "You've clicked me X times!" and use an IF block to show a special message if the number of clicks is over 10.
- Combine the **Get Stored Variable** placeholder with the **Copy to Clipboard** action to let users copy the value of a variable to their clipboard.
- Use variables in the **Open GUI** action to load different screens based on the user's progress or preferences, which you track with variables.
## Variable Examples
Here are a few examples to inspire your own variable usage:
1. **High Score**: Create a `highscore` variable and a button that sets it to the player's current score if it's higher than the existing value. Display the high score on the menu using the **Get Stored Variable** placeholder.
2. **Difficulty Selector**: Make variables for different game difficulties, like `easy`, `medium`, and `hard`. Use buttons to set the difficulty variable, and show/hide elements based on the selected difficulty.
3. **Tutorial Progress**: Add variables to track the player's progress through a tutorial, like `tutorial_step`. Increment the variable as they complete each step, and use loading requirements to gradually reveal more of the menu.
Variables combined with FancyMenu's other features give you incredible flexibility to create menus that are tailored to each player's actions and preferences. Experiment with different variable setups to unlock the full potential of your menu customizations!
================== END PAGE: https://docs.fancymenu.net/docs/variables ==================
================== BEGIN PAGE: https://docs.fancymenu.net/docs/video ==================
---
title: Videos (MP4)
description: What to know about using videos in FancyMenu.
published: true
date: 2026-05-03T11:01:52.000Z
tags:
editor: markdown
dateCreated: 2025-06-30T21:24:26.869Z
---
# Videos
FancyMenu supports playing MP4 videos as elements, menu backgrounds and Game Intro content.
FancyMenu 3.9.0 adds a new native **Video** element and **Video** menu background powered by Watermedia V3. The old **Video [MCEF]** element/background type is deprecated and should only be kept for old layouts that still need it.
There are also the following **actions** to control video backgrounds and elements:
- **Set Video Element Volume** to set the volume of a Video element
- **Set Video Element Play Time** to seek a Video element to a millisecond timestamp
- **Toggle Video Element Paused State** to toggle the paused state of a Video element
- **Set Video Background Volume** to set the volume of a Video menu background
- **Set Video Background Play Time** to seek a Video menu background to a millisecond timestamp
- **Toggle Video Background Paused State** to toggle the paused state of a Video menu background
And the following **placeholders** to get information about video backgrounds and elements:
- **Video Element Volume** to get the volume of a Video element
- **Video Element Duration** to get the duration of a Video element
- **Video Element Play Time** to get the current play time (progress) of a Video element
- **Video Element Paused State** to get the paused state (true/false) of a Video element
- **Video Background Volume** to get the volume of a Video menu background
- **Video Background Duration** to get the duration of a Video menu background
- **Video Background Play Time** to get the current play time (progress) of a Video menu background
- **Video Background Paused State** to get the paused state (true/false) of a Video menu background
The duration and play-time placeholders return `MM:SS` by default. Set `output_as_timestamp` to `true` when you need millisecond timestamps. Play-time placeholders can still use `show_percentage` for 0-100 progress values.
FancyMenu 3.9.0 also adds the **On Video Playback Status Changed** listener, which can react to `PLAYING`, `PAUSED`, `STOPPED` and `FINISHED`.
## Requirements
To use the new native Video element and menu background type, you need to install:
- **Watermedia V3**
- **Watermedia Binaries V3**
These are optional dependencies, so they must be added to the instance manually if you want video support.
The deprecated **Video [MCEF]** type still uses MCEF. For new layouts, use the native Watermedia-powered Video type instead.
## Videos in Loading Screens
Video support does NOT work in loading screens (game/resource loading screen & world loading screen).
This also means that you should NOT add videos to the game loading screen via **Drippy Loading Screen**, since it will not work in most cases.
You should use short, simple AFMA/FMA files in loading screens instead, since users don't notice them getting reloaded in most cases when the animation is simple and short enough.
## Troubleshooting
If you have issues with native video support, first confirm that both Watermedia V3 and Watermedia Binaries V3 are installed and match your Minecraft/modloader version.
================== END PAGE: https://docs.fancymenu.net/docs/video ==================
================== BEGIN PAGE: https://docs.fancymenu.net/docs/window-customization ==================
---
title: Window Icon & Title
description: How to change the window icon and title.
published: true
date: 2026-05-03T11:01:52.000Z
tags:
editor: markdown
dateCreated: 2025-04-14T20:16:32.382Z
---
# Window Icon & Title
FancyMenu allows you to change the icon and title of the Minecraft window.

# Custom Icon
To set a custom icon for the Minecraft window in FancyMenu 3.9.0+, navigate to **Customization -> Global Customizations** in the **menu bar**.

- Icons need to be **PNG** files (and **ICNS for macOS**)
- Icons need to have at least **1 transparent pixel** to not look glitched (MC/LWJGL bug)
- You need to set valid files for all 3 icon versions (16x16, 32x32, macOS) to enable the custom icon toggle
> **Again**: Icons need to have at least **1 transparent pixel** to not look glitched (MC/LWJGL bug). The icon will look broken if it doesn't have at least one fully transparent pixel!
{.is-danger}
# Custom Title
To set a custom title for the Minecraft window in FancyMenu 3.9.0+, navigate to **Customization -> Global Customizations** in the **menu bar**.

================== END PAGE: https://docs.fancymenu.net/docs/window-customization ==================
================== BEGIN PAGE: https://docs.fancymenu.net/docs/world-creation-screen ==================
---
title: World Creation Screen
description: Customizing the World Creation screen.
published: true
date: 2025-06-25T19:52:25.327Z
tags:
editor: markdown
dateCreated: 2025-06-25T19:52:21.375Z
---
# World Creation Screen
If you already tried to customize the World Creation screen (aka. Create World, New World, New Game), you probably noticed that it's a _pain_ to customize. This is because that screen is pretty complex and is built in a way that makes it super difficult for FancyMenu to properly customize it due to buttons and other GUI elements being stacked.
In newer versions of Minecraft, the customizability got even worse due to the new tab system.
All that makes it **not recommended** to customize the screen, at least not complex customizations like editing existing GUI elements (like Vanilla buttons, etc.) or adding new custom elements. It is probably fine to set a custom background, but beyond that it gets messy, so it's best to just not customize it much.
================== END PAGE: https://docs.fancymenu.net/docs/world-creation-screen ==================
 # What Are Actions?
An **action** is a task or job that FancyMenu runs when triggered. For example, an action might open a new screen, send a chat message, or adjust the volume of an audio element. In FancyMenu's editor, actions are configured with a value (if needed) that provides extra details—such as a URL or server address.
# What Are Statements?
To create more complex behavior, FancyMenu supports basic control statements in action scripts. These include:
- **If Statement:** Runs a block of actions only if a specified [condition](/en/conditions) is met.
- **Else-If Statement:** Checks another [condition](/en/conditions) if the preceding *if* (or earlier *else-if*) wasn't met.
- **Else Statement:** Runs if none of the preceding [conditions](/en/conditions) are met.
- **While Statement:** Repeats a block of actions continuously while a [condition](/en/conditions) remains true (with a built‑in timeout to prevent infinite loops).
- **Delay Block:** Waits for the specified time before running its contained actions. The rest of the script keeps running while the delay counts down.
- **Execute Later Block:** Queues contained actions to run on the main thread after a millisecond delay.
- **Comment:** Adds a note inside the script for organization. Comments do not run any action.
By combining these statements with actions, you can build dynamic and conditional behavior, for example, checking if a player's health is low before sending a warning message or repeating an update until a condition changes.
# Where Can You Use Action Scripts?
Action scripts are versatile and can be used throughout your layout. You can assign them, for example, to:
- **Buttons:** Execute an action when the button is clicked.
- **Tickers:** Continuously run an action script to update on-screen information.
- **Sliders:** Trigger an action script whenever the slider's value changes.
- **Screen Events:** Run scripts when a screen opens or closes (for example, playing a sound when a menu appears).
- **Listeners:** When a listener that listeners to a specific event gets fired, it will execute its action script.
# Using Placeholders in Actions
Action values support dynamic content through **placeholders**. Most of the time these placeholders use a JSON-like syntax and are replaced with live data when the action runs.
## JSON-Like Placeholders
These are the normal [placeholders](/en/placeholders) that can be used in many places throughout layouts.
They follow this syntax:
```json
{"placeholder": "placeholder_id", "values": {"key1": "value1", "key2": "value2"}}
```
They can fetch game data like the player's name, screen dimensions, or calculated values using the **Calculator** placeholder. You can also nest placeholders for more advanced uses.
## `$$` Placeholders (Variables)
The `$$` placeholders are special. Some features of FancyMenu will provide these special placeholders for their nested actions, requirements and normal placeholders, so they can be used inside to get more information about the environment (element, listener, etc.) they are in.
For example, if actions are used within a slider, using `$$value` in the action will be replaced with the slider's current value.
When using actions in listeners, every listener will provide its own unique set of variables/placeholders for getting more information about the listener, like pressed mouse button, entered structure, etc.
# How to Set Up and Edit Actions
To add, edit, or remove actions (and statement blocks) for an element, simply **right-click the element** (whether it's a button, slider, ticker, or other interactive item) and then select **Manage Action Script**. This opens the Manage Actions screen, where you can:
- **Add new actions or statements:** Insert new action entries or control statements (if, else-if, else, while) to build your script.
- **Edit existing actions or statements:** Modify the action value or change the control logic.
- **Remove actions or statements:** Delete unwanted actions from the script.
For [listeners](/listeners) there is a special menu to manage and create listeners, including accessing their action scripts to have the same experience as when editing a button's or slider's action script for example.
> When in the Action Script Editor screen, just right-click the big dark-grey area to open a context menu for adding actions, statements and more.
{.is-info}
# Action Script Editor Shortcuts and More
The action script editor has some great QoL features making script editing super easy.
## Shortcuts
- `DEL` : Quick-delete the selected entry
- `ENTER` : Starts the in-line editing of the selected entry (or opens the edit screen if there is not in-line edit for the selected entry)
- `CTRL + C` : Copy the selected action (only works with actions for now)
- `CTRL + V` : Paste the previously copied action
- `CTRL + Z` : One step back (undo)
- `CTRL + Y` : One step forward (redo)
- `ARROW UP` : Navigate one entry up from the currently selected one
- `ARROW DOWN` : Navigate one entry down from the currently selected one
- `SHIFT + ARROW UP` : Move the selected entry one up
- `SHIFT + ARROW DOWN` : Move the selected entry one down
- `A` : Quick-open the Action Chooser screen to add a new action
- `CTRL + S` : Done/save from the editor window
## More QoL Features
- Double-clicking the value of an action lets you edit the value without going into the full value editing screen.
- IF statement chains (with appended ELSE/ELSE-IF statements), WHILE loops and Folders can be collapsed (only visual, does not affect script logic).
- The editor always adds new actions below the selected entry (or nested in the selected chain/loop/folder).
- Right-clicking the dark-grey script area background opens a context menu with options to add actions, statements and everything else important.
# Actions in Detail
This list contains most, if not all, actions available in FancyMenu. It's possible that the list is a bit outdated sometimes due to updates of the mod.
## Next Track (`audio_next_track`)
- **Description:** Goes to the next track in an audio element
- **Value Required:** Yes - `audio_element_identifier` (the ID of the audio element to control)
## Previous Track (`audio_previous_track`)
- **Description:** Goes to the previous track in an audio element
- **Value Required:** Yes - `audio_element_identifier` (the ID of the audio element to control)
## Set Track Volume (`set_audio_element_volume`)
- **Description:** Sets the volume of an audio element (0.0 to 1.0)
- **Value Required:** Yes - `element_identifier:volume`
## Toggle Play/Pause Track (`audio_toggle_play`)
- **Description:** Toggles play/pause of an audio element's current track
- **Value Required:** Yes - `audio_element_identifier`
## Play Audio (`play_audio`)
- **Description:** Plays an audio resource once. The action tracks audio it started so it can later be stopped by `stop_all_action_audios`.
- **Value Required:** Yes - JSON configuration with `audioSource`, `soundChannel`, and `baseVolume`
- **Example Value:** `{"audioSource":"[source:local]/config/fancymenu/assets/example.ogg","soundChannel":"master","baseVolume":1.0}`
## Stop All Action Audios (`stop_all_action_audios`)
- **Description:** Stops all audio tracks that were started by the **Play Audio** action. This does not stop Audio elements, menu open/close sounds, button sounds, or other audio systems.
- **Value Required:** No
## Set Video Element Volume (`set_video_element_volume`)
- **Description:** Sets the volume of a video element (0.0 to 1.0)
- **Value Required:** Yes - `video_element_identifier:volume`
## Set Video Element Play Time (`set_video_element_play_time`)
- **Description:** Seeks a video element to a millisecond timestamp
- **Value Required:** Yes - `video_element_identifier:timestamp_ms`
## Toggle Video Element Paused State (`toggle_video_element_pause_state`)
- **Description:** Toggles the paused state of a video element
- **Value Required:** Yes - `video_element_identifier`
## Set Video Background Volume (`set_video_menu_background_volume`)
- **Description:** Sets the volume of a video menu background (0.0 to 1.0)
- **Value Required:** Yes - `background_identifier:volume`
> To get the identifier of a background, right-click the editor background and click on 'Copy Background Identifier'.
{.is-info}
## Set Video Background Play Time (`set_video_menu_background_play_time`)
- **Description:** Seeks a video menu background to a millisecond timestamp
- **Value Required:** Yes - `background_identifier:timestamp_ms`
> To get the identifier of a background, right-click the editor background and click on 'Copy Background Identifier'.
{.is-info}
## Toggle Video Background Paused State (`toggle_video_menu_background_pause_state`)
- **Description:** Toggles the paused state of a video menu background
- **Value Required:** Yes - `background_identifier`
> To get the identifier of a background, right-click the editor background and click on 'Copy Background Identifier'.
{.is-info}
## Toggle Layout (`toggle_layout`)
- **Description:** Toggles a layout (Enable/Disable) by its name
- **Value Required:** Yes - `layout_name`
## Enable Layout (`enable_layout`)
- **Description:** Enables a layout by its name
- **Value Required:** Yes - `layout_name`
## Disable Layout (`disable_layout`)
- **Description:** Disables a layout by its name
- **Value Required:** Yes - `layout_name`
## Open Screen or Custom GUI (`opengui`)
- **Description:** Opens a screen by its identifier (vanilla, mod, or custom GUI)
- **Value Required:** Yes - `screen_identifier`
> This action **will not work for every screen**, especially mod screens. If the action fails to open a screen, it will show an error. There is not much you can do in that case, because then it's probably a screen that is too complex to get opened automatically by FancyMenu.
>
> Compatibility for mod screens will also not get added manually on FancyMenu's side anymore, because adding compatibility for all the mods out there would take ages, sorry. In most cases it is also not recommended to contact the dev of the other mod in that case, because if FancyMenu can't open the screen, there is not easy way to add support for it. The recommended workaround here is to try to use the **"Mimic Vanilla/Mod Button"** action to mimic a button that opens the specific screen. If there is no button, then you're out of luck, sorry.
{.is-info}
## Close Screen (`closegui`)
- **Description:** Closes the active screen
- **Value Required:** No
## Update Screen (`update_screen`)
- **Description:** Reinitializes the current screen
- **Value Required:** No
## Back to Last Screen (`back_to_last_screen`)
- **Description:** Goes back to the previous screen (the one before the current)
- **Value Required:** No
## Join Server (`joinserver`)
- **Description:** Connects the player to a Minecraft server
- **Value Required:** Yes - `server_ip:port`
## Enter World (`loadworld`)
- **Description:** Enters a Minecraft world
- **Value Required:** Yes - `world_folder_name`
## Enter/Join Last World/Server (`join_last_world`)
- **Description:** Enters/joins the last world or server the player was in
- **Value Required:** No
## Leave World or Server (`disconnect_server_or_world`)
- **Description:** Leaves a world or server and opens a specified screen
- **Value Required:** Yes - `screen_identifier`
## Quit Minecraft (`quitgame`)
- **Description:** Quits Minecraft completely
- **Value Required:** No
## Send Chat Message/Command (`sendmessage`)
- **Description:** Sends a chat message or executes a chat command
- **Value Required:** Yes - `message_text` or `/command_text`
## Execute Command As Integrated Server (`execute_command_as_integrated_server`)
- **Description:** Force-executes a command in singleplayer as the integrated server, ignoring permissions and the cheats setting.
- **Value Required:** Yes - Command text, for example `/give @p minecraft:diamond 1`
> This action only works in singleplayer while the world is not opened to LAN. It intentionally does nothing on multiplayer servers.
{.is-warning}
## Paste to Chat (`paste_to_chat`)
- **Description:** Pastes text to the chat input field (append or replace)
- **Value Required:** Yes - `true:Text` or `false:Text`
## Display In Chat [Client-Side] (`display_in_chat_client_side`)
- **Description:** Prints text directly to local chat (no server)
- **Value Required:** Yes - `text_or_json`
## Send FM Data To Server (`send_fm_data_to_server`)
- **Description:** Sends custom text data to the current FancyMenu server through the FM Data packet channel.
- **Value Required:** Yes - `data_identifier||data`
## Connect To Remote Server (`connect_to_remote_server`)
- **Description:** Opens or reuses a client-initiated WebSocket connection to an external remote server.
- **Value Required:** Yes - Remote server URL, for example `wss://example.com/ws`
## Send Data To Remote Server (`send_data_to_remote_server`)
- **Description:** Opens or reuses a remote server connection and sends text data to it.
- **Value Required:** Yes - `remote_server_url||data`
## Close Remote Server Connection (`close_remote_server_connection`)
- **Description:** Closes a specific remote server connection by request ID.
- **Value Required:** Yes - Request ID, usually from a Remote Server listener variable such as `$$request_id`
## Close All Remote Server Connections (`close_all_remote_server_connections`)
- **Description:** Closes all active remote server connections opened by FancyMenu.
- **Value Required:** No
## Open URL in Browser (`openlink`)
- **Description:** Opens a link in your default browser
- **Value Required:** Yes - `https://example.com`
## Copy Text to Clipboard (`copytoclipboard`)
- **Description:** Copies text to the clipboard
- **Value Required:** Yes - `text_to_copy`
## Print to Game Log (`print_to_log`)
- **Description:** Writes a line to the game log
- **Value Required:** Yes - `text_to_log`
## Set Variable Value (FM Variable) (`set_variable`)
- **Description:** Stores text content in a FancyMenu variable
- **Value Required:** Yes - `variable_name:variable_value`
## Clear All Variables (FM Variable) (`clear_variables`)
- **Description:** Clears ALL of FancyMenu's stored variables
- **Value Required:** No
## Send HTTP Request (`send_http_request`)
- **Description:** Sends an HTTP request; can store the response in a variable
- **Value Required:** Yes - HTTP request configuration
> This action allows you to send data to REST APIs, webhooks, or any HTTP endpoint.
> Supports various authentication methods, custom headers, and different request types.
>
> This action also allows you to store the response of the request in a FancyMenu variable for later use!
{.is-info}
## Manage Resource Pack (`manage_resource_pack`)
- **Description:** Enable/disable/toggle a resource pack by display name (optional reload)
- **Value Required:** Yes - `pack_name|||MODE|||reload_bool`
## Reload Resource Packs (`reload_resource_packs`)
- **Description:** Reloads resource packs (5s cooldown)
- **Value Required:** No
## Reload FancyMenu (`reloadmenu`)
- **Description:** Reloads FancyMenu, including panoramas, slideshows and all resources (heavy)
- **Value Required:** No
> This action has a **big impact on performance** and can cause lags if used in Tickers. It is not recommended to use this action in anything else than a button.
{.is-warning}
## Toggle Element Animator (`toggle_element_animator`)
- **Description:** Toggles an element animator playback state
- **Value Required:** Yes - `animator_identifier`
## Enable Element Animator (`enable_element_animator`)
- **Description:** Enables an element animator
- **Value Required:** Yes - `animator_identifier`
## Disable Element Animator (`disable_element_animator`)
- **Description:** Disables an element animator
- **Value Required:** Yes - `animator_identifier`
## Reset Element Animator (`reset_element_animator`)
- **Description:** Resets an element animator timeline/state
- **Value Required:** Yes - `animator_identifier`
## Mimic Vanilla/Mod Button (`mimicbutton`)
- **Description:** Mimics the click action of a vanilla or mod button
- **Value Required:** Yes - `screen_identifier:widget_locator`
## Mimic Keybind (`mimic_keybind`)
- **Description:** Runs a Minecraft keybind (optional hold)
- **Value Required:** Yes - `keybind_id|||keep_pressed_bool|||duration_ms`
## Set Text Input Field Value (`set_text_input_field_value`)
- **Description:** Sets the value of a custom or vanilla input field by element identifier.
- **Value Required:** Yes - `element_identifier|||new_value|||force_set_when_inactive`
## Create File in Game Directory (`create_file_in_game_dir`)
- **Description:** Creates an empty file in the game directory (instance root). Accepts the `.minecraft/` prefix to target the default launcher profile directory (may differ from the current instance dir).
- **Value Required:** Yes - `file_path`
## Delete File/Folder in Game Directory (`delete_file_in_game_dir`)
- **Description:** Deletes a file or folder in the game directory (instance root). Accepts `.minecraft/` prefix to hit the default launcher profile (can differ from the running instance). Append `*` to delete **all files directly inside** a folder (ignores sub-directories; keeps the folder).
- **Value Required:** Yes - `target_path`
## Copy File/Folder in Game Directory (`copy_file_in_game_dir`)
- **Description:** Copies within the game directory (instance root); `.minecraft/` prefix targets the default launcher profile (not always the current instance). Append `*` to the **source** path to copy every file directly inside that folder (ignores sub-directories); destination must be a directory and cannot use `*`.
- **Value Required:** Yes - `source||destination`
## Move File/Folder in Game Directory (`move_file_in_game_dir`)
- **Description:** Moves within the game directory (instance root); `.minecraft/` prefix targets the default launcher profile (may differ from the current instance). Append `*` to the **source** path to move every file directly inside that folder (ignores sub-directories); destination must be a directory and cannot use `*`.
- **Value Required:** Yes - `source||destination`
## Rename File/Folder in Game Directory (`rename_file_in_game_dir`)
- **Description:** Renames a file or folder inside the game directory (instance root); `.minecraft/` prefix targets the default launcher profile (may differ from current instance). Keeps contents intact, only the name changes.
- **Value Required:** Yes - `path||new_name`
## Download File to Game Directory (`download_file_to_game_dir`)
- **Description:** Downloads a file asynchronously into the game directory (instance root); `.minecraft/` prefix targets the default launcher profile (not necessarily the running instance). Provide the **target folder**; filename is derived from headers/URL automatically.
- **Value Required:** Yes - `url||target_folder`
## Extract ZIP File In Game Directory (`extract_zip_file_in_game_dir`)
- **Description:** Extracts a ZIP file into a target folder inside the game directory or default `.minecraft` directory. Triggers the **On ZIP Extracted via Action** listener when finished.
- **Value Required:** Yes - `source_zip_path||target_folder_path`
## Open File/Folder In Game Directory (`open_file_folder_in_game_dir`)
- **Description:** Opens a file or folder with the operating system's default app. The target must stay inside the game directory or the default `.minecraft` directory.
- **Value Required:** Yes - `target_path`
## Write File in Game Directory (`write_file_in_game_dir`)
- **Description:** Writes or appends text inside the game directory (instance root); `.minecraft/` prefix targets the default launcher profile (may differ from this instance). Creates the file if missing. Supports `\n` in the value to insert line breaks; append mode controlled by the final boolean.
- **Value Required:** Yes - `path|||content|||append_bool`
## Select File from System (`select_file_to_game_dir`)
- **Description:** Opens a native file picker (any location) and copies the selected file into the game directory (instance root) or default `.minecraft/` when prefixed (that default may differ from this instance). Supports extension filters, custom filter label, and optional overwrite toggle.
- **Value Required:** Yes - selection configuration
## Show Toast (`show_toast`)
- **Description:** Displays a configurable toast notification
- **Value Required:** Yes - toast configuration
## Start Scheduler (`start_scheduler`)
- **Description:** Starts a scheduler by its scheduler ID.
- **Value Required:** Yes - `scheduler_id`
## Stop Scheduler (`stop_scheduler`)
- **Description:** Stops a scheduler by its scheduler ID.
- **Value Required:** Yes - `scheduler_id`
## Set Minecraft Option (`edit_minecraft_option`)
- **Description:** Edits a Minecraft config option
- **Value Required:** Yes - `option_name:set_to_value`
================== END PAGE: https://docs.fancymenu.net/docs/action-scripts ==================
================== BEGIN PAGE: https://docs.fancymenu.net/docs/advanced-positioning-sizing ==================
---
title: Advanced Positioning & Sizing
description: How to use Advanced Positioning and Sizing of elements.
published: true
date: 2025-08-01T01:44:12.713Z
tags:
editor: markdown
dateCreated: 2025-04-14T20:03:22.929Z
---
# Advanced Positioning & Sizing
Advanced positoning/sizing allows you to have **full control over the position and size of your elements**. This is very powerful but also **a lot more time-consuming** than using FancyMenu's automated sizing and positioning.
> If you just want elements to better scale with Minecraft's **GUI scale**, it is recommended to use layout-wide **auto-scaling** instead, which can be enabled by first forcing a GUI scale in the menu that opens when right-clicking the editor background and then enabling **Auto-Scaling** in the same menu.
{.is-warning}
# Toggling Advanced Positioning/Sizing Mode
To **enable** andvanced positioning/sizing for an element, **right-click** it and click on **Advanced Positioning** or **Advanced Sizing**.
The element will automatically switch to the advanced mode when you set an advanced position or size value.
To **disable** it and switch back to normal positioning/sizing, **clear all positioning/sizing values**.
> While an element is in Advanced Sizing/Positioning mode, resizing and/or moving the element could be disabled or restricted.
{.is-warning}
# Calculating Positions/Sizes
The reason why advanced positioning/sizing is so powerful is that you can use **placeholders** in the position/size values.
This allows you to use the **Calculator** placeholder (located in the **Advanced** placeholder category) in combination with placeholders of the **GUI** category, like **Screen Width**, **GUI Scale**, **Element Width** and more.
> You can add placeholders by clicking on the **Placeholders** button at the top-right side of the text editor. If you don't see this button, the content you want to edit does **not support** placeholders.
{.is-info}
To calculate something with the **Calculator** placeholder, replace the example expression with your own. You can use nested placeholders in the expression, so you can make use of the screen size, element size, etc. placeholders there.
For example, this placeholder will simply solve `1 + 1` and will show as `2` later:
`{"placeholder":"calc","values":{"expression":"1 + 1","decimal":"false"}}`
The `decimal` variable is set to `false`, which is important for most sizing/positioning calculations, so just set this always to `false` when working with advanced positioning/sizing.
The following calculator uses the **Screen Width** placeholder and divides it by `2`:
`{"placeholder":"calc","values":{"expression":"{"placeholder":"guiwidth"} / 2","decimal":"false"}}`
================== END PAGE: https://docs.fancymenu.net/docs/advanced-positioning-sizing ==================
================== BEGIN PAGE: https://docs.fancymenu.net/docs/apng ==================
---
title: APNGs
description: How to make FancyMenu-compatible APNG images.
published: true
date: 2026-05-03T11:01:52.000Z
tags:
editor: markdown
dateCreated: 2025-04-14T20:14:10.093Z
---
# Animated PNG Images
> For new large or complex animations, prefer [AFMA/FMA files](/fma). FancyMenu 3.9.0 can use Watermedia V3 + Watermedia Binaries V3 for faster APNG/GIF decoding when available, but AFMA is still the preferred FancyMenu animation format.
{.is-info}
APNGs are an animated version of PNG images, making it possible to have the same features as with a GIF, but in full, lossless PNG quality!
FancyMenu has built-in APNG support, but it's a bit picky about what APNGs are supported.
It needs **uncompressed** APNGs that are **not interlaced**.
# Making APNG Animations
You would be surprised how difficult it is to find a good APNG editor, especially with options to disable compression and interlacing.
A great choice for an editor is [ScreenToGif](https://www.screentogif.com/), which is actually a tool to record GIFs and APNGs of your screen, but it's also great to make normal APNGs by skipping the record part and directly loading into the editor!
## Open The Editor
The first thing you see after opening [ScreenToGif](https://www.screentogif.com/) is this screen. Click on **Editor** here.

## Load the Frames
Now you need your PNG frames. Drag-&-Drop them into the editor.

## Frame Delay
To configure the delay between frames, select the frame(s) you want to edit, switch to the **Edit** tab and in the **Delay (Duration)** section, click on **Override**.

## Looping
The looping behavior can be configured in the **Save As** menu. Take a look at the next step for how to open this menu.
## Exporting the APNG
Now you're ready to switch to the **File** tab again to click on **Save As**.
In the save menu, make sure to:
- Set the file type to **APNG** (first setting, you maybe need to scroll to the top of the menu first)
- Disable **Detect Unchanged Pixels**
> You can also configure the **looping behavior** in the that menu! Disabling **Looped Apng** will make the APNG not loop at all, and when enabling it you can choose between a specific number of loops or infinite looping.
{.is-info}

## Using the APNG in FancyMenu
Now you can copy your APNG file to `/config/fancymenu/assets/`. Then you will be able to use it for nearly everything that accepts images.
> It is **really important** that the APNG file name ends with `.apng`!
> FancyMenu will not be able to identify the image as APNG if it's not ending with `.apng`.
{.is-warning}

================== END PAGE: https://docs.fancymenu.net/docs/apng ==================
================== BEGIN PAGE: https://docs.fancymenu.net/docs/background-music ==================
---
title: Menu Background Music
description: How to customize the music played in menus.
published: true
date: 2026-05-03T11:01:52.000Z
tags:
editor: markdown
dateCreated: 2025-04-14T20:14:14.268Z
---
# Menu Background Music
It's possible to replace Minecraft's default menu background music with custom tracks or just disable the normal Vanilla music that plays in menus.
# Disabling Vanilla Music
FancyMenu has multiple ways to disable Vanilla menu music. This can be useful if you plan to play other audio tracks in screens or if you just don't want music to play at all in some screens.
## Globally
If you want no music in menus at all, this is the easiest way to do that.
To globally disable or replace Vanilla menu music in FancyMenu 3.9.0+, go to FancyMenu's menu bar at the top of screens and click **Customization -> Global Customizations**. Global Customizations can replace menu music without requiring a resource pack and without enabling customizations for every screen.
# What Are Actions?
An **action** is a task or job that FancyMenu runs when triggered. For example, an action might open a new screen, send a chat message, or adjust the volume of an audio element. In FancyMenu's editor, actions are configured with a value (if needed) that provides extra details—such as a URL or server address.
# What Are Statements?
To create more complex behavior, FancyMenu supports basic control statements in action scripts. These include:
- **If Statement:** Runs a block of actions only if a specified [condition](/en/conditions) is met.
- **Else-If Statement:** Checks another [condition](/en/conditions) if the preceding *if* (or earlier *else-if*) wasn't met.
- **Else Statement:** Runs if none of the preceding [conditions](/en/conditions) are met.
- **While Statement:** Repeats a block of actions continuously while a [condition](/en/conditions) remains true (with a built‑in timeout to prevent infinite loops).
- **Delay Block:** Waits for the specified time before running its contained actions. The rest of the script keeps running while the delay counts down.
- **Execute Later Block:** Queues contained actions to run on the main thread after a millisecond delay.
- **Comment:** Adds a note inside the script for organization. Comments do not run any action.
By combining these statements with actions, you can build dynamic and conditional behavior, for example, checking if a player's health is low before sending a warning message or repeating an update until a condition changes.
# Where Can You Use Action Scripts?
Action scripts are versatile and can be used throughout your layout. You can assign them, for example, to:
- **Buttons:** Execute an action when the button is clicked.
- **Tickers:** Continuously run an action script to update on-screen information.
- **Sliders:** Trigger an action script whenever the slider's value changes.
- **Screen Events:** Run scripts when a screen opens or closes (for example, playing a sound when a menu appears).
- **Listeners:** When a listener that listeners to a specific event gets fired, it will execute its action script.
# Using Placeholders in Actions
Action values support dynamic content through **placeholders**. Most of the time these placeholders use a JSON-like syntax and are replaced with live data when the action runs.
## JSON-Like Placeholders
These are the normal [placeholders](/en/placeholders) that can be used in many places throughout layouts.
They follow this syntax:
```json
{"placeholder": "placeholder_id", "values": {"key1": "value1", "key2": "value2"}}
```
They can fetch game data like the player's name, screen dimensions, or calculated values using the **Calculator** placeholder. You can also nest placeholders for more advanced uses.
## `$$` Placeholders (Variables)
The `$$` placeholders are special. Some features of FancyMenu will provide these special placeholders for their nested actions, requirements and normal placeholders, so they can be used inside to get more information about the environment (element, listener, etc.) they are in.
For example, if actions are used within a slider, using `$$value` in the action will be replaced with the slider's current value.
When using actions in listeners, every listener will provide its own unique set of variables/placeholders for getting more information about the listener, like pressed mouse button, entered structure, etc.
# How to Set Up and Edit Actions
To add, edit, or remove actions (and statement blocks) for an element, simply **right-click the element** (whether it's a button, slider, ticker, or other interactive item) and then select **Manage Action Script**. This opens the Manage Actions screen, where you can:
- **Add new actions or statements:** Insert new action entries or control statements (if, else-if, else, while) to build your script.
- **Edit existing actions or statements:** Modify the action value or change the control logic.
- **Remove actions or statements:** Delete unwanted actions from the script.
For [listeners](/listeners) there is a special menu to manage and create listeners, including accessing their action scripts to have the same experience as when editing a button's or slider's action script for example.
> When in the Action Script Editor screen, just right-click the big dark-grey area to open a context menu for adding actions, statements and more.
{.is-info}
# Action Script Editor Shortcuts and More
The action script editor has some great QoL features making script editing super easy.
## Shortcuts
- `DEL` : Quick-delete the selected entry
- `ENTER` : Starts the in-line editing of the selected entry (or opens the edit screen if there is not in-line edit for the selected entry)
- `CTRL + C` : Copy the selected action (only works with actions for now)
- `CTRL + V` : Paste the previously copied action
- `CTRL + Z` : One step back (undo)
- `CTRL + Y` : One step forward (redo)
- `ARROW UP` : Navigate one entry up from the currently selected one
- `ARROW DOWN` : Navigate one entry down from the currently selected one
- `SHIFT + ARROW UP` : Move the selected entry one up
- `SHIFT + ARROW DOWN` : Move the selected entry one down
- `A` : Quick-open the Action Chooser screen to add a new action
- `CTRL + S` : Done/save from the editor window
## More QoL Features
- Double-clicking the value of an action lets you edit the value without going into the full value editing screen.
- IF statement chains (with appended ELSE/ELSE-IF statements), WHILE loops and Folders can be collapsed (only visual, does not affect script logic).
- The editor always adds new actions below the selected entry (or nested in the selected chain/loop/folder).
- Right-clicking the dark-grey script area background opens a context menu with options to add actions, statements and everything else important.
# Actions in Detail
This list contains most, if not all, actions available in FancyMenu. It's possible that the list is a bit outdated sometimes due to updates of the mod.
## Next Track (`audio_next_track`)
- **Description:** Goes to the next track in an audio element
- **Value Required:** Yes - `audio_element_identifier` (the ID of the audio element to control)
## Previous Track (`audio_previous_track`)
- **Description:** Goes to the previous track in an audio element
- **Value Required:** Yes - `audio_element_identifier` (the ID of the audio element to control)
## Set Track Volume (`set_audio_element_volume`)
- **Description:** Sets the volume of an audio element (0.0 to 1.0)
- **Value Required:** Yes - `element_identifier:volume`
## Toggle Play/Pause Track (`audio_toggle_play`)
- **Description:** Toggles play/pause of an audio element's current track
- **Value Required:** Yes - `audio_element_identifier`
## Play Audio (`play_audio`)
- **Description:** Plays an audio resource once. The action tracks audio it started so it can later be stopped by `stop_all_action_audios`.
- **Value Required:** Yes - JSON configuration with `audioSource`, `soundChannel`, and `baseVolume`
- **Example Value:** `{"audioSource":"[source:local]/config/fancymenu/assets/example.ogg","soundChannel":"master","baseVolume":1.0}`
## Stop All Action Audios (`stop_all_action_audios`)
- **Description:** Stops all audio tracks that were started by the **Play Audio** action. This does not stop Audio elements, menu open/close sounds, button sounds, or other audio systems.
- **Value Required:** No
## Set Video Element Volume (`set_video_element_volume`)
- **Description:** Sets the volume of a video element (0.0 to 1.0)
- **Value Required:** Yes - `video_element_identifier:volume`
## Set Video Element Play Time (`set_video_element_play_time`)
- **Description:** Seeks a video element to a millisecond timestamp
- **Value Required:** Yes - `video_element_identifier:timestamp_ms`
## Toggle Video Element Paused State (`toggle_video_element_pause_state`)
- **Description:** Toggles the paused state of a video element
- **Value Required:** Yes - `video_element_identifier`
## Set Video Background Volume (`set_video_menu_background_volume`)
- **Description:** Sets the volume of a video menu background (0.0 to 1.0)
- **Value Required:** Yes - `background_identifier:volume`
> To get the identifier of a background, right-click the editor background and click on 'Copy Background Identifier'.
{.is-info}
## Set Video Background Play Time (`set_video_menu_background_play_time`)
- **Description:** Seeks a video menu background to a millisecond timestamp
- **Value Required:** Yes - `background_identifier:timestamp_ms`
> To get the identifier of a background, right-click the editor background and click on 'Copy Background Identifier'.
{.is-info}
## Toggle Video Background Paused State (`toggle_video_menu_background_pause_state`)
- **Description:** Toggles the paused state of a video menu background
- **Value Required:** Yes - `background_identifier`
> To get the identifier of a background, right-click the editor background and click on 'Copy Background Identifier'.
{.is-info}
## Toggle Layout (`toggle_layout`)
- **Description:** Toggles a layout (Enable/Disable) by its name
- **Value Required:** Yes - `layout_name`
## Enable Layout (`enable_layout`)
- **Description:** Enables a layout by its name
- **Value Required:** Yes - `layout_name`
## Disable Layout (`disable_layout`)
- **Description:** Disables a layout by its name
- **Value Required:** Yes - `layout_name`
## Open Screen or Custom GUI (`opengui`)
- **Description:** Opens a screen by its identifier (vanilla, mod, or custom GUI)
- **Value Required:** Yes - `screen_identifier`
> This action **will not work for every screen**, especially mod screens. If the action fails to open a screen, it will show an error. There is not much you can do in that case, because then it's probably a screen that is too complex to get opened automatically by FancyMenu.
>
> Compatibility for mod screens will also not get added manually on FancyMenu's side anymore, because adding compatibility for all the mods out there would take ages, sorry. In most cases it is also not recommended to contact the dev of the other mod in that case, because if FancyMenu can't open the screen, there is not easy way to add support for it. The recommended workaround here is to try to use the **"Mimic Vanilla/Mod Button"** action to mimic a button that opens the specific screen. If there is no button, then you're out of luck, sorry.
{.is-info}
## Close Screen (`closegui`)
- **Description:** Closes the active screen
- **Value Required:** No
## Update Screen (`update_screen`)
- **Description:** Reinitializes the current screen
- **Value Required:** No
## Back to Last Screen (`back_to_last_screen`)
- **Description:** Goes back to the previous screen (the one before the current)
- **Value Required:** No
## Join Server (`joinserver`)
- **Description:** Connects the player to a Minecraft server
- **Value Required:** Yes - `server_ip:port`
## Enter World (`loadworld`)
- **Description:** Enters a Minecraft world
- **Value Required:** Yes - `world_folder_name`
## Enter/Join Last World/Server (`join_last_world`)
- **Description:** Enters/joins the last world or server the player was in
- **Value Required:** No
## Leave World or Server (`disconnect_server_or_world`)
- **Description:** Leaves a world or server and opens a specified screen
- **Value Required:** Yes - `screen_identifier`
## Quit Minecraft (`quitgame`)
- **Description:** Quits Minecraft completely
- **Value Required:** No
## Send Chat Message/Command (`sendmessage`)
- **Description:** Sends a chat message or executes a chat command
- **Value Required:** Yes - `message_text` or `/command_text`
## Execute Command As Integrated Server (`execute_command_as_integrated_server`)
- **Description:** Force-executes a command in singleplayer as the integrated server, ignoring permissions and the cheats setting.
- **Value Required:** Yes - Command text, for example `/give @p minecraft:diamond 1`
> This action only works in singleplayer while the world is not opened to LAN. It intentionally does nothing on multiplayer servers.
{.is-warning}
## Paste to Chat (`paste_to_chat`)
- **Description:** Pastes text to the chat input field (append or replace)
- **Value Required:** Yes - `true:Text` or `false:Text`
## Display In Chat [Client-Side] (`display_in_chat_client_side`)
- **Description:** Prints text directly to local chat (no server)
- **Value Required:** Yes - `text_or_json`
## Send FM Data To Server (`send_fm_data_to_server`)
- **Description:** Sends custom text data to the current FancyMenu server through the FM Data packet channel.
- **Value Required:** Yes - `data_identifier||data`
## Connect To Remote Server (`connect_to_remote_server`)
- **Description:** Opens or reuses a client-initiated WebSocket connection to an external remote server.
- **Value Required:** Yes - Remote server URL, for example `wss://example.com/ws`
## Send Data To Remote Server (`send_data_to_remote_server`)
- **Description:** Opens or reuses a remote server connection and sends text data to it.
- **Value Required:** Yes - `remote_server_url||data`
## Close Remote Server Connection (`close_remote_server_connection`)
- **Description:** Closes a specific remote server connection by request ID.
- **Value Required:** Yes - Request ID, usually from a Remote Server listener variable such as `$$request_id`
## Close All Remote Server Connections (`close_all_remote_server_connections`)
- **Description:** Closes all active remote server connections opened by FancyMenu.
- **Value Required:** No
## Open URL in Browser (`openlink`)
- **Description:** Opens a link in your default browser
- **Value Required:** Yes - `https://example.com`
## Copy Text to Clipboard (`copytoclipboard`)
- **Description:** Copies text to the clipboard
- **Value Required:** Yes - `text_to_copy`
## Print to Game Log (`print_to_log`)
- **Description:** Writes a line to the game log
- **Value Required:** Yes - `text_to_log`
## Set Variable Value (FM Variable) (`set_variable`)
- **Description:** Stores text content in a FancyMenu variable
- **Value Required:** Yes - `variable_name:variable_value`
## Clear All Variables (FM Variable) (`clear_variables`)
- **Description:** Clears ALL of FancyMenu's stored variables
- **Value Required:** No
## Send HTTP Request (`send_http_request`)
- **Description:** Sends an HTTP request; can store the response in a variable
- **Value Required:** Yes - HTTP request configuration
> This action allows you to send data to REST APIs, webhooks, or any HTTP endpoint.
> Supports various authentication methods, custom headers, and different request types.
>
> This action also allows you to store the response of the request in a FancyMenu variable for later use!
{.is-info}
## Manage Resource Pack (`manage_resource_pack`)
- **Description:** Enable/disable/toggle a resource pack by display name (optional reload)
- **Value Required:** Yes - `pack_name|||MODE|||reload_bool`
## Reload Resource Packs (`reload_resource_packs`)
- **Description:** Reloads resource packs (5s cooldown)
- **Value Required:** No
## Reload FancyMenu (`reloadmenu`)
- **Description:** Reloads FancyMenu, including panoramas, slideshows and all resources (heavy)
- **Value Required:** No
> This action has a **big impact on performance** and can cause lags if used in Tickers. It is not recommended to use this action in anything else than a button.
{.is-warning}
## Toggle Element Animator (`toggle_element_animator`)
- **Description:** Toggles an element animator playback state
- **Value Required:** Yes - `animator_identifier`
## Enable Element Animator (`enable_element_animator`)
- **Description:** Enables an element animator
- **Value Required:** Yes - `animator_identifier`
## Disable Element Animator (`disable_element_animator`)
- **Description:** Disables an element animator
- **Value Required:** Yes - `animator_identifier`
## Reset Element Animator (`reset_element_animator`)
- **Description:** Resets an element animator timeline/state
- **Value Required:** Yes - `animator_identifier`
## Mimic Vanilla/Mod Button (`mimicbutton`)
- **Description:** Mimics the click action of a vanilla or mod button
- **Value Required:** Yes - `screen_identifier:widget_locator`
## Mimic Keybind (`mimic_keybind`)
- **Description:** Runs a Minecraft keybind (optional hold)
- **Value Required:** Yes - `keybind_id|||keep_pressed_bool|||duration_ms`
## Set Text Input Field Value (`set_text_input_field_value`)
- **Description:** Sets the value of a custom or vanilla input field by element identifier.
- **Value Required:** Yes - `element_identifier|||new_value|||force_set_when_inactive`
## Create File in Game Directory (`create_file_in_game_dir`)
- **Description:** Creates an empty file in the game directory (instance root). Accepts the `.minecraft/` prefix to target the default launcher profile directory (may differ from the current instance dir).
- **Value Required:** Yes - `file_path`
## Delete File/Folder in Game Directory (`delete_file_in_game_dir`)
- **Description:** Deletes a file or folder in the game directory (instance root). Accepts `.minecraft/` prefix to hit the default launcher profile (can differ from the running instance). Append `*` to delete **all files directly inside** a folder (ignores sub-directories; keeps the folder).
- **Value Required:** Yes - `target_path`
## Copy File/Folder in Game Directory (`copy_file_in_game_dir`)
- **Description:** Copies within the game directory (instance root); `.minecraft/` prefix targets the default launcher profile (not always the current instance). Append `*` to the **source** path to copy every file directly inside that folder (ignores sub-directories); destination must be a directory and cannot use `*`.
- **Value Required:** Yes - `source||destination`
## Move File/Folder in Game Directory (`move_file_in_game_dir`)
- **Description:** Moves within the game directory (instance root); `.minecraft/` prefix targets the default launcher profile (may differ from the current instance). Append `*` to the **source** path to move every file directly inside that folder (ignores sub-directories); destination must be a directory and cannot use `*`.
- **Value Required:** Yes - `source||destination`
## Rename File/Folder in Game Directory (`rename_file_in_game_dir`)
- **Description:** Renames a file or folder inside the game directory (instance root); `.minecraft/` prefix targets the default launcher profile (may differ from current instance). Keeps contents intact, only the name changes.
- **Value Required:** Yes - `path||new_name`
## Download File to Game Directory (`download_file_to_game_dir`)
- **Description:** Downloads a file asynchronously into the game directory (instance root); `.minecraft/` prefix targets the default launcher profile (not necessarily the running instance). Provide the **target folder**; filename is derived from headers/URL automatically.
- **Value Required:** Yes - `url||target_folder`
## Extract ZIP File In Game Directory (`extract_zip_file_in_game_dir`)
- **Description:** Extracts a ZIP file into a target folder inside the game directory or default `.minecraft` directory. Triggers the **On ZIP Extracted via Action** listener when finished.
- **Value Required:** Yes - `source_zip_path||target_folder_path`
## Open File/Folder In Game Directory (`open_file_folder_in_game_dir`)
- **Description:** Opens a file or folder with the operating system's default app. The target must stay inside the game directory or the default `.minecraft` directory.
- **Value Required:** Yes - `target_path`
## Write File in Game Directory (`write_file_in_game_dir`)
- **Description:** Writes or appends text inside the game directory (instance root); `.minecraft/` prefix targets the default launcher profile (may differ from this instance). Creates the file if missing. Supports `\n` in the value to insert line breaks; append mode controlled by the final boolean.
- **Value Required:** Yes - `path|||content|||append_bool`
## Select File from System (`select_file_to_game_dir`)
- **Description:** Opens a native file picker (any location) and copies the selected file into the game directory (instance root) or default `.minecraft/` when prefixed (that default may differ from this instance). Supports extension filters, custom filter label, and optional overwrite toggle.
- **Value Required:** Yes - selection configuration
## Show Toast (`show_toast`)
- **Description:** Displays a configurable toast notification
- **Value Required:** Yes - toast configuration
## Start Scheduler (`start_scheduler`)
- **Description:** Starts a scheduler by its scheduler ID.
- **Value Required:** Yes - `scheduler_id`
## Stop Scheduler (`stop_scheduler`)
- **Description:** Stops a scheduler by its scheduler ID.
- **Value Required:** Yes - `scheduler_id`
## Set Minecraft Option (`edit_minecraft_option`)
- **Description:** Edits a Minecraft config option
- **Value Required:** Yes - `option_name:set_to_value`
================== END PAGE: https://docs.fancymenu.net/docs/action-scripts ==================
================== BEGIN PAGE: https://docs.fancymenu.net/docs/advanced-positioning-sizing ==================
---
title: Advanced Positioning & Sizing
description: How to use Advanced Positioning and Sizing of elements.
published: true
date: 2025-08-01T01:44:12.713Z
tags:
editor: markdown
dateCreated: 2025-04-14T20:03:22.929Z
---
# Advanced Positioning & Sizing
Advanced positoning/sizing allows you to have **full control over the position and size of your elements**. This is very powerful but also **a lot more time-consuming** than using FancyMenu's automated sizing and positioning.
> If you just want elements to better scale with Minecraft's **GUI scale**, it is recommended to use layout-wide **auto-scaling** instead, which can be enabled by first forcing a GUI scale in the menu that opens when right-clicking the editor background and then enabling **Auto-Scaling** in the same menu.
{.is-warning}
# Toggling Advanced Positioning/Sizing Mode
To **enable** andvanced positioning/sizing for an element, **right-click** it and click on **Advanced Positioning** or **Advanced Sizing**.
The element will automatically switch to the advanced mode when you set an advanced position or size value.
To **disable** it and switch back to normal positioning/sizing, **clear all positioning/sizing values**.
> While an element is in Advanced Sizing/Positioning mode, resizing and/or moving the element could be disabled or restricted.
{.is-warning}
# Calculating Positions/Sizes
The reason why advanced positioning/sizing is so powerful is that you can use **placeholders** in the position/size values.
This allows you to use the **Calculator** placeholder (located in the **Advanced** placeholder category) in combination with placeholders of the **GUI** category, like **Screen Width**, **GUI Scale**, **Element Width** and more.
> You can add placeholders by clicking on the **Placeholders** button at the top-right side of the text editor. If you don't see this button, the content you want to edit does **not support** placeholders.
{.is-info}
To calculate something with the **Calculator** placeholder, replace the example expression with your own. You can use nested placeholders in the expression, so you can make use of the screen size, element size, etc. placeholders there.
For example, this placeholder will simply solve `1 + 1` and will show as `2` later:
`{"placeholder":"calc","values":{"expression":"1 + 1","decimal":"false"}}`
The `decimal` variable is set to `false`, which is important for most sizing/positioning calculations, so just set this always to `false` when working with advanced positioning/sizing.
The following calculator uses the **Screen Width** placeholder and divides it by `2`:
`{"placeholder":"calc","values":{"expression":"{"placeholder":"guiwidth"} / 2","decimal":"false"}}`
================== END PAGE: https://docs.fancymenu.net/docs/advanced-positioning-sizing ==================
================== BEGIN PAGE: https://docs.fancymenu.net/docs/apng ==================
---
title: APNGs
description: How to make FancyMenu-compatible APNG images.
published: true
date: 2026-05-03T11:01:52.000Z
tags:
editor: markdown
dateCreated: 2025-04-14T20:14:10.093Z
---
# Animated PNG Images
> For new large or complex animations, prefer [AFMA/FMA files](/fma). FancyMenu 3.9.0 can use Watermedia V3 + Watermedia Binaries V3 for faster APNG/GIF decoding when available, but AFMA is still the preferred FancyMenu animation format.
{.is-info}
APNGs are an animated version of PNG images, making it possible to have the same features as with a GIF, but in full, lossless PNG quality!
FancyMenu has built-in APNG support, but it's a bit picky about what APNGs are supported.
It needs **uncompressed** APNGs that are **not interlaced**.
# Making APNG Animations
You would be surprised how difficult it is to find a good APNG editor, especially with options to disable compression and interlacing.
A great choice for an editor is [ScreenToGif](https://www.screentogif.com/), which is actually a tool to record GIFs and APNGs of your screen, but it's also great to make normal APNGs by skipping the record part and directly loading into the editor!
## Open The Editor
The first thing you see after opening [ScreenToGif](https://www.screentogif.com/) is this screen. Click on **Editor** here.

## Load the Frames
Now you need your PNG frames. Drag-&-Drop them into the editor.

## Frame Delay
To configure the delay between frames, select the frame(s) you want to edit, switch to the **Edit** tab and in the **Delay (Duration)** section, click on **Override**.

## Looping
The looping behavior can be configured in the **Save As** menu. Take a look at the next step for how to open this menu.
## Exporting the APNG
Now you're ready to switch to the **File** tab again to click on **Save As**.
In the save menu, make sure to:
- Set the file type to **APNG** (first setting, you maybe need to scroll to the top of the menu first)
- Disable **Detect Unchanged Pixels**
> You can also configure the **looping behavior** in the that menu! Disabling **Looped Apng** will make the APNG not loop at all, and when enabling it you can choose between a specific number of loops or infinite looping.
{.is-info}

## Using the APNG in FancyMenu
Now you can copy your APNG file to `/config/fancymenu/assets/`. Then you will be able to use it for nearly everything that accepts images.
> It is **really important** that the APNG file name ends with `.apng`!
> FancyMenu will not be able to identify the image as APNG if it's not ending with `.apng`.
{.is-warning}

================== END PAGE: https://docs.fancymenu.net/docs/apng ==================
================== BEGIN PAGE: https://docs.fancymenu.net/docs/background-music ==================
---
title: Menu Background Music
description: How to customize the music played in menus.
published: true
date: 2026-05-03T11:01:52.000Z
tags:
editor: markdown
dateCreated: 2025-04-14T20:14:14.268Z
---
# Menu Background Music
It's possible to replace Minecraft's default menu background music with custom tracks or just disable the normal Vanilla music that plays in menus.
# Disabling Vanilla Music
FancyMenu has multiple ways to disable Vanilla menu music. This can be useful if you plan to play other audio tracks in screens or if you just don't want music to play at all in some screens.
## Globally
If you want no music in menus at all, this is the easiest way to do that.
To globally disable or replace Vanilla menu music in FancyMenu 3.9.0+, go to FancyMenu's menu bar at the top of screens and click **Customization -> Global Customizations**. Global Customizations can replace menu music without requiring a resource pack and without enabling customizations for every screen.
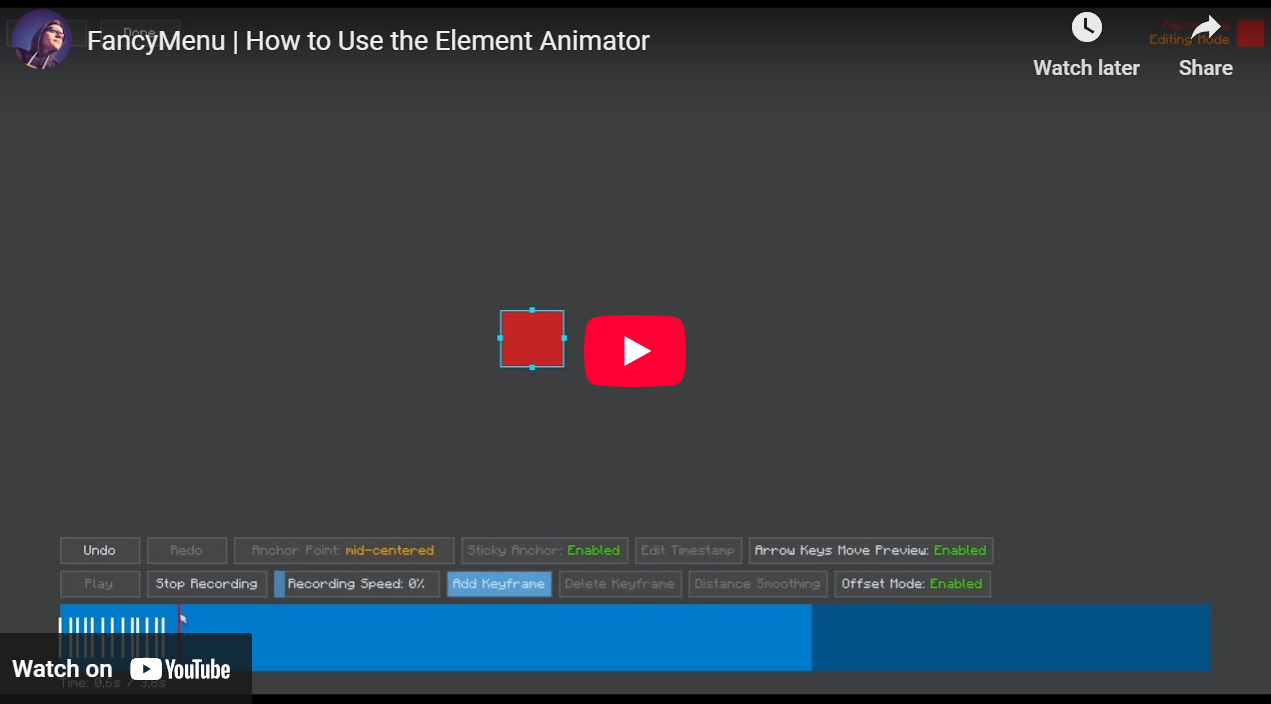 # Adding the Animator Element
1. **Right-Click the Background:**
In the layout editor, right-click on the background.
2. **Select New Element -> Element Animator:**
In the menu that pops up, go to **New Element** and click on **Element Animator**. This adds the Animator Element to your layout.
3. **Set It Up:**
After adding, the Animator element shows up with its default settings. You can change options like looping or color by right-clicking the Animator and choosing from the menu.
# Managing Keyframes
Keyframes are like bookmarks that tell the Animator what the element should look like at a certain time.
## Opening the Keyframe Editor
- **Open the Editor:**
Right-click the Animator element and choose **Edit Keyframes** (or **Manage Keyframes**). This opens a screen where you can add, edit, or delete keyframes.
## Recording and Adding Keyframes
- **Start Recording:**
In the keyframe editor, press the **`R` key** to start recording. When recording, the preview box changes color to show it’s active.
- **Change the Preview:**
Move or resize the preview box to set the look you want. In offset mode, the preview stays centered on a crosshair so changes are shown as offsets.
- **Add a Keyframe:**
Press the **`K` key** to save the current look as a keyframe. This keyframe saves the preview’s position, size, and anchor settings.
## Editing Keyframes
- **Select a Keyframe:**
Click on a keyframe marker in the timeline. You can also hold **Ctrl** and click to select more than one.
- **Move a Keyframe:**
Drag the keyframe marker left or right to change its time. You can also use:
- **Left Arrow:** to move it 100ms earlier.
- **Right Arrow:** to move it 100ms later.
- **Fine-Tune the Preview:**
When a keyframe is selected, adjust the preview box by moving or resizing it. Use **Ctrl + Z** to undo and **Ctrl + Y** to redo changes if needed.
## Removing Keyframes
- **Delete a Keyframe:**
Select a keyframe and press the **Delete key** to remove it.
- **Delete Multiple Keyframes:**
You can select several keyframes (for example, using **Ctrl + A** to select all) and press Delete to remove them all.
## Keyframe Smoothing
Keyframe smoothing is a feature that helps you evenly space out your keyframes. This makes your animation look more consistent and smooth.
- **Select Multiple Keyframes:**
First, select two or more keyframes that you want to smooth out (use **Ctrl + Click** or **Ctrl + A**).
- **Click the Smoothing Button:**
In the keyframe editor’s bottom toolbar, click the button labeled **Distance Smoothing**.
- **Enter a New Distance:**
A small input box will appear. Type in a value (in milliseconds) to set the same time gap between each selected keyframe.
- **Apply the Smoothing:**
Press Enter to apply the smoothing. The keyframes will be adjusted so that the time difference between them is even.
# Previewing Your Animation
After you have recorded keyframes, you can see how your animation will look:
- **Play the Animation:**
In the keyframe editor, press the **`P` key** or click the play button. The preview will start from the beginning and show how the preview box changes over time.
- **Note on Looping:**
While previewing in the keyframe editor, the animation will **not loop**. This means it plays from start to end only once. Looping will only be active when the Animator element is applied to a target element in the final layout.
- **Pause the Preview:**
Press the **`P` key** again to pause the animation if you want to stop at a certain point.
- **Drag the Progress Bar:**
If available, you can drag the timeline marker to check how the animation looks at any specific time.
# Choosing Target Elements
After setting up your keyframes, you need to choose which layout elements will be animated:
1. **Open the Target Manager:**
Right-click the Animator element and choose **Manage Targets**.
2. **Add Targets:**
Click **Add Target** to see a list of available elements. Pick the ones you want to animate.
3. **Remove Targets:**
To remove a target, open the manager and click **Remove Target**.
When the animation plays in the final layout, the Animator will use your keyframes to change the chosen elements’ size, position, and more. Looping will be applied here if you set it.
# Keyboard Shortcuts
Use these shortcuts in the keyframe editor to work faster:
- **`R` Key:** Start or stop recording.
- **`T` Key:** Pause or resume recording.
- **`P` Key:** Play or pause the animation preview.
- **`K` Key:** Add a new keyframe at the current time.
- **Left/Right Arrow Keys:**
- **Left Arrow:** Move a keyframe 100ms earlier.
- **Right Arrow:** Move a keyframe 100ms later.
- **Delete Key:** Remove the selected keyframe(s).
- **Ctrl + A:** Select all keyframes.
- **Ctrl + Z:** Undo your last change.
- **Ctrl + Y:** Redo the change you just undid.
- **Ctrl + Keyframe Dragging**: Drag multiple selected keyframes at once.
# Extra Settings and Tips
- **Loop Animation:**
You can set the Animator to loop. When looping is on, the animation will restart after the last keyframe—but note that this only happens for the final target element. In the keyframe editor preview, looping does not occur.
- **Ignore Size/Position:**
If you do not want the keyframes to change an element’s size or position, turn these options off.
- **Timing Offsets:**
FancyMenu 3.9.0 adds timing offsets for controlled elements. You can offset individual target elements, or use random timing offsets in a configured range, so one animation can start at slightly different times for each target.
- **Offset Mode:**
In offset mode, animations are applied as changes from the element’s original spot. The preview is shown centered on a crosshair.
- **Undo and Redo:**
Use **Ctrl + Z** to undo and **Ctrl + Y** to redo changes.
- **Check the Order:**
Make sure your keyframes are in the right order by time. The system sorts them for you, but if you move one, double-check the order.
- **Preview Changes:**
Use the play button or **`P` key** to see your animation in action before saving it.
# Conclusion
By following these simple steps, you can add an Animator element to your layout and create smooth animations. Whether you record live changes with the preview, adjust keyframes with your keyboard, choose which elements to animate, or preview your animation to see how it looks, the Animator element gives you an easy way to bring life to your custom menus.
Happy animating!
================== END PAGE: https://docs.fancymenu.net/docs/element-animator ==================
================== BEGIN PAGE: https://docs.fancymenu.net/docs/element-identifiers ==================
---
title: Element Identifiers
description: How element identifiers work in FancyMenu.
published: true
date: 2025-05-17T19:06:46.339Z
tags:
editor: markdown
dateCreated: 2025-05-17T19:06:11.365Z
---
# Element Identifiers
Every element in FancyMenu has a unique identifier that gets automatically applied to it when creating it.
These identifiers are used to, well, identify the element, so other parts of FancyMenu, like placeholders, actions and loading requirements can communicate with the element.
# Getting the Identifier of Elements
To get the identifier of an element, because you need it somewhere else, just **right-click** the element in the editor and click on **Copy Element Identifier**. Doing that will copy the element's identifier to the clipboard, so you can easily paste it where you need it.
================== END PAGE: https://docs.fancymenu.net/docs/element-identifiers ==================
================== BEGIN PAGE: https://docs.fancymenu.net/docs/element-opacity ==================
---
title: Element Opacity
description: How to control the opacity of elements.
published: true
date: 2025-09-03T17:05:25.530Z
tags:
editor: markdown
dateCreated: 2025-08-04T19:13:04.533Z
---
# Element Opacity
Most elements in FancyMenu (with some exceptions) support setting their opacity via their right-click menu.
The opacity value of elements supports placeholders, which makes it possible to dynamically update their opacity based on the placeholder.
This makes it possible to create custom fading logic when used in combination with Ticker elements to update variable values and then apply it as opacity via placeholders.
To set the opacity of elements, **right-click the element -> Opacity -> Set**.
# Fading In/Out Elements
If you simply want to fade-in or -out elements, it's probably easier to just use the built-in fading feature of elements. You can enable fading in the right-click menu of elements.
This feature makes elements fade-in every time they load, be it the initial load when opening a menu or when the element's loading requirements make it load. They will fade-out whenever their loading requirements make it unload/invisible.
The fading feature supports setting a fading speed to control how fast and element should fade in or out.
================== END PAGE: https://docs.fancymenu.net/docs/element-opacity ==================
================== BEGIN PAGE: https://docs.fancymenu.net/docs/elements ==================
---
title: Elements
description: Everything to know about FancyMenu's element types.
published: true
date: 2026-05-03T11:01:52.000Z
tags:
editor: markdown
dateCreated: 2025-07-05T21:09:31.485Z
---
# Elements
Elements are the building blocks of your custom layouts in FancyMenu. You can add them to any layout to display information, add interactivity, or create stunning visual effects.
# Adding Elements to a Layout
You can add a new element to your layout from within the **Layout Editor**.
1. **Right-click** on the editor's background to open the context menu.
2. Hover over **New Element**.
3. A list of all available element types will appear. Click on the one you want to add.

Once an element is added, you can move, resize, and customize it by **right-clicking** on it to open its specific context menu. To learn more about how to arrange elements, see the [Positioning Elements](https://docs.fancymenu.net/en/positioning-elements) and [Element Identifiers](https://docs.fancymenu.net/en/element-identifiers) pages.
# Elements in Detail
The following list contains most, if not all, elements available in FancyMenu. The list can sometimes be a little outdated due to updates of FancyMenu.
## Button
A clickable button that can perform a wide variety of actions. This is one of the most powerful and versatile elements for creating interactive menus.
* **Use Cases:**
* Creating a "Join Discord" or "Visit Website" button.
* Adding a quick-join button for a specific server.
* Building custom navigation between different menus.
* Creating buttons that toggle other layouts on or off.
* **Key Features:**
* **Actions:** Can execute a sequence of actions, such as opening a URL, joining a server, sending a chat command, mimicking another button's function, controlling variables, and much more. Learn more at the [Action Scripts](https://docs.fancymenu.net/en/action-scripts) documentation.
* **Custom Appearance:** Fully customizable textures for normal, hovered, and inactive states. Supports transparent backgrounds, nine-slicing, custom label colors, hover label colors, label scale, label shadow toggles and button icon textures.
* **Sounds:** Custom click, hover and unhover sounds.
* **Template Mode:** Can act as a template to apply its appearance and properties to all other Vanilla or modded buttons in the menu, ensuring a consistent look. Read more at the [Button & Slider Templates](https://docs.fancymenu.net/en/button-slider-templates) page.
## Slider
A slider that users can drag to select a value from a list or a range. It can execute actions whenever its value changes.
* **Use Cases:**
* Creating a custom volume control.
* A slider to switch between different themes or background images (using the "List" type).
* Adjusting a specific Minecraft option, like brightness or render distance.
* **Key Features:**
* **Types:** Can be a `Value List` (e.g., "Easy", "Normal", "Hard"), an `Integer Range` (e.g., 1-100), or a `Decimal Range` (e.g., 0.0-1.0).
* **Dynamic Actions:** Executes actions on value change. The slider's current value can be used within its actions to perform dynamic tasks, which can be used with [Variables](https://docs.fancymenu.net/en/variables).
* **Customization:** The slider's label can dynamically display its current value. The handle and background textures are fully customizable, including transparent backgrounds, label color/scale options, text shadow toggles and custom click/unhover sounds.
## Checkbox
A standard checkbox that can be toggled on or off. It can execute actions upon being toggled.
* **Use Cases:**
* An "I agree to the rules" checkbox.
* A setting to enable or disable a specific feature in your custom menu.
* Toggling a layout or variable on/off.
* **Key Features:**
* **Actions on Toggle:** Executes [Action Scripts](https://docs.fancymenu.net/en/action-scripts) when its state changes. The current state (`true` or `false`) can be accessed within its actions.
* **Variable Mode:** Can be linked directly to a FancyMenu variable, making the checkbox state read from and write to that variable.
* **Custom Appearance:** Supports custom textures for the background (in normal, hover, and inactive states) and the checkmark itself.
## Text Input Field
A field where users can type text. Its content can be linked to a FancyMenu variable, allowing you to capture and use user input.
* **Use Cases:**
* A "Server IP" input field that works with a "Join Server" button.
* A field to enter a player's name for a custom skin preview.
* Creating a basic login-like interface.
* **Key Features:**
* **Variable Linking:** The text entered by the user is stored in a specified [variable](https://docs.fancymenu.net/en/variables).
* **Input Validation:** Can be configured to only accept specific character types, such as numbers, URLs, or plain text.
* **Max Length:** You can set a maximum character limit for the input.
* **Appearance and Sounds:** Supports custom background color, border colors, border rounding, text color, hint/placeholder text, hint color, hover sounds, unhover sounds and click sounds.
## Tooltip
A text box that can be configured to appear at a specific location or follow the mouse cursor. Its visibility is typically controlled by [Conditions (Loading Requirements)](https://docs.fancymenu.net/en/conditions).
* **Use Cases:**
* Displaying detailed information when a user hovers over a button or image.
* Creating context-sensitive help tips that appear under certain conditions.
* Showing dynamic information (like server status) next to the cursor.
* **Key Features:**
* **Mouse Following:** Can be set to follow the mouse pointer.
* **Markdown Support:** The tooltip content supports full Markdown formatting.
* **Custom Background:** The background can be a solid color or a custom nine-sliced texture for a fully themed look.
## Item
Displays a single Minecraft item, either from vanilla or a mod.
* **Use Cases:**
* Using items as icons for buttons or menu selections.
* Creating a shop or kit selection GUI.
* Displaying a player's held item or armor.
* **Key Features:**
* **Custom Data:** You can set the item's name, lore, count, enchantment glint, and even custom NBT data. You can learn more about using NBT with the [NBT Data Placeholder](https://docs.fancymenu.net/en/nbt-data-placeholder) documentation.
* **Tooltip Display:** Can be configured to show the item's standard tooltip on hover.
## Block/Item JSON Model
Renders a block or item JSON model from Minecraft resources or external sources.
* **Use Cases:**
* Displaying a 3D resource-pack model in a menu.
* Showing item/block previews with custom textures.
* Building model-based decorative UI elements.
* **Key Features:**
* **Model Source:** Can load model JSON from Minecraft resources or external sources.
* **Texture Overrides:** Supports setting a custom texture.
* **Rendering Controls:** Includes rotation and light controls.
## Image
Displays a static image from a local file, a web URL, or a Minecraft resource location.
* **Use Cases:**
* Adding a server logo or modpack brand.
* Creating decorative borders or UI frames.
* Using images as part of a more complex UI design.
* **Key Features:**
* **Nine-Slicing:** Allows the image to be used as a scalable border or panel without distorting the corners. Learn more at the [Nine-Slicing & Tiling](https://docs.fancymenu.net/en/nine-slicing-and-tiling) page.
* **Texture Repeating:** The image can be tiled to fill the element's area.
* **Tinting:** You can apply a color tint to the image.
* **Rounded Corners:** Non-nine-sliced and non-repeated images can have rounded corners.
* **Parallax Effect:** Can be configured to move slightly with the mouse for a 3D effect. See the [Parallax Effect](https://docs.fancymenu.net/en/parallax) page for more.
## Text
A highly versatile element for displaying text. It can be used for anything from single-line labels to multi-page, scrollable documents.
* **Use Cases:**
* Displaying server rules, patch notes, or welcome messages.
* Creating dynamic info panels using [placeholders](https://docs.fancymenu.net/en/placeholders), e.g., "Welcome, `{"placeholder":"playername"}`!".
* Adding labels and descriptions to your UI.
* **Key Features:**
* **Content Sources:** Text can be entered directly, loaded from a local file, or fetched from a web URL.
* **Markdown Support:** Supports a wide range of Markdown for rich text formatting, including headers, lists, code blocks, and tables. The appearance of Markdown elements is fully customizable. See the [Text Formatting](https://docs.fancymenu.net/en/text-formatting) page for more info.
* **Scrolling:** Automatically becomes scrollable if the content is larger than the element's area. Scrollbars can be customized or disabled.
* **Styling:** Full control over text color, scale, alignment, shadow, and line spacing.
## Video
Plays a video file. This is perfect for cinematic intros or decorative looping backgrounds.
> The new native Video element in FancyMenu 3.9.0 requires **Watermedia V3** and **Watermedia Binaries V3**. The old **Video [MCEF]** element is deprecated.
{.is-warning}
* **Use Cases:**
* An animated modpack or server trailer.
* A looping, ambient video to add life to your menu.
* An in-game tutorial video.
* **Key Features:**
* **Sources:** Supports both local video files and web URLs. See the [Videos (MP4)](https://docs.fancymenu.net/en/video) page for details.
* **Playback Control:** Can be set to loop automatically. Its volume, sound channel and aspect-ratio preserving behavior are adjustable.
* **Interactive Control:** The video's playback, seek time and volume can be controlled via button actions.
## GLSL Shader
Renders a custom GLSL shader inside an element.
* **Use Cases:**
* Animated shader panels.
* Procedural visual effects.
* Shadertoy-style menu effects clipped to an element rectangle.
* **Key Features:**
* **Shader Runtime:** Supports single-pass and multipass shaders.
* **Shadertoy Support:** Can use Shadertoy-style `mainImage` shaders.
* **Uniforms:** Exposes FancyMenu and input uniforms. See the [GLSL Shader API](https://docs.fancymenu.net/en/glsl-shader-api) page for details.
## Slideshow
Displays a sequence of images. The configuration for the slideshow (images, timing, transitions) is done in a separate `.properties` file located in the `/config/fancymenu/assets/slideshows/` directory.
* **Use Cases:**
* A rotating gallery of in-game screenshots.
* Showcasing key features of a modpack.
* A dynamic background that cycles through different scenes.
* **Key Features:**
* Loads pre-configured slideshows. See the [Slideshows](https://docs.fancymenu.net/en/slideshows) documentation for setup instructions.
* Can be set to maintain the aspect ratio of the images.
## Rectangle Shape
A simple, solid-colored rectangle.
* **Use Cases:**
* Creating a semi-transparent background behind text to improve readability.
* Designing simple UI panels and dividers.
* As a colored placeholder during layout design.
* **Key Features:**
* Supports HEX RGBA colors, rounded corners and optional blur, allowing the shape to work as a simple panel, tint or blur background.
## Circle Shape
A simple, solid-colored circle/ellipse shape.
* **Use Cases:**
* Creating circular accents, indicators or soft UI areas.
* Building themed UI decorations without a texture file.
* **Key Features:**
* Works similar to the Rectangle Shape element and supports color/blur-style visual customization.
## Splash Text
A recreation of Minecraft's iconic yellow, bouncing splash text from the title screen.
* **Use Cases:**
* Replacing the vanilla splash text with your own custom messages.
* Adding an eye-catching, animated message to any menu.
* **Key Features:**
* **Content Sources:** Can use the default vanilla splashes, a list of custom text entered directly, or text from a local file.
* **Customization:** You can toggle the bouncing effect and customize the text's color, scale, rotation, and shadow.
## Player Entity
Renders a player model in the menu.
* **Use Cases:**
* Displaying the current player's character on the main menu.
* Creating a team selection or class preview screen.
* A "profile" section showing the player's skin and name.
* **Key Features:**
* **Dynamic Appearance:** Can be configured to automatically copy the current player's skin, cape, and name. For more on this, check out the [Player Heads](https://docs.fancymenu.net/en/player-heads) guide.
* **Custom Poses:** Offers fine-grained control over the rotation of the head, body, arms, and legs. The head and body can also be set to follow the mouse cursor.
* **Attributes:** Can be set to be a baby, crouching, or have a slim model.
## Browser
An element that renders a live web page inside the game.
This element requires the **MCEF (Minecraft Chromium Embedded Framework)** mod to be installed and working!
You can download MCEF from the official project pages on [CurseForge](https://www.curseforge.com/minecraft/mc-mods/mcef) and [Modrinth](https://modrinth.com/mod/mcef).
For newer Minecraft versions (1.21.5+), the official MCEF projects do not provide builds, but there is a fork with builds for latest Minecraft versions, which can be found [here](https://www.curseforge.com/minecraft/mc-mods/mcef-keksuccino) (CurseForge) and [here](https://modrinth.com/mod/mcef-keksuccino) (Modrinth). This fork is maintained by Keksuccino, to get builds for latest Minecraft versions out as fast as possible.
* **Use Cases:**
* Displaying a server's live Dynmap.
* Embedding a YouTube video player.
* Showing a wiki or documentation page directly in-game.
* **Key Features:**
* **Interactivity:** Can be made fully interactable, allowing users to click links, scroll, and type.
* **Media Control:** Offers options to mute media, loop videos, and hide video controls on the loaded page.
### Loading Local HTML Files
The Browser element lets you load local HTML documents in `/config/fancymenu/assets/`! This means you can display local browser-rendered content for fancy looking changelogs and more.
To load a local HTML file, start your URL with `file:///`, followed by the SHORT file path, for example `/config/fancymenu/assets/cool_changelog.html`, which makes it look like this: `file:///config/fancymenu/assets/cool_changelog.html`.
On **Linux** you need to give it the absolute file path, but since hardcoding an absolute path would break the layout, you need to let a placeholder convert the short path to an absolute one dynamically: `file:///{"placeholder":"absolute_path","values":{"short_path":"/config/fancymenu/assets/cool_changelog.html"}}`.
It is SUPER IMPORTANT that you start the short path with `/` on Linux, like in the example above. Without this it will not work.
## Element Animator
A powerful tool for creating complex, keyframe-based animations. It can animate the position, size, and anchor point of one or multiple other elements.
* **Use Cases:**
* Creating a sophisticated intro animation where menu elements slide or fade into view.
* Making decorative elements pulsate, rotate, or move along a path.
* Animating a notification to pop up and then disappear.
* **Key Features:**
* **Keyframe Editor:** A dedicated editor for adding, editing, and sequencing keyframes on a timeline.
* **Multi-Target:** A single Animator can control multiple "target" elements at once.
* **Control:** Animations can be set to loop. You can also choose to animate only position or size.
* **Timing Offsets:** Target elements can use individual or randomized start timing offsets.
* **[Learn more about the Element Animator.](https://docs.fancymenu.net/en/element-animator)**
## Ticker
An invisible element that executes a list of actions at a regular interval (every "tick").
> For new background automation in FancyMenu 3.9.0+, consider using [Schedulers](https://docs.fancymenu.net/en/schedulers). Schedulers are global, easier to organize and can keep running independently of a specific screen.
{.is-info}
* **Use Cases:**
* Periodically checking a server's online status and updating a text element.
* Creating a countdown timer that updates a text label.
* Running a script repeatedly to create custom behaviors.
* **Key Features:**
* **Timing Control:** You can set the delay between ticks in milliseconds.
* **Tick Modes:** Can be set to tick continuously, only once per game session, or once every time the menu is loaded.
* **Asynchronous:** Can run its [actions](https://docs.fancymenu.net/en/action-scripts) in a separate thread to avoid impacting game performance, though some actions cannot be run this way.
## Audio
An invisible element that plays audio files. It can manage a playlist of tracks and offers various playback controls.
* **Use Cases:**
* Adding custom background music to a menu.
* Creating a music player with buttons to control playback (next/previous track, volume).
* Playing ambient soundscapes.
* **Key Features:**
* **Playlist:** Can manage multiple audio tracks.
* **Playback Modes:** Can play tracks in order or shuffle them (with support for track weighting to make some tracks more common than others).
* **Control:** Supports looping, volume adjustment, and can be assigned to a specific sound channel (e.g., Master, Music). For more info, see the [Menu Background Music](https://docs.fancymenu.net/en/background-music) page.
## Music Controller
An invisible element used to control Minecraft's default music playback within a specific menu.
* **Use Cases:**
* Disabling the default menu music on a screen where you want to play your own custom music via an **Audio** element.
* Stopping in-world music from continuing to play when a menu is opened in-game.
* **Key Features:**
* Separate toggles to control vanilla "Menu Music" and "World Music."
## Progress Bar
A customizable bar that visually represents a numerical value.
* **Use Cases:**
* A loading bar that tracks world loading progress using `{"placeholder":"world_load_progress"}`.
* Visual health, hunger, or experience bars for an in-game HUD.
* A volume indicator that is controlled by a **Slider** element.
* **Key Features:**
* **Dynamic Value:** The progress value (0-100 or 0.0-1.0) is set via a text field that supports [placeholders](https://docs.fancymenu.net/en/placeholders).
* **Appearance:** The bar's direction (up, down, left, right), colors, textures and nine-slicing for bar/background textures are all customizable.
* **Animation:** Features a smooth filling animation to make progress changes look less jarring.
## Dragger
An invisible element that the user can click and drag to move around. Other elements can be anchored to it to create movable widgets.
* **Use Cases:**
* Creating a draggable clock or information panel.
* Allowing users to customize the position of UI elements to their preference.
* **Key Features:**
* **Persistent Position:** The dragged offset is saved, so the element stays where the user left it, even after restarting the game.
* **Anchor Point:** Acts as a movable anchor for other elements, which is a key part of [Positioning Elements](https://docs.fancymenu.net/en/positioning-elements).
## Cursor
An invisible element that replaces the default system cursor with a custom image when a layout is active.
* **Use Cases:**
* Creating a fully themed UI that matches your modpack's aesthetic.
* **Key Features:**
* **Custom Texture:** Use any image for your cursor.
* **Hotspot:** You can define the exact pixel on the image that serves as the "click point". See the [Custom Cursor](https://docs.fancymenu.net/en/custom-cursor) guide for more.
================== END PAGE: https://docs.fancymenu.net/docs/elements ==================
================== BEGIN PAGE: https://docs.fancymenu.net/docs/essential ==================
---
title: Essential Mod
description: How to customize Essential's UI.
published: true
date: 2025-08-04T01:11:43.629Z
tags:
editor: markdown
dateCreated: 2025-07-31T18:11:30.915Z
---
# Essential
Recent versions of the Essential mod added compatibility with FancyMenu, which means you should now be able to fully customize all elements Essential adds to the Title screen and Pause screen!
For a detailed guide about how to customize Essential's UI, you should take a look at [this wiki page](https://essential.gg/wiki/fancymenu) of the Essential wiki!
# Customization Issues
If you encounter some bug or inconvenience while trying to customize Essential's elements, it is almost always caused by Essential and the Essential devs need to fix it on their side.
You should report the bug/issue to the Essential team via their Discord or GitHub.
# Links used in this page
- Essential wiki page about FancyMenu: https://essential.gg/wiki/fancymenu
================== END PAGE: https://docs.fancymenu.net/docs/essential ==================
================== BEGIN PAGE: https://docs.fancymenu.net/docs/fancymenu-ui-scale ==================
---
title: FancyMenu's UI Scale
description: How to change the scale of FancyMenu's UI.
published: true
date: 2026-05-03T11:01:52.000Z
tags:
editor: markdown
dateCreated: 2025-08-04T19:19:36.697Z
---
# FancyMenu's UI Scale
FancyMenu's UI (such as the menu bar and context menus) uses a separate scale that is not linked to Minecraft's normal GUI scale.
In case FancyMenu's UI looks too small or big for you, you can change the UI scale via **menu bar -> Customization -> Settings -> FancyMenu's UI**.
FancyMenu 3.9.0 adds more UI scale choices. When the UI scale is set to **Auto**, the smallest automatic scale is now `1.25`; you can still manually choose scale `1` if you prefer it.
The only exception to this are actual full screens added by FancyMenu, such as the screen to manage variables or the layout editor. These screens, in most cases, use Minecraft's normal GUI scale, but it's possible that some screens use a different auto-scaling logic to automatically show at a smaller scale when the window would otherwise be too small to fit all of the screen's content.
================== END PAGE: https://docs.fancymenu.net/docs/fancymenu-ui-scale ==================
================== BEGIN PAGE: https://docs.fancymenu.net/docs/faq ==================
---
title: FAQ
description: Frequently asked questions.
published: true
date: 2026-05-03T11:01:52.000Z
tags:
editor: markdown
dateCreated: 2025-08-04T19:44:22.004Z
---
# FAQ
### I need help with an issue. What information should I provide?
To get the best help, please provide as much context as possible:
1. **A clear description of the problem:** What did you expect to happen, and what actually happened?
2. **Your `latest.log` file:** This is the most important file for troubleshooting. Find it in your instance's `/logs/` folder. **Do not send a crash log** unless specifically asked; the `latest.log` is much more useful. Use a site like https://gist.github.com to share it.
3. **Your Minecraft Version:** (e.g., 1.20.1)
4. **Your Mod Loader and Version:** (e.g., Forge 47.2.0, Fabric 0.15.7)
5. **Your FancyMenu Version:** (e.g., 3.5.2)
6. **Screenshots or videos** of the issue can also be very helpful.
### How do I change the layering of elements (move something in front of or behind another)?
* **Custom vs. Custom:** To change the render order of your own custom elements, use the **Layers widget**. You can open it via the menu bar: **Window -> Widgets -> Layers**. From there, you can drag elements up or down in the hierarchy. You can also right-click an element and use "Move One Layer Up/Down".
* **Custom vs. Vanilla:** To render all your custom elements behind all vanilla elements (e.g., to put a background image behind the default buttons), **right-click the editor background** and toggle the option **"Render Custom Elements Behind Vanilla"**.
### Can I exclude certain buttons from a universal button template?
**No. If a template button has custom textures set, these textures are always shared with all affected elements. You cannot exclude individual buttons.**
### How do I make a button do something when clicked?
Use an **Action Script**.
1. Right-click the button in the editor.
2. Select **Edit Action Script**.
3. Click **Add Action** and choose from the list (e.g., `Open Screen or Custom GUI`, `Join Server`, `Set Variable Value`).
* More info: [Action Scripts](https://docs.fancymenu.net/en/action-scripts)
### Can I create a completely new menu screen from scratch?
Yes, this is done using **Custom GUIs**.
1. In the menu bar, go to **Customization -> Custom GUIs -> Manage Custom GUIs**.
2. Click **"New GUI"** and give it a unique identifier.
3. You can then open this new empty screen and create a layout for it, adding any elements you want.
4. This Custom GUI can then be opened via a button action.
* More info: [Custom GUIs](https://docs.fancymenu.net/en/custom-guis)
### My game is taking a long time to load after enabling pre-loading.
This is expected behavior. Pre-loading large resources like high-resolution animations or sounds during the initial startup will naturally increase the game's loading time.
### My FMA animation is using too much RAM!
Classic FMA files can consume a lot of memory when they contain many high-resolution frames. FancyMenu 3.9.0 adds AFMA, which is much better for large or complex animated textures. For classic FMA files, keep animations short and avoid very large frame counts/resolutions. Animations are meant for short, decorative loops, not for playing full videos.
### Does FancyMenu work with OptiFine?
No. OptiFine is **not compatible** and is known to break many mods, including FancyMenu. It is highly recommended to use modern alternatives like Sodium/Embeddium + Iris/Oculus.
* More info: [OptiFine Alternatives](https://docs.fancymenu.net/en/optifine-alternatives)
### My game is crashing. How do I figure out if it's a mod conflict?
The best way to check for a mod conflict is to **run the game with only FancyMenu and its dependencies** (Konkrete, Melody). If the crash no longer occurs, you can add your other mods back in small groups until the crash happens again to identify the conflicting mod.
### A button from another mod disappears or doesn't work when I try to edit it.
This usually means the other mod adds its buttons in a non-standard way that FancyMenu cannot interact with. This is an issue that the other mod's developer would need to fix on their end. FancyMenu cannot customize elements it cannot "see".
### Can I use FancyMenu layouts on a server?
FancyMenu is a client-side mod. All layouts and customizations are on the player's client. You cannot put layouts on a server to force players to see them. However, you can distribute your `config/fancymenu` folder as part of a modpack. If you want to use commands like `/fmvariable` or `/openguiscreen` from the server, then FancyMenu (or its Spigot plugin) must be installed on the server.
### What's the difference between FancyMenu v2 (for older MC versions) and v3?
FancyMenu v3 is a complete rewrite with many new features, a more stable architecture, and better performance. V2 is outdated, no longer supported, and missing many features like advanced placeholders and scripting. It is highly recommended to use v3 on a modern Minecraft version (1.18.2+). V2 layouts can be automatically converted to v3 when you load them, but some manual fixing may be required.
### Where can I find pre-made layouts and templates?
The FancyMenu community shares layouts in the `#layout-templates` channel on the official Keksuccino's Mods Discord server.
### How can I make the Player Entity render behind other elements?
You can't. Due to how Minecraft renders entities, the Player Entity element will almost always render in front of other 2D elements, regardless of the layer settings.
### My Player Entity has only one leg! What happened?
This is a visual glitch, likely caused by a mod conflict with another mod that alters player animations or models. Check the Player Entity's Pose settings to see if the legs have been rotated or moved by accident.
### How do I create a delay between actions in a script?
FancyMenu 3.9.0 adds **Delay** and **Execute Later** blocks to action scripts. Use those for most delayed action logic. For repeating background logic, use [Schedulers](https://docs.fancymenu.net/en/schedulers).
### Can I customize menus from the Create mod?
No. FancyMenu has known incompatibilities with Create's complex GUIs. Customization for Create screens has been intentionally disabled to prevent crashes.
### Why do buttons from mod X disappear in the editor?
This means the mod adds its buttons in a custom, non-vanilla way. FancyMenu cannot "see" or interact with these elements, so it cannot customize them. The developer of the other mod would need to change how they add their buttons for them to be compatible.
### What is the recommended resolution for background images and button textures?
Backgrounds: A standard 1920x1080 (1080p) image is a great starting point and will scale well for most users.
Buttons: Most vanilla buttons are around 150-200 pixels wide and 20 pixels high. Matching this size for custom textures is a good practice for consistency.
### Is there a way to automatically open a menu or run a command when a player completes an in-game objective (like a quest)?
FancyMenu itself cannot detect in-game events like this. However, you can integrate it with a questing mod like FTB Quests. Most quest mods allow you to run a command as a quest reward. You would set the reward to execute the `/openguiscreen` or `/fmvariable` command to interact with your menus.
### How do I make a button inactive or "grayed out"?
You can control a button's active state using Loading Requirements.
Right-click the button in the editor and select "Active State".
Add a requirement that must be met for the button to be active. For example, to permanently disable a button, you could add an Is Number requirement that checks if 0 equals 1 (which is always false).
The button will now use its "Inactive Background" texture and will be unclickable.
### How can I remove the header and footer (the dirt texture bars) on scrollable screens?
In FancyMenu v3, you can customize these. In the layout editor, right-click the editor background and look for options like "Customize Header/Footer". You can set their textures to be fully transparent to effectively remove them visually. Note that this may not work on all screens, especially older or heavily modded ones.
### I can't create a layout "for the current screen". The button is greyed out.
You need to enabled customizations for that screen first via **menu bar -> Customization -> Current Screen Customizations -> toggle it to Enabled**.
### I can't customize any elements of a screen when opening it in the editor. It's just an empty screen then.
This could mean you accidentally created a universal layout instead of one **for the current screen**.
It could also mean that the screen you are customizing is a scrollable screen, which are screens that FancyMenu can't customize by default.
The third possibility is that it's a screen from a mod that adds elements in a non-Vanilla way, which makes FancyMenu unable to customize these elements.
### There are weird grey boxes at my Text element.
These translucent (low opacity) boxes/rectangles can be at the right or bottom edge of your Text element and they are not a bug. These are the scroll grabbers of the Text element, since the element is scrollable.
If you don't want these boxes to be visible, you can either right-click the element and disable scrolling completely OR you can also set the grabber textures to completely transparent ones in the same right-click menu, if you want the element to be still scrollable.
### How can I show the latest Minecraft changelog in my menus?
There's a great [GitHub project](https://github.com/ClaytonTDM/minecraft-changelogs-markdown) that converts Minecraft's changelogs to FancyMenu-compatible Markdown, so you can show the latest MC changelog in your menus! It updates daily to fetch new changelogs.
For example, to show the latest Minecraft changelog in a Text element, set its **Source Mode** to **Resource** and set its resource source to **Web**. Then use this URL as source: `https://clay.is-a.dev/minecraft-changelogs-markdown/{"placeholder":"mcversion"}/fancymenu.md`
### What's the easiest way to stretch any element to the size of the screen?
Most elements have an option in their right-click context menus to stretch them horizontally and vertically. Enabling this will make them always stretch to the full width and/or height of the screen. Horizontal and vertical stretching can be toggled independently.
### I can't click buttons or interact with sliders when they are behind or in front of a Text element.
This happens because Text elements are interactable by default (to be able to grab the scroll grabber or click Markdown hyperlinks), which means they consume mouse clicks and scroll events. The best way would be to simply not move buttons behind/in front of Text elements, but if there is no way around it, you can make the Text element not interactable by **right-clicking it** and then setting **Interactable** to **Disabled**. Keep in mind this makes the Text element a static, non-interactable text, so you can't scroll it anymore or click on hyperlinks.
### How can I make it so buttons and sliders do not get selected/focused anymore when navigating in screens with the Arrow and Tab keyboard keys?
To make buttons and sliders not navigable, you need to **right-click** it and set **Navigable** to **Disabled**. The button/slider will still be clickable, but you can't focus it with Arrow/Tab navigation anymore.
This is also useful if you want to add buttons/sliders to the Chat screen, so you can still use the Arrow Up key to scroll through older messages without accidentally selecting buttons/sliders in the screen.
### One of FancyMenu's context menus is missing an option that should be there.
FancyMenu's context menus (the menus that open when you right-click somewhere or when you interact with menu bars) are SCROLLABLE. This means you can use your scroll wheel while your mouse cursor is over the menu to scroll up or down, which let's you see more options that were previously not visible.
================== END PAGE: https://docs.fancymenu.net/docs/faq ==================
================== BEGIN PAGE: https://docs.fancymenu.net/docs/ffmpeg-frames ==================
---
title: Get Frames from Videos
description: How to get frames from a video file.
published: true
date: 2025-04-16T19:18:14.899Z
tags: ffmpeg, mp4, mkv, video, frame, frames
editor: markdown
dateCreated: 2025-04-14T20:14:40.022Z
---
# How to Get Frames from a Video Using FFmpeg
*This page was partly generated by ChatGPT AI.*
FFmpeg is a free tool that helps you work with videos and audio files. One cool thing you can do with it is take pictures (frames) out of a video, like an MP4 file. Here’s how you can do that step by step.
MP4 will be used in the following commands, but FFmpeg also supports other video formats like AVI, MOV, MKV and MPEG.
# What You Need
Before you start, make sure you have:
1. **FFmpeg Installed**:
- Download FFmpeg from the official [FFmpeg website](https://ffmpeg.org/download.html). Make sure to download the "full" build.
- Follow the setup instructions for your computer.
2. **Command Line Access**:
- Use the terminal (Linux/macOS) or command prompt (Windows) to run FFmpeg commands.
3. **A Video File**:
- Have an MP4, AVI, MOV, MKV or MPEG video file ready to use.
# Before You Start
Before running any commands, make sure to prepare the following:
## Enable File Extensions
- It’s important to see file extensions like `.mp4` or `.avi` when renaming your video file.
- **On Windows**:
- Open File Explorer.
- Click on the "View" tab at the top.
- Check the box that says "File name extensions."
- **On macOS**:
- Open Finder.
- Click on "Finder" in the menu bar and select "Preferences."
- Go to the "Advanced" tab and check the box for "Show all filename extensions."
## Create an Output Folder
- Create a folder named `output_frames` in the directory where the FFmpeg executable is located. This is where your extracted frames will be saved.
## Prepare Your Video File
- Place the video file you want to extract frames from in the same directory as the FFmpeg executable.
- Rename the video file to `input` followed by its file extension (e.g., `input.mp4`, `input.avi`, etc.). This ensures that the commands below will work without modification.
# Adding the Animator Element
1. **Right-Click the Background:**
In the layout editor, right-click on the background.
2. **Select New Element -> Element Animator:**
In the menu that pops up, go to **New Element** and click on **Element Animator**. This adds the Animator Element to your layout.
3. **Set It Up:**
After adding, the Animator element shows up with its default settings. You can change options like looping or color by right-clicking the Animator and choosing from the menu.
# Managing Keyframes
Keyframes are like bookmarks that tell the Animator what the element should look like at a certain time.
## Opening the Keyframe Editor
- **Open the Editor:**
Right-click the Animator element and choose **Edit Keyframes** (or **Manage Keyframes**). This opens a screen where you can add, edit, or delete keyframes.
## Recording and Adding Keyframes
- **Start Recording:**
In the keyframe editor, press the **`R` key** to start recording. When recording, the preview box changes color to show it’s active.
- **Change the Preview:**
Move or resize the preview box to set the look you want. In offset mode, the preview stays centered on a crosshair so changes are shown as offsets.
- **Add a Keyframe:**
Press the **`K` key** to save the current look as a keyframe. This keyframe saves the preview’s position, size, and anchor settings.
## Editing Keyframes
- **Select a Keyframe:**
Click on a keyframe marker in the timeline. You can also hold **Ctrl** and click to select more than one.
- **Move a Keyframe:**
Drag the keyframe marker left or right to change its time. You can also use:
- **Left Arrow:** to move it 100ms earlier.
- **Right Arrow:** to move it 100ms later.
- **Fine-Tune the Preview:**
When a keyframe is selected, adjust the preview box by moving or resizing it. Use **Ctrl + Z** to undo and **Ctrl + Y** to redo changes if needed.
## Removing Keyframes
- **Delete a Keyframe:**
Select a keyframe and press the **Delete key** to remove it.
- **Delete Multiple Keyframes:**
You can select several keyframes (for example, using **Ctrl + A** to select all) and press Delete to remove them all.
## Keyframe Smoothing
Keyframe smoothing is a feature that helps you evenly space out your keyframes. This makes your animation look more consistent and smooth.
- **Select Multiple Keyframes:**
First, select two or more keyframes that you want to smooth out (use **Ctrl + Click** or **Ctrl + A**).
- **Click the Smoothing Button:**
In the keyframe editor’s bottom toolbar, click the button labeled **Distance Smoothing**.
- **Enter a New Distance:**
A small input box will appear. Type in a value (in milliseconds) to set the same time gap between each selected keyframe.
- **Apply the Smoothing:**
Press Enter to apply the smoothing. The keyframes will be adjusted so that the time difference between them is even.
# Previewing Your Animation
After you have recorded keyframes, you can see how your animation will look:
- **Play the Animation:**
In the keyframe editor, press the **`P` key** or click the play button. The preview will start from the beginning and show how the preview box changes over time.
- **Note on Looping:**
While previewing in the keyframe editor, the animation will **not loop**. This means it plays from start to end only once. Looping will only be active when the Animator element is applied to a target element in the final layout.
- **Pause the Preview:**
Press the **`P` key** again to pause the animation if you want to stop at a certain point.
- **Drag the Progress Bar:**
If available, you can drag the timeline marker to check how the animation looks at any specific time.
# Choosing Target Elements
After setting up your keyframes, you need to choose which layout elements will be animated:
1. **Open the Target Manager:**
Right-click the Animator element and choose **Manage Targets**.
2. **Add Targets:**
Click **Add Target** to see a list of available elements. Pick the ones you want to animate.
3. **Remove Targets:**
To remove a target, open the manager and click **Remove Target**.
When the animation plays in the final layout, the Animator will use your keyframes to change the chosen elements’ size, position, and more. Looping will be applied here if you set it.
# Keyboard Shortcuts
Use these shortcuts in the keyframe editor to work faster:
- **`R` Key:** Start or stop recording.
- **`T` Key:** Pause or resume recording.
- **`P` Key:** Play or pause the animation preview.
- **`K` Key:** Add a new keyframe at the current time.
- **Left/Right Arrow Keys:**
- **Left Arrow:** Move a keyframe 100ms earlier.
- **Right Arrow:** Move a keyframe 100ms later.
- **Delete Key:** Remove the selected keyframe(s).
- **Ctrl + A:** Select all keyframes.
- **Ctrl + Z:** Undo your last change.
- **Ctrl + Y:** Redo the change you just undid.
- **Ctrl + Keyframe Dragging**: Drag multiple selected keyframes at once.
# Extra Settings and Tips
- **Loop Animation:**
You can set the Animator to loop. When looping is on, the animation will restart after the last keyframe—but note that this only happens for the final target element. In the keyframe editor preview, looping does not occur.
- **Ignore Size/Position:**
If you do not want the keyframes to change an element’s size or position, turn these options off.
- **Timing Offsets:**
FancyMenu 3.9.0 adds timing offsets for controlled elements. You can offset individual target elements, or use random timing offsets in a configured range, so one animation can start at slightly different times for each target.
- **Offset Mode:**
In offset mode, animations are applied as changes from the element’s original spot. The preview is shown centered on a crosshair.
- **Undo and Redo:**
Use **Ctrl + Z** to undo and **Ctrl + Y** to redo changes.
- **Check the Order:**
Make sure your keyframes are in the right order by time. The system sorts them for you, but if you move one, double-check the order.
- **Preview Changes:**
Use the play button or **`P` key** to see your animation in action before saving it.
# Conclusion
By following these simple steps, you can add an Animator element to your layout and create smooth animations. Whether you record live changes with the preview, adjust keyframes with your keyboard, choose which elements to animate, or preview your animation to see how it looks, the Animator element gives you an easy way to bring life to your custom menus.
Happy animating!
================== END PAGE: https://docs.fancymenu.net/docs/element-animator ==================
================== BEGIN PAGE: https://docs.fancymenu.net/docs/element-identifiers ==================
---
title: Element Identifiers
description: How element identifiers work in FancyMenu.
published: true
date: 2025-05-17T19:06:46.339Z
tags:
editor: markdown
dateCreated: 2025-05-17T19:06:11.365Z
---
# Element Identifiers
Every element in FancyMenu has a unique identifier that gets automatically applied to it when creating it.
These identifiers are used to, well, identify the element, so other parts of FancyMenu, like placeholders, actions and loading requirements can communicate with the element.
# Getting the Identifier of Elements
To get the identifier of an element, because you need it somewhere else, just **right-click** the element in the editor and click on **Copy Element Identifier**. Doing that will copy the element's identifier to the clipboard, so you can easily paste it where you need it.
================== END PAGE: https://docs.fancymenu.net/docs/element-identifiers ==================
================== BEGIN PAGE: https://docs.fancymenu.net/docs/element-opacity ==================
---
title: Element Opacity
description: How to control the opacity of elements.
published: true
date: 2025-09-03T17:05:25.530Z
tags:
editor: markdown
dateCreated: 2025-08-04T19:13:04.533Z
---
# Element Opacity
Most elements in FancyMenu (with some exceptions) support setting their opacity via their right-click menu.
The opacity value of elements supports placeholders, which makes it possible to dynamically update their opacity based on the placeholder.
This makes it possible to create custom fading logic when used in combination with Ticker elements to update variable values and then apply it as opacity via placeholders.
To set the opacity of elements, **right-click the element -> Opacity -> Set**.
# Fading In/Out Elements
If you simply want to fade-in or -out elements, it's probably easier to just use the built-in fading feature of elements. You can enable fading in the right-click menu of elements.
This feature makes elements fade-in every time they load, be it the initial load when opening a menu or when the element's loading requirements make it load. They will fade-out whenever their loading requirements make it unload/invisible.
The fading feature supports setting a fading speed to control how fast and element should fade in or out.
================== END PAGE: https://docs.fancymenu.net/docs/element-opacity ==================
================== BEGIN PAGE: https://docs.fancymenu.net/docs/elements ==================
---
title: Elements
description: Everything to know about FancyMenu's element types.
published: true
date: 2026-05-03T11:01:52.000Z
tags:
editor: markdown
dateCreated: 2025-07-05T21:09:31.485Z
---
# Elements
Elements are the building blocks of your custom layouts in FancyMenu. You can add them to any layout to display information, add interactivity, or create stunning visual effects.
# Adding Elements to a Layout
You can add a new element to your layout from within the **Layout Editor**.
1. **Right-click** on the editor's background to open the context menu.
2. Hover over **New Element**.
3. A list of all available element types will appear. Click on the one you want to add.

Once an element is added, you can move, resize, and customize it by **right-clicking** on it to open its specific context menu. To learn more about how to arrange elements, see the [Positioning Elements](https://docs.fancymenu.net/en/positioning-elements) and [Element Identifiers](https://docs.fancymenu.net/en/element-identifiers) pages.
# Elements in Detail
The following list contains most, if not all, elements available in FancyMenu. The list can sometimes be a little outdated due to updates of FancyMenu.
## Button
A clickable button that can perform a wide variety of actions. This is one of the most powerful and versatile elements for creating interactive menus.
* **Use Cases:**
* Creating a "Join Discord" or "Visit Website" button.
* Adding a quick-join button for a specific server.
* Building custom navigation between different menus.
* Creating buttons that toggle other layouts on or off.
* **Key Features:**
* **Actions:** Can execute a sequence of actions, such as opening a URL, joining a server, sending a chat command, mimicking another button's function, controlling variables, and much more. Learn more at the [Action Scripts](https://docs.fancymenu.net/en/action-scripts) documentation.
* **Custom Appearance:** Fully customizable textures for normal, hovered, and inactive states. Supports transparent backgrounds, nine-slicing, custom label colors, hover label colors, label scale, label shadow toggles and button icon textures.
* **Sounds:** Custom click, hover and unhover sounds.
* **Template Mode:** Can act as a template to apply its appearance and properties to all other Vanilla or modded buttons in the menu, ensuring a consistent look. Read more at the [Button & Slider Templates](https://docs.fancymenu.net/en/button-slider-templates) page.
## Slider
A slider that users can drag to select a value from a list or a range. It can execute actions whenever its value changes.
* **Use Cases:**
* Creating a custom volume control.
* A slider to switch between different themes or background images (using the "List" type).
* Adjusting a specific Minecraft option, like brightness or render distance.
* **Key Features:**
* **Types:** Can be a `Value List` (e.g., "Easy", "Normal", "Hard"), an `Integer Range` (e.g., 1-100), or a `Decimal Range` (e.g., 0.0-1.0).
* **Dynamic Actions:** Executes actions on value change. The slider's current value can be used within its actions to perform dynamic tasks, which can be used with [Variables](https://docs.fancymenu.net/en/variables).
* **Customization:** The slider's label can dynamically display its current value. The handle and background textures are fully customizable, including transparent backgrounds, label color/scale options, text shadow toggles and custom click/unhover sounds.
## Checkbox
A standard checkbox that can be toggled on or off. It can execute actions upon being toggled.
* **Use Cases:**
* An "I agree to the rules" checkbox.
* A setting to enable or disable a specific feature in your custom menu.
* Toggling a layout or variable on/off.
* **Key Features:**
* **Actions on Toggle:** Executes [Action Scripts](https://docs.fancymenu.net/en/action-scripts) when its state changes. The current state (`true` or `false`) can be accessed within its actions.
* **Variable Mode:** Can be linked directly to a FancyMenu variable, making the checkbox state read from and write to that variable.
* **Custom Appearance:** Supports custom textures for the background (in normal, hover, and inactive states) and the checkmark itself.
## Text Input Field
A field where users can type text. Its content can be linked to a FancyMenu variable, allowing you to capture and use user input.
* **Use Cases:**
* A "Server IP" input field that works with a "Join Server" button.
* A field to enter a player's name for a custom skin preview.
* Creating a basic login-like interface.
* **Key Features:**
* **Variable Linking:** The text entered by the user is stored in a specified [variable](https://docs.fancymenu.net/en/variables).
* **Input Validation:** Can be configured to only accept specific character types, such as numbers, URLs, or plain text.
* **Max Length:** You can set a maximum character limit for the input.
* **Appearance and Sounds:** Supports custom background color, border colors, border rounding, text color, hint/placeholder text, hint color, hover sounds, unhover sounds and click sounds.
## Tooltip
A text box that can be configured to appear at a specific location or follow the mouse cursor. Its visibility is typically controlled by [Conditions (Loading Requirements)](https://docs.fancymenu.net/en/conditions).
* **Use Cases:**
* Displaying detailed information when a user hovers over a button or image.
* Creating context-sensitive help tips that appear under certain conditions.
* Showing dynamic information (like server status) next to the cursor.
* **Key Features:**
* **Mouse Following:** Can be set to follow the mouse pointer.
* **Markdown Support:** The tooltip content supports full Markdown formatting.
* **Custom Background:** The background can be a solid color or a custom nine-sliced texture for a fully themed look.
## Item
Displays a single Minecraft item, either from vanilla or a mod.
* **Use Cases:**
* Using items as icons for buttons or menu selections.
* Creating a shop or kit selection GUI.
* Displaying a player's held item or armor.
* **Key Features:**
* **Custom Data:** You can set the item's name, lore, count, enchantment glint, and even custom NBT data. You can learn more about using NBT with the [NBT Data Placeholder](https://docs.fancymenu.net/en/nbt-data-placeholder) documentation.
* **Tooltip Display:** Can be configured to show the item's standard tooltip on hover.
## Block/Item JSON Model
Renders a block or item JSON model from Minecraft resources or external sources.
* **Use Cases:**
* Displaying a 3D resource-pack model in a menu.
* Showing item/block previews with custom textures.
* Building model-based decorative UI elements.
* **Key Features:**
* **Model Source:** Can load model JSON from Minecraft resources or external sources.
* **Texture Overrides:** Supports setting a custom texture.
* **Rendering Controls:** Includes rotation and light controls.
## Image
Displays a static image from a local file, a web URL, or a Minecraft resource location.
* **Use Cases:**
* Adding a server logo or modpack brand.
* Creating decorative borders or UI frames.
* Using images as part of a more complex UI design.
* **Key Features:**
* **Nine-Slicing:** Allows the image to be used as a scalable border or panel without distorting the corners. Learn more at the [Nine-Slicing & Tiling](https://docs.fancymenu.net/en/nine-slicing-and-tiling) page.
* **Texture Repeating:** The image can be tiled to fill the element's area.
* **Tinting:** You can apply a color tint to the image.
* **Rounded Corners:** Non-nine-sliced and non-repeated images can have rounded corners.
* **Parallax Effect:** Can be configured to move slightly with the mouse for a 3D effect. See the [Parallax Effect](https://docs.fancymenu.net/en/parallax) page for more.
## Text
A highly versatile element for displaying text. It can be used for anything from single-line labels to multi-page, scrollable documents.
* **Use Cases:**
* Displaying server rules, patch notes, or welcome messages.
* Creating dynamic info panels using [placeholders](https://docs.fancymenu.net/en/placeholders), e.g., "Welcome, `{"placeholder":"playername"}`!".
* Adding labels and descriptions to your UI.
* **Key Features:**
* **Content Sources:** Text can be entered directly, loaded from a local file, or fetched from a web URL.
* **Markdown Support:** Supports a wide range of Markdown for rich text formatting, including headers, lists, code blocks, and tables. The appearance of Markdown elements is fully customizable. See the [Text Formatting](https://docs.fancymenu.net/en/text-formatting) page for more info.
* **Scrolling:** Automatically becomes scrollable if the content is larger than the element's area. Scrollbars can be customized or disabled.
* **Styling:** Full control over text color, scale, alignment, shadow, and line spacing.
## Video
Plays a video file. This is perfect for cinematic intros or decorative looping backgrounds.
> The new native Video element in FancyMenu 3.9.0 requires **Watermedia V3** and **Watermedia Binaries V3**. The old **Video [MCEF]** element is deprecated.
{.is-warning}
* **Use Cases:**
* An animated modpack or server trailer.
* A looping, ambient video to add life to your menu.
* An in-game tutorial video.
* **Key Features:**
* **Sources:** Supports both local video files and web URLs. See the [Videos (MP4)](https://docs.fancymenu.net/en/video) page for details.
* **Playback Control:** Can be set to loop automatically. Its volume, sound channel and aspect-ratio preserving behavior are adjustable.
* **Interactive Control:** The video's playback, seek time and volume can be controlled via button actions.
## GLSL Shader
Renders a custom GLSL shader inside an element.
* **Use Cases:**
* Animated shader panels.
* Procedural visual effects.
* Shadertoy-style menu effects clipped to an element rectangle.
* **Key Features:**
* **Shader Runtime:** Supports single-pass and multipass shaders.
* **Shadertoy Support:** Can use Shadertoy-style `mainImage` shaders.
* **Uniforms:** Exposes FancyMenu and input uniforms. See the [GLSL Shader API](https://docs.fancymenu.net/en/glsl-shader-api) page for details.
## Slideshow
Displays a sequence of images. The configuration for the slideshow (images, timing, transitions) is done in a separate `.properties` file located in the `/config/fancymenu/assets/slideshows/` directory.
* **Use Cases:**
* A rotating gallery of in-game screenshots.
* Showcasing key features of a modpack.
* A dynamic background that cycles through different scenes.
* **Key Features:**
* Loads pre-configured slideshows. See the [Slideshows](https://docs.fancymenu.net/en/slideshows) documentation for setup instructions.
* Can be set to maintain the aspect ratio of the images.
## Rectangle Shape
A simple, solid-colored rectangle.
* **Use Cases:**
* Creating a semi-transparent background behind text to improve readability.
* Designing simple UI panels and dividers.
* As a colored placeholder during layout design.
* **Key Features:**
* Supports HEX RGBA colors, rounded corners and optional blur, allowing the shape to work as a simple panel, tint or blur background.
## Circle Shape
A simple, solid-colored circle/ellipse shape.
* **Use Cases:**
* Creating circular accents, indicators or soft UI areas.
* Building themed UI decorations without a texture file.
* **Key Features:**
* Works similar to the Rectangle Shape element and supports color/blur-style visual customization.
## Splash Text
A recreation of Minecraft's iconic yellow, bouncing splash text from the title screen.
* **Use Cases:**
* Replacing the vanilla splash text with your own custom messages.
* Adding an eye-catching, animated message to any menu.
* **Key Features:**
* **Content Sources:** Can use the default vanilla splashes, a list of custom text entered directly, or text from a local file.
* **Customization:** You can toggle the bouncing effect and customize the text's color, scale, rotation, and shadow.
## Player Entity
Renders a player model in the menu.
* **Use Cases:**
* Displaying the current player's character on the main menu.
* Creating a team selection or class preview screen.
* A "profile" section showing the player's skin and name.
* **Key Features:**
* **Dynamic Appearance:** Can be configured to automatically copy the current player's skin, cape, and name. For more on this, check out the [Player Heads](https://docs.fancymenu.net/en/player-heads) guide.
* **Custom Poses:** Offers fine-grained control over the rotation of the head, body, arms, and legs. The head and body can also be set to follow the mouse cursor.
* **Attributes:** Can be set to be a baby, crouching, or have a slim model.
## Browser
An element that renders a live web page inside the game.
This element requires the **MCEF (Minecraft Chromium Embedded Framework)** mod to be installed and working!
You can download MCEF from the official project pages on [CurseForge](https://www.curseforge.com/minecraft/mc-mods/mcef) and [Modrinth](https://modrinth.com/mod/mcef).
For newer Minecraft versions (1.21.5+), the official MCEF projects do not provide builds, but there is a fork with builds for latest Minecraft versions, which can be found [here](https://www.curseforge.com/minecraft/mc-mods/mcef-keksuccino) (CurseForge) and [here](https://modrinth.com/mod/mcef-keksuccino) (Modrinth). This fork is maintained by Keksuccino, to get builds for latest Minecraft versions out as fast as possible.
* **Use Cases:**
* Displaying a server's live Dynmap.
* Embedding a YouTube video player.
* Showing a wiki or documentation page directly in-game.
* **Key Features:**
* **Interactivity:** Can be made fully interactable, allowing users to click links, scroll, and type.
* **Media Control:** Offers options to mute media, loop videos, and hide video controls on the loaded page.
### Loading Local HTML Files
The Browser element lets you load local HTML documents in `/config/fancymenu/assets/`! This means you can display local browser-rendered content for fancy looking changelogs and more.
To load a local HTML file, start your URL with `file:///`, followed by the SHORT file path, for example `/config/fancymenu/assets/cool_changelog.html`, which makes it look like this: `file:///config/fancymenu/assets/cool_changelog.html`.
On **Linux** you need to give it the absolute file path, but since hardcoding an absolute path would break the layout, you need to let a placeholder convert the short path to an absolute one dynamically: `file:///{"placeholder":"absolute_path","values":{"short_path":"/config/fancymenu/assets/cool_changelog.html"}}`.
It is SUPER IMPORTANT that you start the short path with `/` on Linux, like in the example above. Without this it will not work.
## Element Animator
A powerful tool for creating complex, keyframe-based animations. It can animate the position, size, and anchor point of one or multiple other elements.
* **Use Cases:**
* Creating a sophisticated intro animation where menu elements slide or fade into view.
* Making decorative elements pulsate, rotate, or move along a path.
* Animating a notification to pop up and then disappear.
* **Key Features:**
* **Keyframe Editor:** A dedicated editor for adding, editing, and sequencing keyframes on a timeline.
* **Multi-Target:** A single Animator can control multiple "target" elements at once.
* **Control:** Animations can be set to loop. You can also choose to animate only position or size.
* **Timing Offsets:** Target elements can use individual or randomized start timing offsets.
* **[Learn more about the Element Animator.](https://docs.fancymenu.net/en/element-animator)**
## Ticker
An invisible element that executes a list of actions at a regular interval (every "tick").
> For new background automation in FancyMenu 3.9.0+, consider using [Schedulers](https://docs.fancymenu.net/en/schedulers). Schedulers are global, easier to organize and can keep running independently of a specific screen.
{.is-info}
* **Use Cases:**
* Periodically checking a server's online status and updating a text element.
* Creating a countdown timer that updates a text label.
* Running a script repeatedly to create custom behaviors.
* **Key Features:**
* **Timing Control:** You can set the delay between ticks in milliseconds.
* **Tick Modes:** Can be set to tick continuously, only once per game session, or once every time the menu is loaded.
* **Asynchronous:** Can run its [actions](https://docs.fancymenu.net/en/action-scripts) in a separate thread to avoid impacting game performance, though some actions cannot be run this way.
## Audio
An invisible element that plays audio files. It can manage a playlist of tracks and offers various playback controls.
* **Use Cases:**
* Adding custom background music to a menu.
* Creating a music player with buttons to control playback (next/previous track, volume).
* Playing ambient soundscapes.
* **Key Features:**
* **Playlist:** Can manage multiple audio tracks.
* **Playback Modes:** Can play tracks in order or shuffle them (with support for track weighting to make some tracks more common than others).
* **Control:** Supports looping, volume adjustment, and can be assigned to a specific sound channel (e.g., Master, Music). For more info, see the [Menu Background Music](https://docs.fancymenu.net/en/background-music) page.
## Music Controller
An invisible element used to control Minecraft's default music playback within a specific menu.
* **Use Cases:**
* Disabling the default menu music on a screen where you want to play your own custom music via an **Audio** element.
* Stopping in-world music from continuing to play when a menu is opened in-game.
* **Key Features:**
* Separate toggles to control vanilla "Menu Music" and "World Music."
## Progress Bar
A customizable bar that visually represents a numerical value.
* **Use Cases:**
* A loading bar that tracks world loading progress using `{"placeholder":"world_load_progress"}`.
* Visual health, hunger, or experience bars for an in-game HUD.
* A volume indicator that is controlled by a **Slider** element.
* **Key Features:**
* **Dynamic Value:** The progress value (0-100 or 0.0-1.0) is set via a text field that supports [placeholders](https://docs.fancymenu.net/en/placeholders).
* **Appearance:** The bar's direction (up, down, left, right), colors, textures and nine-slicing for bar/background textures are all customizable.
* **Animation:** Features a smooth filling animation to make progress changes look less jarring.
## Dragger
An invisible element that the user can click and drag to move around. Other elements can be anchored to it to create movable widgets.
* **Use Cases:**
* Creating a draggable clock or information panel.
* Allowing users to customize the position of UI elements to their preference.
* **Key Features:**
* **Persistent Position:** The dragged offset is saved, so the element stays where the user left it, even after restarting the game.
* **Anchor Point:** Acts as a movable anchor for other elements, which is a key part of [Positioning Elements](https://docs.fancymenu.net/en/positioning-elements).
## Cursor
An invisible element that replaces the default system cursor with a custom image when a layout is active.
* **Use Cases:**
* Creating a fully themed UI that matches your modpack's aesthetic.
* **Key Features:**
* **Custom Texture:** Use any image for your cursor.
* **Hotspot:** You can define the exact pixel on the image that serves as the "click point". See the [Custom Cursor](https://docs.fancymenu.net/en/custom-cursor) guide for more.
================== END PAGE: https://docs.fancymenu.net/docs/elements ==================
================== BEGIN PAGE: https://docs.fancymenu.net/docs/essential ==================
---
title: Essential Mod
description: How to customize Essential's UI.
published: true
date: 2025-08-04T01:11:43.629Z
tags:
editor: markdown
dateCreated: 2025-07-31T18:11:30.915Z
---
# Essential
Recent versions of the Essential mod added compatibility with FancyMenu, which means you should now be able to fully customize all elements Essential adds to the Title screen and Pause screen!
For a detailed guide about how to customize Essential's UI, you should take a look at [this wiki page](https://essential.gg/wiki/fancymenu) of the Essential wiki!
# Customization Issues
If you encounter some bug or inconvenience while trying to customize Essential's elements, it is almost always caused by Essential and the Essential devs need to fix it on their side.
You should report the bug/issue to the Essential team via their Discord or GitHub.
# Links used in this page
- Essential wiki page about FancyMenu: https://essential.gg/wiki/fancymenu
================== END PAGE: https://docs.fancymenu.net/docs/essential ==================
================== BEGIN PAGE: https://docs.fancymenu.net/docs/fancymenu-ui-scale ==================
---
title: FancyMenu's UI Scale
description: How to change the scale of FancyMenu's UI.
published: true
date: 2026-05-03T11:01:52.000Z
tags:
editor: markdown
dateCreated: 2025-08-04T19:19:36.697Z
---
# FancyMenu's UI Scale
FancyMenu's UI (such as the menu bar and context menus) uses a separate scale that is not linked to Minecraft's normal GUI scale.
In case FancyMenu's UI looks too small or big for you, you can change the UI scale via **menu bar -> Customization -> Settings -> FancyMenu's UI**.
FancyMenu 3.9.0 adds more UI scale choices. When the UI scale is set to **Auto**, the smallest automatic scale is now `1.25`; you can still manually choose scale `1` if you prefer it.
The only exception to this are actual full screens added by FancyMenu, such as the screen to manage variables or the layout editor. These screens, in most cases, use Minecraft's normal GUI scale, but it's possible that some screens use a different auto-scaling logic to automatically show at a smaller scale when the window would otherwise be too small to fit all of the screen's content.
================== END PAGE: https://docs.fancymenu.net/docs/fancymenu-ui-scale ==================
================== BEGIN PAGE: https://docs.fancymenu.net/docs/faq ==================
---
title: FAQ
description: Frequently asked questions.
published: true
date: 2026-05-03T11:01:52.000Z
tags:
editor: markdown
dateCreated: 2025-08-04T19:44:22.004Z
---
# FAQ
### I need help with an issue. What information should I provide?
To get the best help, please provide as much context as possible:
1. **A clear description of the problem:** What did you expect to happen, and what actually happened?
2. **Your `latest.log` file:** This is the most important file for troubleshooting. Find it in your instance's `/logs/` folder. **Do not send a crash log** unless specifically asked; the `latest.log` is much more useful. Use a site like https://gist.github.com to share it.
3. **Your Minecraft Version:** (e.g., 1.20.1)
4. **Your Mod Loader and Version:** (e.g., Forge 47.2.0, Fabric 0.15.7)
5. **Your FancyMenu Version:** (e.g., 3.5.2)
6. **Screenshots or videos** of the issue can also be very helpful.
### How do I change the layering of elements (move something in front of or behind another)?
* **Custom vs. Custom:** To change the render order of your own custom elements, use the **Layers widget**. You can open it via the menu bar: **Window -> Widgets -> Layers**. From there, you can drag elements up or down in the hierarchy. You can also right-click an element and use "Move One Layer Up/Down".
* **Custom vs. Vanilla:** To render all your custom elements behind all vanilla elements (e.g., to put a background image behind the default buttons), **right-click the editor background** and toggle the option **"Render Custom Elements Behind Vanilla"**.
### Can I exclude certain buttons from a universal button template?
**No. If a template button has custom textures set, these textures are always shared with all affected elements. You cannot exclude individual buttons.**
### How do I make a button do something when clicked?
Use an **Action Script**.
1. Right-click the button in the editor.
2. Select **Edit Action Script**.
3. Click **Add Action** and choose from the list (e.g., `Open Screen or Custom GUI`, `Join Server`, `Set Variable Value`).
* More info: [Action Scripts](https://docs.fancymenu.net/en/action-scripts)
### Can I create a completely new menu screen from scratch?
Yes, this is done using **Custom GUIs**.
1. In the menu bar, go to **Customization -> Custom GUIs -> Manage Custom GUIs**.
2. Click **"New GUI"** and give it a unique identifier.
3. You can then open this new empty screen and create a layout for it, adding any elements you want.
4. This Custom GUI can then be opened via a button action.
* More info: [Custom GUIs](https://docs.fancymenu.net/en/custom-guis)
### My game is taking a long time to load after enabling pre-loading.
This is expected behavior. Pre-loading large resources like high-resolution animations or sounds during the initial startup will naturally increase the game's loading time.
### My FMA animation is using too much RAM!
Classic FMA files can consume a lot of memory when they contain many high-resolution frames. FancyMenu 3.9.0 adds AFMA, which is much better for large or complex animated textures. For classic FMA files, keep animations short and avoid very large frame counts/resolutions. Animations are meant for short, decorative loops, not for playing full videos.
### Does FancyMenu work with OptiFine?
No. OptiFine is **not compatible** and is known to break many mods, including FancyMenu. It is highly recommended to use modern alternatives like Sodium/Embeddium + Iris/Oculus.
* More info: [OptiFine Alternatives](https://docs.fancymenu.net/en/optifine-alternatives)
### My game is crashing. How do I figure out if it's a mod conflict?
The best way to check for a mod conflict is to **run the game with only FancyMenu and its dependencies** (Konkrete, Melody). If the crash no longer occurs, you can add your other mods back in small groups until the crash happens again to identify the conflicting mod.
### A button from another mod disappears or doesn't work when I try to edit it.
This usually means the other mod adds its buttons in a non-standard way that FancyMenu cannot interact with. This is an issue that the other mod's developer would need to fix on their end. FancyMenu cannot customize elements it cannot "see".
### Can I use FancyMenu layouts on a server?
FancyMenu is a client-side mod. All layouts and customizations are on the player's client. You cannot put layouts on a server to force players to see them. However, you can distribute your `config/fancymenu` folder as part of a modpack. If you want to use commands like `/fmvariable` or `/openguiscreen` from the server, then FancyMenu (or its Spigot plugin) must be installed on the server.
### What's the difference between FancyMenu v2 (for older MC versions) and v3?
FancyMenu v3 is a complete rewrite with many new features, a more stable architecture, and better performance. V2 is outdated, no longer supported, and missing many features like advanced placeholders and scripting. It is highly recommended to use v3 on a modern Minecraft version (1.18.2+). V2 layouts can be automatically converted to v3 when you load them, but some manual fixing may be required.
### Where can I find pre-made layouts and templates?
The FancyMenu community shares layouts in the `#layout-templates` channel on the official Keksuccino's Mods Discord server.
### How can I make the Player Entity render behind other elements?
You can't. Due to how Minecraft renders entities, the Player Entity element will almost always render in front of other 2D elements, regardless of the layer settings.
### My Player Entity has only one leg! What happened?
This is a visual glitch, likely caused by a mod conflict with another mod that alters player animations or models. Check the Player Entity's Pose settings to see if the legs have been rotated or moved by accident.
### How do I create a delay between actions in a script?
FancyMenu 3.9.0 adds **Delay** and **Execute Later** blocks to action scripts. Use those for most delayed action logic. For repeating background logic, use [Schedulers](https://docs.fancymenu.net/en/schedulers).
### Can I customize menus from the Create mod?
No. FancyMenu has known incompatibilities with Create's complex GUIs. Customization for Create screens has been intentionally disabled to prevent crashes.
### Why do buttons from mod X disappear in the editor?
This means the mod adds its buttons in a custom, non-vanilla way. FancyMenu cannot "see" or interact with these elements, so it cannot customize them. The developer of the other mod would need to change how they add their buttons for them to be compatible.
### What is the recommended resolution for background images and button textures?
Backgrounds: A standard 1920x1080 (1080p) image is a great starting point and will scale well for most users.
Buttons: Most vanilla buttons are around 150-200 pixels wide and 20 pixels high. Matching this size for custom textures is a good practice for consistency.
### Is there a way to automatically open a menu or run a command when a player completes an in-game objective (like a quest)?
FancyMenu itself cannot detect in-game events like this. However, you can integrate it with a questing mod like FTB Quests. Most quest mods allow you to run a command as a quest reward. You would set the reward to execute the `/openguiscreen` or `/fmvariable` command to interact with your menus.
### How do I make a button inactive or "grayed out"?
You can control a button's active state using Loading Requirements.
Right-click the button in the editor and select "Active State".
Add a requirement that must be met for the button to be active. For example, to permanently disable a button, you could add an Is Number requirement that checks if 0 equals 1 (which is always false).
The button will now use its "Inactive Background" texture and will be unclickable.
### How can I remove the header and footer (the dirt texture bars) on scrollable screens?
In FancyMenu v3, you can customize these. In the layout editor, right-click the editor background and look for options like "Customize Header/Footer". You can set their textures to be fully transparent to effectively remove them visually. Note that this may not work on all screens, especially older or heavily modded ones.
### I can't create a layout "for the current screen". The button is greyed out.
You need to enabled customizations for that screen first via **menu bar -> Customization -> Current Screen Customizations -> toggle it to Enabled**.
### I can't customize any elements of a screen when opening it in the editor. It's just an empty screen then.
This could mean you accidentally created a universal layout instead of one **for the current screen**.
It could also mean that the screen you are customizing is a scrollable screen, which are screens that FancyMenu can't customize by default.
The third possibility is that it's a screen from a mod that adds elements in a non-Vanilla way, which makes FancyMenu unable to customize these elements.
### There are weird grey boxes at my Text element.
These translucent (low opacity) boxes/rectangles can be at the right or bottom edge of your Text element and they are not a bug. These are the scroll grabbers of the Text element, since the element is scrollable.
If you don't want these boxes to be visible, you can either right-click the element and disable scrolling completely OR you can also set the grabber textures to completely transparent ones in the same right-click menu, if you want the element to be still scrollable.
### How can I show the latest Minecraft changelog in my menus?
There's a great [GitHub project](https://github.com/ClaytonTDM/minecraft-changelogs-markdown) that converts Minecraft's changelogs to FancyMenu-compatible Markdown, so you can show the latest MC changelog in your menus! It updates daily to fetch new changelogs.
For example, to show the latest Minecraft changelog in a Text element, set its **Source Mode** to **Resource** and set its resource source to **Web**. Then use this URL as source: `https://clay.is-a.dev/minecraft-changelogs-markdown/{"placeholder":"mcversion"}/fancymenu.md`
### What's the easiest way to stretch any element to the size of the screen?
Most elements have an option in their right-click context menus to stretch them horizontally and vertically. Enabling this will make them always stretch to the full width and/or height of the screen. Horizontal and vertical stretching can be toggled independently.
### I can't click buttons or interact with sliders when they are behind or in front of a Text element.
This happens because Text elements are interactable by default (to be able to grab the scroll grabber or click Markdown hyperlinks), which means they consume mouse clicks and scroll events. The best way would be to simply not move buttons behind/in front of Text elements, but if there is no way around it, you can make the Text element not interactable by **right-clicking it** and then setting **Interactable** to **Disabled**. Keep in mind this makes the Text element a static, non-interactable text, so you can't scroll it anymore or click on hyperlinks.
### How can I make it so buttons and sliders do not get selected/focused anymore when navigating in screens with the Arrow and Tab keyboard keys?
To make buttons and sliders not navigable, you need to **right-click** it and set **Navigable** to **Disabled**. The button/slider will still be clickable, but you can't focus it with Arrow/Tab navigation anymore.
This is also useful if you want to add buttons/sliders to the Chat screen, so you can still use the Arrow Up key to scroll through older messages without accidentally selecting buttons/sliders in the screen.
### One of FancyMenu's context menus is missing an option that should be there.
FancyMenu's context menus (the menus that open when you right-click somewhere or when you interact with menu bars) are SCROLLABLE. This means you can use your scroll wheel while your mouse cursor is over the menu to scroll up or down, which let's you see more options that were previously not visible.
================== END PAGE: https://docs.fancymenu.net/docs/faq ==================
================== BEGIN PAGE: https://docs.fancymenu.net/docs/ffmpeg-frames ==================
---
title: Get Frames from Videos
description: How to get frames from a video file.
published: true
date: 2025-04-16T19:18:14.899Z
tags: ffmpeg, mp4, mkv, video, frame, frames
editor: markdown
dateCreated: 2025-04-14T20:14:40.022Z
---
# How to Get Frames from a Video Using FFmpeg
*This page was partly generated by ChatGPT AI.*
FFmpeg is a free tool that helps you work with videos and audio files. One cool thing you can do with it is take pictures (frames) out of a video, like an MP4 file. Here’s how you can do that step by step.
MP4 will be used in the following commands, but FFmpeg also supports other video formats like AVI, MOV, MKV and MPEG.
# What You Need
Before you start, make sure you have:
1. **FFmpeg Installed**:
- Download FFmpeg from the official [FFmpeg website](https://ffmpeg.org/download.html). Make sure to download the "full" build.
- Follow the setup instructions for your computer.
2. **Command Line Access**:
- Use the terminal (Linux/macOS) or command prompt (Windows) to run FFmpeg commands.
3. **A Video File**:
- Have an MP4, AVI, MOV, MKV or MPEG video file ready to use.
# Before You Start
Before running any commands, make sure to prepare the following:
## Enable File Extensions
- It’s important to see file extensions like `.mp4` or `.avi` when renaming your video file.
- **On Windows**:
- Open File Explorer.
- Click on the "View" tab at the top.
- Check the box that says "File name extensions."
- **On macOS**:
- Open Finder.
- Click on "Finder" in the menu bar and select "Preferences."
- Go to the "Advanced" tab and check the box for "Show all filename extensions."
## Create an Output Folder
- Create a folder named `output_frames` in the directory where the FFmpeg executable is located. This is where your extracted frames will be saved.
## Prepare Your Video File
- Place the video file you want to extract frames from in the same directory as the FFmpeg executable.
- Rename the video file to `input` followed by its file extension (e.g., `input.mp4`, `input.avi`, etc.). This ensures that the commands below will work without modification.
 # Listener Variables
Listeners often expose a special type of variable for its nested actions, requirements and placeholders.
These variables can be accessed like placeholders (they are effectively placeholders).
You use these variables by simply using their names with the `$$` prefix in text inputs, similar to how you would use a normal placeholder.
For example, if you use the **On Keyboard Key Pressed** listener and want to print the key name to the log via the **Print to Log** action, you would use something like `Key pressed! The key is: $$key_name` as input for the message the action should print. The variable placeholder will later get replaced with the actual name of the key.
> Even tho these are called "variables", they are in no way related to FancyMenu's normal [variable system](/variables). You can't set these variables, since they are **read-only**. You also can't use any actions, requirements and placeholders meant for FancyMenu's variable system with these special listener variables, so using **Get Variable Value [FM Variable]**, **Is Variable Value [FM Variable]** or **Set Variable Value [FM Variable]** will not work for listener variables.
{.is-warning}
# Listeners in Detail
This list should include most, if not all, of FancyMenu's listeners. It is possible that the list is not always up-to-date due to updates of the mod.
## On Markdown Text Clicked
- Fires when Markdown text with a `click:` event is clicked, for example `[Open](click:open_menu)`.
- Variables:
- `$$text_event_id` – event ID from the Markdown link
## On Markdown Text Hovered
- Fires when Markdown text with a `hover:` event is hovered, for example `[Hint](hover:show_hint)`.
- Variables:
- `$$text_event_id` – event ID from the Markdown link
## On ZIP Extracted via Action
- Fires when the **Extract ZIP File In Game Directory** action finishes.
- Variables:
- `$$source_zip_path` – resolved source ZIP path
- `$$target_folder_path` – resolved extraction target path
- `$$extract_succeeded` – true/false
- `$$failure_reason` – error text when extraction failed
## On Element Spawned
- Fires when an element is spawned via an action/scripted element-spawn flow.
- Variables:
- `$$element_type` – spawned element type
- `$$element_identifier` – spawned element identifier
- `$$target_screen` – target screen identifier
## On Animated Texture Started Playing
- Fires when an animated texture starts playing.
- Variables:
- `$$texture_source` – texture source
- `$$texture_source_type` – source type
- `$$texture_will_restart` – true/false
## On Animated Texture Finished Playing
- Fires when an animated texture finishes playing.
- Variables:
- `$$texture_source`
- `$$texture_source_type`
- `$$texture_will_restart`
## On Video Playback Status Changed
- Fires when a video element or video menu background changes playback status.
- Variables:
- `$$video_source` – video source
- `$$video_source_type` – source type
- `$$is_looping` – true/false
- `$$new_status` – `PLAYING`, `STOPPED`, `PAUSED`, or `FINISHED`
## On System Message Received in Chat
- Fires when the client receives a system chat message, such as command feedback.
- Variables:
- `$$system_message_string` – plain text message
- `$$system_message_component` – JSON component
## On FM Data Received
- Fires when a server sends FM Data to this client via `/fmdata send`.
- Variables:
- `$$data_identifier` – data identifier string
- `$$data` – data payload
- `$$sent_by` – server IP or `integrated_server`
## On Remote Server Connected
- Fires when FancyMenu initializes a remote server connection.
- Variables:
- `$$request_id` – cached request ID
- `$$remote_server_url` – remote server URL
## On Remote Server Data Received
- Fires when text data is received from a connected remote server.
- Variables:
- `$$request_id` – request ID
- `$$remote_server_url` – remote server URL
- `$$data` – received payload
## On Remote Server Connection Closed
- Fires when a remote server connection closes.
- Variables:
- `$$request_id` – request ID
- `$$remote_server_url` – remote server URL
- `$$intentionally_closed` – TRUE if closed by an action
- `$$crashed` – TRUE if the connection crashed unexpectedly
- `$$unknown_close_reason` – TRUE if no known close reason was available
## On Keyboard Key Pressed
- Triggers whenever a key is pressed (repeats while held; works in screens and in-game).
- Variables:
- `$$key_name` – display name of the key
- `$$key_keycode` – GLFW key code
- `$$key_scancode` – GLFW scan code
- `$$key_modifiers` – active modifier bit mask
## On Keyboard Key Released
- Triggers when a key is released (screens and in-game).
- Variables:
- `$$key_name`
- `$$key_keycode`
- `$$key_scancode`
- `$$key_modifiers`
## On Keyboard Character Typed in Screen
- Fires when a character is typed while a screen is open.
- Variables:
- `$$char` – typed character
## On Mouse Moved in Screen
- Fires whenever the mouse moves while a screen is open.
- Variables:
- `$$mouse_pos_x` – current X
- `$$mouse_pos_y` – current Y
- `$$mouse_move_delta_x` – X delta since last event
- `$$mouse_move_delta_y` – Y delta since last event
## On Mouse Button Clicked
- Fires when a mouse button is pressed (screens and in-game).
- Variables:
- `$$button` – left/right/middle
- `$$mouse_pos_x` – current X
- `$$mouse_pos_y` – current Y
## On Mouse Button Released
- Fires when a mouse button is released (screens and in-game).
- Variables:
- `$$button`
- `$$mouse_pos_x`
- `$$mouse_pos_y`
## On Mouse Scrolled in Screen
- Fires when the mouse wheel is scrolled while a screen is open.
- Variables:
- `$$scroll_delta_y` – vertical scroll amount
## On Screen Opened
- Runs right after any screen becomes active; can be used to override it.
- Variables:
- `$$screen_identifier` – identifier of the opened screen
## On Screen Closed
- Runs immediately after a screen closes.
- Variables:
- `$$screen_identifier` – identifier of the closed screen
## On Quit Minecraft
- Fires once when the client begins shutting down.
- Variables:
- `$$timestamp_millis` – epoch millis when quitting
- `$$timestamp_iso` – ISO-8601 timestamp of quit moment
## On Death
- Runs when the vanilla death screen opens for the local player.
- Variables:
- `$$days_survived` – days since last death
- `$$death_reason_string` – plain-text cause
- `$$death_reason_component` – JSON component cause
- `$$death_pos_x` – death X coordinate
- `$$death_pos_y` – death Y coordinate
- `$$death_pos_z` – death Z coordinate
## On Variable Updated [FM Variable]
- Fires whenever a FancyMenu variable is set/updated.
- Variables:
- `$$var_name` – variable name
- `$$old_value` – previous value
- `$$new_value` – new value
## On File Downloaded via Action
- Fires after the “Download File to Game Directory” action finishes.
- Variables:
- `$$download_url` – download source
- `$$target_file_path` – saved file path
- `$$download_succeeded` – true/false
## On File Selected
- Fires after the “Select File” action completes.
- Variables:
- `$$selected_file_path` – absolute chosen file path or empty if cancelled
- `$$target_file_path` – resolved path inside instance
- `$$selection_succeeded` – true if copy succeeded
- `$$selection_cancelled` – true if dialog closed
- `$$failure_reason` – error info on failure
## On Chat Message Received
- Fires when a normal player chat line appears on the client.
- Variables:
- `$$chat_message_string` – plain text line
- `$$chat_message_component` – full JSON component
- `$$sender_uuid` – sender UUID or ERROR
- `$$sender_name` – sender name or ERROR
## On Chat Message Sent
- Fires when the local player sends a chat message.
- Variables:
- `$$chat_message_string` – plain text line
- `$$chat_message_component` – full JSON component
## On Effect Gained
- Fires when the player gains a status effect.
- Variables:
- `$$effect_key` – effect resource location
- `$$effect_type` – positive/negative/neutral
- `$$effect_duration` – ticks remaining
## On Effect Lost
- Fires when the player loses a status effect.
- Variables:
- `$$effect_key` – expired effect
- `$$effect_type` – category
## On Experience Changed
- Fires whenever the player’s total XP changes.
- Variables:
- `$$new_experience_amount` – after change
- `$$old_experience_amount` – before change
- `$$is_level_up` – TRUE if level increased
## On Damage Taken
- Fires once per hit when the player takes damage.
- Variables:
- `$$damage_amount` – health removed
- `$$damage_type` – damage type resource location
- `$$is_fatal_damage` – TRUE if lethal
- `$$damage_source` – attacker resource location or NONE
## On Started Freezing
- Fires when the player starts freezing.
- Variables:
- `$$freezing_intensity` – 0.0 none, 1.0 fully frozen
## On Stopped Freezing
- Fires when the player stops freezing.
- Variables:
- (none)
## On Fully Frozen
- Fires once when the player becomes fully frozen.
- Variables:
- (none)
## On Start Looking At Block
- Fires once when the crosshair first points at a block (max 20 blocks distance).
- Variables:
- `$$block_key` – targeted block
- `$$block_pos_x` – block X
- `$$block_pos_y` – block Y
- `$$block_pos_z` – block Z
- `$$distance_to_player` – eyes to hit position
## On Stop Looking At Block
- Fires when the crosshair stops pointing at a block (reports last targeted block, max 20 blocks).
- Variables:
- `$$block_key`
- `$$block_pos_x`
- `$$block_pos_y`
- `$$block_pos_z`
- `$$distance_to_player`
## On Start Looking At Entity
- Fires once when the crosshair first points at an entity (max 20 blocks).
- Variables:
- `$$entity_key` – targeted entity type
- `$$distance_to_player`
- `$$entity_pos_x`
- `$$entity_pos_y`
- `$$entity_pos_z`
- `$$entity_uuid`
## On Stop Looking At Entity
- Fires when the crosshair stops pointing at an entity (reports last targeted entity, max 20 blocks).
- Variables:
- `$$entity_key`
- `$$distance_to_player`
- `$$entity_pos_x`
- `$$entity_pos_y`
- `$$entity_pos_z`
- `$$entity_uuid`
## On Entity Spawned
- **Requires FancyMenu on the server.** Fires when any entity spawns anywhere on the connected world/server.
- Variables:
- `$$entity_key`
- `$$distance_to_player` – −1 if other dimension
- `$$entity_pos_x`
- `$$entity_pos_y`
- `$$entity_pos_z`
- `$$entity_uuid`
- `$$dimension_key`
- `$$is_same_dimension_as_player`
## On Entity Died
- **Requires FancyMenu on the server.** Fires when any entity dies on the connected world/server.
- Variables:
- `$$entity_key`
- `$$distance_to_player` – −1 if other dimension
- `$$death_pos_x`
- `$$death_pos_y`
- `$$death_pos_z`
- `$$entity_uuid`
- `$$dimension_key`
- `$$damage_type`
- `$$is_same_dimension_as_player`
- `$$entity_killed_by_name`
- `$$entity_killed_by_key`
- `$$entity_killed_by_uuid`
## On Entity Starts Being In Sight
- Fires when an entity first becomes visible within 200 blocks.
- Variables:
- `$$entity_key`
- `$$distance_to_player`
- `$$entity_pos_x`
- `$$entity_pos_y`
- `$$entity_pos_z`
- `$$entity_uuid`
## On Entity Stops Being In Sight
- Fires when a previously visible entity leaves view or moves beyond 200 blocks.
- Variables:
- `$$entity_key`
- `$$distance_to_player`
- `$$entity_pos_x`
- `$$entity_pos_y`
- `$$entity_pos_z`
- `$$entity_uuid`
## On Interacted With Entity
- Fires when the player successfully interacts with an entity.
- Variables:
- `$$entity_key`
- `$$entity_pos_x`
- `$$entity_pos_y`
- `$$entity_pos_z`
- `$$entity_uuid`
## On Entity Mounted
- Fires when the player begins riding an entity.
- Variables:
- `$$entity_key`
- `$$entity_pos_x`
- `$$entity_pos_y`
- `$$entity_pos_z`
- `$$entity_uuid`
## On Entity Unmounted
- Fires when the player stops riding their current entity.
- Variables:
- `$$entity_key`
- `$$entity_pos_x`
- `$$entity_pos_y`
- `$$entity_pos_z`
- `$$entity_uuid`
## On Block Broke
- Fires when the player breaks a block.
- Variables:
- `$$block_key`
- `$$broke_with_item_key` – tool used or EMPTY
- `$$block_pos_x`
- `$$block_pos_y`
- `$$block_pos_z`
## On Block Placed
- Fires when the player places a block.
- Variables:
- `$$block_key`
- `$$block_pos_x`
- `$$block_pos_y`
- `$$block_pos_z`
## On Interacted With Block
- Fires when the player successfully interacts with a block.
- Variables:
- `$$block_key`
- `$$block_pos_x`
- `$$block_pos_y`
- `$$block_pos_z`
## On Stepping On Block
- Fires when the player steps onto a block.
- Variables:
- `$$block_key`
- `$$block_pos_x`
- `$$block_pos_y`
- `$$block_pos_z`
## On Enter Biome
- Fires when the player enters a new biome.
- Variables:
- `$$biome_key` – entered biome
## On Leave Biome
- Fires when the player leaves their current biome.
- Variables:
- `$$biome_key` – biome just left
## On Enter Structure
- **Requires FancyMenu on the server.** Coarse structure-area detection; can trigger near/above/below the structure.
- Variables:
- `$$structure_key` – entered structure
## On Leave Structure
- **Requires FancyMenu on the server.** Coarse detection; can trigger near the structure footprint.
- Variables:
- `$$structure_key` – structure just left
## On Enter Structure (High Precision)
- **Requires FancyMenu on the server.** Fires when the player steps into a structure’s bounding boxes.
- Variables:
- `$$structure_key`
## On Leave Structure (High Precision)
- **Requires FancyMenu on the server.** Fires after the player exits a structure’s bounding boxes.
- Variables:
- `$$structure_key`
## On Dimension Entered
- Fires when the player enters a new dimension.
- Variables:
- `$$dimension_key` – entered dimension
## On Start Swimming
- Fires when the player starts swimming.
- Variables:
- `$$fluid_type` – fluid resource location
## On Stop Swimming
- Fires when the player stops swimming.
- Variables:
- `$$fluid_type` – fluid where swimming stopped
## On Start Touching Fluid
- Fires when the player starts touching a fluid.
- Variables:
- `$$fluid_type` – touched fluid
## On Stop Touching Fluid
- Fires when the player stops touching a fluid.
- Variables:
- `$$fluid_type` – fluid no longer touched
## On Music Track Started
- Fires when a new music track begins.
- Variables:
- `$$track_resource_location` – audio file
- `$$track_display_name` – human-readable name or UNKNOWN
- `$$track_artist` – artist or UNKNOWN
- `$$track_duration_ms` – milliseconds (0 if unknown)
## On Music Track Stopped
- Fires when the current music track ends or is replaced.
- Variables:
- `$$track_resource_location`
- `$$track_display_name`
- `$$track_artist`
- `$$track_duration_ms`
## On World Sound Triggered
- Fires when a positional world sound starts near the player.
- Variables:
- `$$sound_resource_location` – sound file
- `$$sound_display_name` – subtitle name when available
- `$$sound_origin_pos_x`
- `$$sound_origin_pos_y`
- `$$sound_origin_pos_z`
- `$$sound_origin_distance_to_player`
- `$$sound_origin_direction_from_player` – degrees 0–360 relative to facing
## On Weather Changed
- Fires when weather changes globally or locally (biome change or going indoors can retrigger).
- Variables:
- `$$weather_type` – clear/rain/thunder
- `$$weather_can_snow` – TRUE if snow renders
- `$$weather_can_rain` – TRUE if rain renders
## On Started Burning
- Fires when the player starts burning.
- Variables:
- (none)
## On Stopped Burning
- Fires when the player stops burning.
- Variables:
- (none)
## On Started Drowning
- Fires when the player begins taking drowning damage.
- Variables:
- (none)
## On Position Changed
- Fires whenever the player’s block position changes.
- Variables:
- `$$old_pos_x` – previous block X
- `$$old_pos_y` – previous block Y
- `$$old_pos_z` – previous block Z
- `$$new_pos_x` – new block X
- `$$new_pos_y` – new block Y
- `$$new_pos_z` – new block Z
## On Started Running
- Fires when the player starts sprinting.
- Variables:
- (none)
## On Stopped Running
- Fires when the player stops sprinting.
- Variables:
- (none)
## On Jump
- Fires whenever the player jumps.
- Variables:
- (none)
## On Server Joined
- Fires after successfully joining a multiplayer server.
- Variables:
- `$$server_ip` – joined server address
## On Server Left
- Fires after disconnecting from a multiplayer server.
- Variables:
- `$$server_ip` – left server address
## Singleplayer World Entered
- Fires after a singleplayer world finishes loading and control is returned.
- Variables:
- `$$world_name` – display name
- `$$world_save_path` – absolute save folder
- `$$world_difficulty` – difficulty key
- `$$world_cheats_allowed` – TRUE if cheats enabled
- `$$world_icon_path` – absolute icon path
- `$$world_is_first_join` – TRUE on very first visit
## Singleplayer World Left
- Fires after a singleplayer world closes and finishes saving.
- Variables:
- `$$world_name`
- `$$world_save_path`
- `$$world_difficulty`
- `$$world_cheats_allowed`
- `$$world_icon_path`
## On Other Player Joined World/Server
- Fires when another player joins the current world/server.
- Variables:
- `$$player_name` – name of joining player
- `$$player_uuid` – UUID
## On Other Player Left World/Server
- Fires when another player leaves the current world/server.
- Variables:
- `$$player_name`
- `$$player_uuid`
## On Other Player Died
- Fires when another player in the current world dies.
- Variables:
- `$$player_name`
- `$$player_uuid`
- `$$death_pos_x`
- `$$death_pos_y`
- `$$death_pos_z`
## On Item Picked Up
- Fires when the player picks up an item entity.
- Variables:
- `$$item_key` – picked-up item resource location
## On Item Dropped
- Fires when the player drops an item from their inventory.
- Variables:
- `$$item_key` – dropped item resource location
## On Item Consumed
- Fires when the player finishes consuming an item.
- Variables:
- `$$item_key` – consumed item
## On Item Hovered in Inventory
- Fires when the user hovers an item in any inventory screen.
- Variables:
- `$$item_key` – hovered item resource location
- `$$item_display_name_string` – plain text item display name
- `$$item_display_name_json` – JSON component item display name
## On Item Used
- Fires when the player uses an item.
- Variables:
- `$$item_key` – used item
- `$$used_on_type` – block/entity/self/none
- `$$used_on_entity_key` – target entity type or empty
- `$$used_on_block_key` – target block or empty
- `$$target_pos_x` – target X or -1
- `$$target_pos_y` – target Y or -1
- `$$target_pos_z` – target Z or -1
## On Item Broke
- Fires when an item in the player’s inventory breaks.
- Variables:
- `$$item_key` – broken item
- `$$item_type` – tool/armor/other
================== END PAGE: https://docs.fancymenu.net/docs/listeners ==================
================== BEGIN PAGE: https://docs.fancymenu.net/docs/loading-screen ==================
---
title: Loading Screen
description: How to edit Minecraft's game loading screen (aka. splash screen).
published: true
date: 2025-04-14T20:15:15.383Z
tags:
editor: markdown
dateCreated: 2025-04-14T20:15:12.882Z
---
FancyMenu does not directly support Minecraft's game loading screen (aka. splash screen), but you can use **[Drippy Loading Screen](https://www.curseforge.com/minecraft/mc-mods/drippy-loading-screen)** for this, which is an **addon** for FancyMenu!
================== END PAGE: https://docs.fancymenu.net/docs/loading-screen ==================
================== BEGIN PAGE: https://docs.fancymenu.net/docs/localization ==================
---
title: Localizing Layouts
description: How to localize layout content.
published: true
date: 2025-06-16T21:58:07.153Z
tags:
editor: markdown
dateCreated: 2025-04-14T20:15:16.589Z
---
# Localizing Layouts
FancyMenu lets you localize text content and even whole elements or layouts!
# Text Content
FancyMenu allows you to add your own localizations to the game.
These can then be used with the **Localize Text** placeholder to localize text to the current game language.
## Using Vanilla Minecraft Localization Keys
Before creating custom localizations, you might want to use existing Minecraft localization keys. This saves time and ensures consistency with vanilla Minecraft text.
### Finding Vanilla Localization Keys
The easiest way to find Minecraft's localization keys is to browse the game's asset files online:
1. **Visit MCAsset.cloud:**
Go to [https://mcasset.cloud/](https://mcasset.cloud/) - this website allows you to browse Minecraft's assets without extracting them from the game.
2. **Navigate to Language Files:**
- Select your Minecraft version from the dropdown
- Navigate to: `assets` → `minecraft` → `lang`
- Open `en_us.json` to see all English localizations
3. **Find the Key You Need:**
- Use your browser's search function (Ctrl+F or Cmd+F) to find specific text
- The format is `"key": "text"` - the first part in quotes before the colon (`:`) is the key
- For example: `"menu.singleplayer": "Singleplayer"` - the key is `menu.singleplayer`
### Using Mod Localization Keys
If you have other mods installed, you can also use their localization keys:
1. Check the mod's documentation for available keys
2. Browse the mod's language files if they're open source
## Custom Localization Files
Localization files are text files with all the text content that should be available in multiple languages. Each translatable text has a unique key, so Minecraft can find the correct translatable text in the localization files.
- **Default File (en_us.json):**
English (US). This file is used when no other language file is chosen. It acts as the backup language file.
- **Other Language Files:**
For example, you can create a German file called `de_de.json` for players who use German.
### How to Create a Custom Localization File
You always need an `en_us.json` file! Without it, the game has no fallback when stuff goes wrong or an unsupported language is set.
1. **Open a Text Editor:**
Use Notepad (Windows), TextEdit (Mac), or any simple text editor.
2. **Write Your JSON Code:**
Create your file with your custom keys. A key is a unique name that Minecraft uses to find the text. For example:
```json
{
"modpack_name.custom.localization.key": "Your custom text here",
"modpack_name.another.key": "Another message"
}
```
3. **Save the File:**
Save the file as `en_us.json` for the default English text.
If you now want to add translated versions, like German, copy the content from the `en_us.json` file to the new file and only translate the actual text, NOT the keys! Keys need to stay the same, so the game can still find the text.
For German, you would then save the file as `de_de.json`. For other languages, please check [this Minecraft wiki page](https://minecraft.wiki/w/Language) for the correct language code for your language and name the file after it. Search for the **"in-game locale code"** for your language.
## Creating a Minecraft Resource Pack for MC 1.21.4
Now that your localization files are ready, we need a way to load them in Minecraft. For that, we will use a resource pack. We will make the pack to be enabled by default and we can even hide it if we don't want modpack users to mess with it.
A **resource pack** is a ZIP file that holds files that change the game's look and feel.
### Steps to Create Your Resource Pack
1. **Make a New Folder:**
Create a folder named something like `my_custom_pack` where you will add your custom localization files.
2. **Create the Pack File (`pack.mcmeta`):**
Inside your folder, create a file called `pack.mcmeta` with the following content:
```json
{
"pack": {
"pack_format": 16,
"description": "My Custom Pack with Localizations"
}
}
```
*Note: `pack_format` 16 is for Minecraft 1.21.4.*
3. **Add Your Localization Files:**
Inside your resource pack folder, create the following folder structure:
```
my_custom_pack/
├── assets/
│ └── minecraft/
│ └── lang/
│ ├── en_us.json
│ └── de_de.json
└── pack.mcmeta
```
Place your custom `en_us.json` (and any other language files like `de_de.json`) in the `lang` folder.
4. **ZIP the Resource Pack:**
Once your folder is ready, **compress the entire folder into a ZIP file**. Name the ZIP file **my_custom_pack.zip**. This is the example name used throughout the guide.
## Where to Place the Resource Pack
Place your **my_custom_pack.zip** file in the **Minecraft Resourcepacks folder**. This folder is usually located at:
- **Windows:** `%appdata%\.minecraft\resourcepacks`
- **Mac:** `~/Library/Application Support/minecraft/resourcepacks`
- **Linux:** `~/.minecraft/resourcepacks`
> For modpacks, the `resourcepacks` folder is in your pack's instance directory.
{.is-warning}
## Auto-Loading the Pack with "Resource Pack Overrides"
The **Resource Pack Overrides** mod makes it possible enable resource packs by default.
### Steps to Auto-Load Your Pack
1. **Install the Mod:**
Download and install the mod from [CurseForge](https://www.curseforge.com/minecraft/mc-mods/resource-pack-overrides) or [Modrinth](https://modrinth.com/mod/resource-pack-overrides).
2. **Locate the Config File:**
Find the file at `.minecraft/config/resourcepackoverrides.json`.
*If the file does not exist, create it manually.*
3. **Edit the Config File:**
Open the file and add your resource pack to the `default_packs` list using its file name:
```json
{
"schema_version": 2,
"default_packs": [
"file/my_custom_pack.zip"
]
}
```
This tells Minecraft to load your resource pack automatically when you start the game.
**It's important to add the `file/` prefix!**
*Note: The resource packs in the list are applied in reverse order. That means the pack at the top of the list will appear below the others in the game's resource pack menu.*
## Hiding the Resource Pack in the Selection Screen
You can hide your resource pack so players do not see it in the resource pack selection screen.
### How to Hide It
1. **Edit the Config File Again:**
In the same file `.minecraft/config/resourcepackoverrides.json`, add an override for your pack:
```json
{
"schema_version": 2,
"default_packs": [
"file/my_custom_pack.zip"
],
"pack_overrides": {
"file/my_custom_pack.zip": {
"hidden": true
}
}
}
```
This configuration will hide **my_custom_pack.zip** from the selection screen while still loading it automatically.
## Using Your New Localization Keys with FancyMenu
Now that your custom localization files are loaded, you can use your new keys in FancyMenu layouts.
1. **Edit a Text-Based Element:**
Open FancyMenu and choose an element like a Button or Text element.
2. **Click on the Placeholders Button:**
Look for the Placeholders button at the top-right of the text editor. (If you don't see it, the element might not support placeholders.)
3. **Insert the Localize Text Placeholder:**
The Localize Text placeholder appears as a JSON snippet. It looks like this:
```json
{"placeholder":"local","values":{"key":"localization.key"}}
```
Replace `localization.key` with your own custom key. For example, if you want to use your key from the localization file, change it to:
```json
{"placeholder":"local","values":{"key":"modpack_name.custom.localization.key"}}
```
Well, and that's basically it! The placeholder should get replaced with the actual localized content when not editing it in the text editor.
Keep in mind that the placeholder will always localize the text content to the current game language.
# Non-Text Content (Images, etc.)
FancyMenu also allows you to localize images and basically every element you want.
To do this, you will need to use **loading requirements**.
The **Is Game Language** requirement to be more specific.
The **Is Game Language** requirement allows you to show elements or layouts only if a specific game language is set, so you can, for example, make two Image elements that contains text and localize that image to a version with Japanese text when the language is set to Japanese or a version with English text, if the language is set to English.
To set loading requirements to an **element**, right-click it and click on **Loading Requirements**.
To set loading requirements to **whole layouts**, right-click the layout editor background and click on **Loading Requirements [Layout-Wide]**.
================== END PAGE: https://docs.fancymenu.net/docs/localization ==================
================== BEGIN PAGE: https://docs.fancymenu.net/docs/menu-backgrounds ==================
---
title: Menu Backgrounds
description: How to set custom menu backgrounds (images, animations) for screens.
published: true
date: 2026-05-03T11:01:52.000Z
tags:
editor: markdown
dateCreated: 2025-06-10T00:20:13.298Z
---
# Menu Backgrounds
FancyMenu lets you set custom backgrounds for menus. You can use images, animated textures, slideshows, cubic panoramas, colors, browsers, videos, GLSL shaders and more.
# Setting a Background
In FancyMenu 3.9.0+, menu background customization happens directly from the layout editor context menu:
1. Open the layout editor.
2. Right-click the editor background.
3. Open **Menu Backgrounds**.
4. Enable and configure the background type(s) you want.
Common background types include:
- Vanilla
- Image
- Slideshow
- Cubic Panorama
- Color (HEX)
- Browser
- Video
- GLSL Shader
- Video [MCEF] (deprecated)
- and more..
The old **Video [MCEF]** background type is deprecated in FancyMenu 3.9.0. Use the new native **Video** background powered by Watermedia V3 for new layouts.
# Removing the Custom Background
Open **Menu Backgrounds** again and disable/remove the custom background type you no longer want. If no custom background type is active, the screen will fall back to its normal vanilla background behavior.
# Stacking Backgrounds
FancyMenu 3.9.0 allows multiple menu background types to be enabled in the same layout. Active backgrounds are rendered as a stack, so you can combine a base image or panorama with translucent overlays, browser layers, shader layers, parallax layers and other effects.
If you also have multiple layouts active, their background stacks can combine too. To sort layouts and make them show up in a specific order, right-click the editor background and click on **Layout Index**.
# Transparent Backgrounds
Since there is nothing behind backgrounds, it is not possible to make the background at the very bottom transparent, because that would result in graphical glitches, but it is absolutely possible to use transparency for stacked background setups, as long as the bottom one stays as full opacity. That way you can have translucent background layers on top of the bottom one.
To make a background image translucent, use an image editor of your choice.
# Browser Backgrounds
The **Browser** background type works like the Browser element, but fills the whole screen and is auto-focused. This is useful for fullscreen web content, local HTML pages, or web-video layers.
# GLSL Shader Backgrounds
The **GLSL Shader** background type renders custom GLSL shaders and supports Shadertoy-style shader authoring. See the [GLSL Shader API](/glsl-shader-api) page for supported uniforms and shader structure.
================== END PAGE: https://docs.fancymenu.net/docs/menu-backgrounds ==================
================== BEGIN PAGE: https://docs.fancymenu.net/docs/minecraft-options ==================
---
title: Set/Get Minecraft Options
description: How to set and get Minecraft options like volume, FOV, render distance, etc.
published: true
date: 2025-05-10T02:07:08.261Z
tags:
editor: markdown
dateCreated: 2025-05-07T04:47:56.021Z
---
# Working with Minecraft Options in FancyMenu
FancyMenu allows you to get and set Minecraft game settings (options) using different UI elements. This guide will show you how to use buttons, sliders, and tickers to work with Minecraft options in your custom menu layouts.
# Understanding Minecraft Options
Minecraft has many built-in options that control everything from graphics settings to sound volume. FancyMenu lets you access these options by their names.
Some common option names include:
- `soundCategory_master` - Main volume
- `soundCategory_music` - Music volume
- `soundCategory_ambient` - Ambient sounds volume
- `soundCategory_players` - Player sounds volume
- `soundCategory_blocks` - Block sounds volume
- `fov` - Field of view
- `gamma` - Brightness
- `renderDistance` - Render distance
# Displaying Option Values
You can display the current value of any Minecraft option using a special placeholder.
The placeholder looks like this:
```
{"placeholder":"minecraft_option_value","values":{"name":"option_name"}}
```
Replace `option_name` with the actual option name you want to display.
# Setting Options with Buttons
Buttons can be used to set specific values to Minecraft options.
## How to set up a button:
1. Create a new Button element
2. Set the button label (what appears on the button)
3. Add an action: Right-click on the button → Edit Action Script → Add Action → Set Minecraft Option Value
4. In the "Set Minecraft Option Value" window:
- Name: Enter the option name (like `renderDistance`)
- Value: Enter the value to set (like `16`)
## Example:
Creating a button that sets render distance to 16 chunks:
- Option Name: `renderDistance`
- Value: `16`
- Label: "Set Render Distance to 16 chunks"
# Setting Options with Sliders
Sliders are perfect for options with a range of values, like volume settings or brightness.
## How to set up a slider:
1. Create a new Slider element
2. Set the slider type:
- For whole numbers (like render distance): Choose "Integer Range"
- For decimal numbers (like volume): Choose "Decimal Range"
3. Set minimum and maximum values
4. Add an action to set the Minecraft option:
- Right-click → Edit Action Script → Add Action → Set Minecraft Option Value
- Name: The option name
- Value: `$$value` (this special variable contains the current slider value)
5. Set the pre-selected value to the current option value:
- Set "Pre-Selected Value" to `{"placeholder":"minecraft_option_value","values":{"name":"option_name"}}`
## Example slider label formats:
To show the current option value in the slider label, use:
```
Volume: {"placeholder":"minecraft_option_value","values":{"name":"soundCategory_master"}}
```
To show a percentage (useful for volume):
```
Volume: {"placeholder":"calc","values":{"expression":"$$value * 100.0","decimal":"false"}}%
```
# Setting Options with Tickers
Tickers are invisible elements that can change options automatically on a schedule.
## How to set up a ticker:
1. Create a new Ticker element
2. Configure the tick settings:
- Tick Mode: Choose when the option should update
- Tick Delay: Set how often it updates (in milliseconds)
3. Add the action to set a Minecraft option:
- Right-click → Edit Action Script → Add Action → Set Minecraft Option Value
- Set the option name and value
## Example:
Setting gamma (brightness) to maximum when the menu loads:
- Tick Mode: On Load Screen
- Name: `gamma`
- Value: `1.0`
# Common Use Cases
Here are some common cases for what you can do when using FancyMenu to set and get Minecraft options.
## Creating Custom Volume Sliders
Volume sliders are a common use for the Minecraft option integration. Here's how to make a custom music volume slider:
1. Create a new Slider element
2. Set the "Slider Type" to "Decimal Range"
3. Set the "Minimum Range Value" to "0.0"
4. Set the "Maximum Range Value" to "1.0"
5. Edit Action Script → Add Action → Set Minecraft Option Value
- Set Name to `soundCategory_music`
- Set Value to `$$value`
6. Set "Pre-Selected Value" to `{"placeholder":"minecraft_option_value","values":{"name":"soundCategory_music"}}`
7. To display the volume as a percentage, set the label to:
```
Music: {"placeholder":"calc","values":{"expression":"$$value * 100.0","decimal":"false"}}%
```
You can create similar sliders for other sound categories:
- Master Volume: `soundCategory_master`
- Music: `soundCategory_music`
- Ambient: `soundCategory_ambient`
- Blocks: `soundCategory_blocks`
- Players: `soundCategory_players`
- Weather: `soundCategory_weather`
## Creating a Custom FOV Slider
Field of View (FOV) is an important graphics setting that determines how wide your view is in the game. The FOV option internally uses values from -1.0 to 1.0, but displays as 30 to 110 in the UI.
### Understanding the FOV Value Mapping
- Internal value range: -1.0 to 1.0
- Display value range: 30 to 110
- Mapping formula: `(internal_value + 1) * 40 + 30`
### Step 1: Create a Ticker Element to Update FOV Text
First, we need a ticker that will check the current FOV value and set a variable with the appropriate description:
1. Create a new Ticker element
2. Set the "Tick Mode" to "Normal" (so it updates constantly)
3. Set the "Tick Delay" to around "10" (milliseconds) to avoid excessive checks
Now we need to set up actions for the FOV labels. Here's what your action script structure should look like:
```
▶ Action Script
│
├─▶ IF (mapped FOV = 70)
│ └─■ Set Variable Value: fov_text:Normal
│
├─▶ ELSE-IF (mapped FOV = 110)
│ └─■ Set Variable Value: fov_text:Quake Pro
│
└─▶ ELSE
└─■ Set Variable Value: fov_text:[calculated numeric value]
```
Let's set up each part:
#### Set up the "Normal" FOV Label:
1. Right-click → Edit Action Script → Add Action
2. Click "IF Statement" to add a conditional block
3. Set the requirement to "Is Number" with:
- Compare Mode: "equals"
- Number: `{"placeholder":"calc","values":{"decimal":"false","expression":"({"placeholder":"minecraft_option_value","values":{"name":"fov"}} + 1) * 40 + 30"}}`
- Compare With: "70"
4. Inside this IF block, add "Set Variable Value (FM Variable)" action with:
- Value: `fov_text:Normal`
#### Set up the "Quake Pro" FOV Label:
1. Inside the Action Script, add "ELSE-IF Statement"
2. Set the requirement to "Is Number" with:
- Compare Mode: "equals"
- Number: `{"placeholder":"calc","values":{"decimal":"false","expression":"({"placeholder":"minecraft_option_value","values":{"name":"fov"}} + 1) * 40 + 30"}}`
- Compare With: "110"
3. Inside this ELSE-IF block, add "Set Variable Value (FM Variable)" action with:
- Value: `fov_text:Quake Pro`
#### Set up the Numeric FOV Label:
1. Add an "ELSE Statement" block
2. Inside this ELSE block, add "Set Variable Value (FM Variable)" action with:
- Value: `fov_text:{"placeholder":"calc","values":{"decimal":"false","expression":"({"placeholder":"minecraft_option_value","values":{"name":"fov"}} + 1) * 40 + 30"}}`
# Listener Variables
Listeners often expose a special type of variable for its nested actions, requirements and placeholders.
These variables can be accessed like placeholders (they are effectively placeholders).
You use these variables by simply using their names with the `$$` prefix in text inputs, similar to how you would use a normal placeholder.
For example, if you use the **On Keyboard Key Pressed** listener and want to print the key name to the log via the **Print to Log** action, you would use something like `Key pressed! The key is: $$key_name` as input for the message the action should print. The variable placeholder will later get replaced with the actual name of the key.
> Even tho these are called "variables", they are in no way related to FancyMenu's normal [variable system](/variables). You can't set these variables, since they are **read-only**. You also can't use any actions, requirements and placeholders meant for FancyMenu's variable system with these special listener variables, so using **Get Variable Value [FM Variable]**, **Is Variable Value [FM Variable]** or **Set Variable Value [FM Variable]** will not work for listener variables.
{.is-warning}
# Listeners in Detail
This list should include most, if not all, of FancyMenu's listeners. It is possible that the list is not always up-to-date due to updates of the mod.
## On Markdown Text Clicked
- Fires when Markdown text with a `click:` event is clicked, for example `[Open](click:open_menu)`.
- Variables:
- `$$text_event_id` – event ID from the Markdown link
## On Markdown Text Hovered
- Fires when Markdown text with a `hover:` event is hovered, for example `[Hint](hover:show_hint)`.
- Variables:
- `$$text_event_id` – event ID from the Markdown link
## On ZIP Extracted via Action
- Fires when the **Extract ZIP File In Game Directory** action finishes.
- Variables:
- `$$source_zip_path` – resolved source ZIP path
- `$$target_folder_path` – resolved extraction target path
- `$$extract_succeeded` – true/false
- `$$failure_reason` – error text when extraction failed
## On Element Spawned
- Fires when an element is spawned via an action/scripted element-spawn flow.
- Variables:
- `$$element_type` – spawned element type
- `$$element_identifier` – spawned element identifier
- `$$target_screen` – target screen identifier
## On Animated Texture Started Playing
- Fires when an animated texture starts playing.
- Variables:
- `$$texture_source` – texture source
- `$$texture_source_type` – source type
- `$$texture_will_restart` – true/false
## On Animated Texture Finished Playing
- Fires when an animated texture finishes playing.
- Variables:
- `$$texture_source`
- `$$texture_source_type`
- `$$texture_will_restart`
## On Video Playback Status Changed
- Fires when a video element or video menu background changes playback status.
- Variables:
- `$$video_source` – video source
- `$$video_source_type` – source type
- `$$is_looping` – true/false
- `$$new_status` – `PLAYING`, `STOPPED`, `PAUSED`, or `FINISHED`
## On System Message Received in Chat
- Fires when the client receives a system chat message, such as command feedback.
- Variables:
- `$$system_message_string` – plain text message
- `$$system_message_component` – JSON component
## On FM Data Received
- Fires when a server sends FM Data to this client via `/fmdata send`.
- Variables:
- `$$data_identifier` – data identifier string
- `$$data` – data payload
- `$$sent_by` – server IP or `integrated_server`
## On Remote Server Connected
- Fires when FancyMenu initializes a remote server connection.
- Variables:
- `$$request_id` – cached request ID
- `$$remote_server_url` – remote server URL
## On Remote Server Data Received
- Fires when text data is received from a connected remote server.
- Variables:
- `$$request_id` – request ID
- `$$remote_server_url` – remote server URL
- `$$data` – received payload
## On Remote Server Connection Closed
- Fires when a remote server connection closes.
- Variables:
- `$$request_id` – request ID
- `$$remote_server_url` – remote server URL
- `$$intentionally_closed` – TRUE if closed by an action
- `$$crashed` – TRUE if the connection crashed unexpectedly
- `$$unknown_close_reason` – TRUE if no known close reason was available
## On Keyboard Key Pressed
- Triggers whenever a key is pressed (repeats while held; works in screens and in-game).
- Variables:
- `$$key_name` – display name of the key
- `$$key_keycode` – GLFW key code
- `$$key_scancode` – GLFW scan code
- `$$key_modifiers` – active modifier bit mask
## On Keyboard Key Released
- Triggers when a key is released (screens and in-game).
- Variables:
- `$$key_name`
- `$$key_keycode`
- `$$key_scancode`
- `$$key_modifiers`
## On Keyboard Character Typed in Screen
- Fires when a character is typed while a screen is open.
- Variables:
- `$$char` – typed character
## On Mouse Moved in Screen
- Fires whenever the mouse moves while a screen is open.
- Variables:
- `$$mouse_pos_x` – current X
- `$$mouse_pos_y` – current Y
- `$$mouse_move_delta_x` – X delta since last event
- `$$mouse_move_delta_y` – Y delta since last event
## On Mouse Button Clicked
- Fires when a mouse button is pressed (screens and in-game).
- Variables:
- `$$button` – left/right/middle
- `$$mouse_pos_x` – current X
- `$$mouse_pos_y` – current Y
## On Mouse Button Released
- Fires when a mouse button is released (screens and in-game).
- Variables:
- `$$button`
- `$$mouse_pos_x`
- `$$mouse_pos_y`
## On Mouse Scrolled in Screen
- Fires when the mouse wheel is scrolled while a screen is open.
- Variables:
- `$$scroll_delta_y` – vertical scroll amount
## On Screen Opened
- Runs right after any screen becomes active; can be used to override it.
- Variables:
- `$$screen_identifier` – identifier of the opened screen
## On Screen Closed
- Runs immediately after a screen closes.
- Variables:
- `$$screen_identifier` – identifier of the closed screen
## On Quit Minecraft
- Fires once when the client begins shutting down.
- Variables:
- `$$timestamp_millis` – epoch millis when quitting
- `$$timestamp_iso` – ISO-8601 timestamp of quit moment
## On Death
- Runs when the vanilla death screen opens for the local player.
- Variables:
- `$$days_survived` – days since last death
- `$$death_reason_string` – plain-text cause
- `$$death_reason_component` – JSON component cause
- `$$death_pos_x` – death X coordinate
- `$$death_pos_y` – death Y coordinate
- `$$death_pos_z` – death Z coordinate
## On Variable Updated [FM Variable]
- Fires whenever a FancyMenu variable is set/updated.
- Variables:
- `$$var_name` – variable name
- `$$old_value` – previous value
- `$$new_value` – new value
## On File Downloaded via Action
- Fires after the “Download File to Game Directory” action finishes.
- Variables:
- `$$download_url` – download source
- `$$target_file_path` – saved file path
- `$$download_succeeded` – true/false
## On File Selected
- Fires after the “Select File” action completes.
- Variables:
- `$$selected_file_path` – absolute chosen file path or empty if cancelled
- `$$target_file_path` – resolved path inside instance
- `$$selection_succeeded` – true if copy succeeded
- `$$selection_cancelled` – true if dialog closed
- `$$failure_reason` – error info on failure
## On Chat Message Received
- Fires when a normal player chat line appears on the client.
- Variables:
- `$$chat_message_string` – plain text line
- `$$chat_message_component` – full JSON component
- `$$sender_uuid` – sender UUID or ERROR
- `$$sender_name` – sender name or ERROR
## On Chat Message Sent
- Fires when the local player sends a chat message.
- Variables:
- `$$chat_message_string` – plain text line
- `$$chat_message_component` – full JSON component
## On Effect Gained
- Fires when the player gains a status effect.
- Variables:
- `$$effect_key` – effect resource location
- `$$effect_type` – positive/negative/neutral
- `$$effect_duration` – ticks remaining
## On Effect Lost
- Fires when the player loses a status effect.
- Variables:
- `$$effect_key` – expired effect
- `$$effect_type` – category
## On Experience Changed
- Fires whenever the player’s total XP changes.
- Variables:
- `$$new_experience_amount` – after change
- `$$old_experience_amount` – before change
- `$$is_level_up` – TRUE if level increased
## On Damage Taken
- Fires once per hit when the player takes damage.
- Variables:
- `$$damage_amount` – health removed
- `$$damage_type` – damage type resource location
- `$$is_fatal_damage` – TRUE if lethal
- `$$damage_source` – attacker resource location or NONE
## On Started Freezing
- Fires when the player starts freezing.
- Variables:
- `$$freezing_intensity` – 0.0 none, 1.0 fully frozen
## On Stopped Freezing
- Fires when the player stops freezing.
- Variables:
- (none)
## On Fully Frozen
- Fires once when the player becomes fully frozen.
- Variables:
- (none)
## On Start Looking At Block
- Fires once when the crosshair first points at a block (max 20 blocks distance).
- Variables:
- `$$block_key` – targeted block
- `$$block_pos_x` – block X
- `$$block_pos_y` – block Y
- `$$block_pos_z` – block Z
- `$$distance_to_player` – eyes to hit position
## On Stop Looking At Block
- Fires when the crosshair stops pointing at a block (reports last targeted block, max 20 blocks).
- Variables:
- `$$block_key`
- `$$block_pos_x`
- `$$block_pos_y`
- `$$block_pos_z`
- `$$distance_to_player`
## On Start Looking At Entity
- Fires once when the crosshair first points at an entity (max 20 blocks).
- Variables:
- `$$entity_key` – targeted entity type
- `$$distance_to_player`
- `$$entity_pos_x`
- `$$entity_pos_y`
- `$$entity_pos_z`
- `$$entity_uuid`
## On Stop Looking At Entity
- Fires when the crosshair stops pointing at an entity (reports last targeted entity, max 20 blocks).
- Variables:
- `$$entity_key`
- `$$distance_to_player`
- `$$entity_pos_x`
- `$$entity_pos_y`
- `$$entity_pos_z`
- `$$entity_uuid`
## On Entity Spawned
- **Requires FancyMenu on the server.** Fires when any entity spawns anywhere on the connected world/server.
- Variables:
- `$$entity_key`
- `$$distance_to_player` – −1 if other dimension
- `$$entity_pos_x`
- `$$entity_pos_y`
- `$$entity_pos_z`
- `$$entity_uuid`
- `$$dimension_key`
- `$$is_same_dimension_as_player`
## On Entity Died
- **Requires FancyMenu on the server.** Fires when any entity dies on the connected world/server.
- Variables:
- `$$entity_key`
- `$$distance_to_player` – −1 if other dimension
- `$$death_pos_x`
- `$$death_pos_y`
- `$$death_pos_z`
- `$$entity_uuid`
- `$$dimension_key`
- `$$damage_type`
- `$$is_same_dimension_as_player`
- `$$entity_killed_by_name`
- `$$entity_killed_by_key`
- `$$entity_killed_by_uuid`
## On Entity Starts Being In Sight
- Fires when an entity first becomes visible within 200 blocks.
- Variables:
- `$$entity_key`
- `$$distance_to_player`
- `$$entity_pos_x`
- `$$entity_pos_y`
- `$$entity_pos_z`
- `$$entity_uuid`
## On Entity Stops Being In Sight
- Fires when a previously visible entity leaves view or moves beyond 200 blocks.
- Variables:
- `$$entity_key`
- `$$distance_to_player`
- `$$entity_pos_x`
- `$$entity_pos_y`
- `$$entity_pos_z`
- `$$entity_uuid`
## On Interacted With Entity
- Fires when the player successfully interacts with an entity.
- Variables:
- `$$entity_key`
- `$$entity_pos_x`
- `$$entity_pos_y`
- `$$entity_pos_z`
- `$$entity_uuid`
## On Entity Mounted
- Fires when the player begins riding an entity.
- Variables:
- `$$entity_key`
- `$$entity_pos_x`
- `$$entity_pos_y`
- `$$entity_pos_z`
- `$$entity_uuid`
## On Entity Unmounted
- Fires when the player stops riding their current entity.
- Variables:
- `$$entity_key`
- `$$entity_pos_x`
- `$$entity_pos_y`
- `$$entity_pos_z`
- `$$entity_uuid`
## On Block Broke
- Fires when the player breaks a block.
- Variables:
- `$$block_key`
- `$$broke_with_item_key` – tool used or EMPTY
- `$$block_pos_x`
- `$$block_pos_y`
- `$$block_pos_z`
## On Block Placed
- Fires when the player places a block.
- Variables:
- `$$block_key`
- `$$block_pos_x`
- `$$block_pos_y`
- `$$block_pos_z`
## On Interacted With Block
- Fires when the player successfully interacts with a block.
- Variables:
- `$$block_key`
- `$$block_pos_x`
- `$$block_pos_y`
- `$$block_pos_z`
## On Stepping On Block
- Fires when the player steps onto a block.
- Variables:
- `$$block_key`
- `$$block_pos_x`
- `$$block_pos_y`
- `$$block_pos_z`
## On Enter Biome
- Fires when the player enters a new biome.
- Variables:
- `$$biome_key` – entered biome
## On Leave Biome
- Fires when the player leaves their current biome.
- Variables:
- `$$biome_key` – biome just left
## On Enter Structure
- **Requires FancyMenu on the server.** Coarse structure-area detection; can trigger near/above/below the structure.
- Variables:
- `$$structure_key` – entered structure
## On Leave Structure
- **Requires FancyMenu on the server.** Coarse detection; can trigger near the structure footprint.
- Variables:
- `$$structure_key` – structure just left
## On Enter Structure (High Precision)
- **Requires FancyMenu on the server.** Fires when the player steps into a structure’s bounding boxes.
- Variables:
- `$$structure_key`
## On Leave Structure (High Precision)
- **Requires FancyMenu on the server.** Fires after the player exits a structure’s bounding boxes.
- Variables:
- `$$structure_key`
## On Dimension Entered
- Fires when the player enters a new dimension.
- Variables:
- `$$dimension_key` – entered dimension
## On Start Swimming
- Fires when the player starts swimming.
- Variables:
- `$$fluid_type` – fluid resource location
## On Stop Swimming
- Fires when the player stops swimming.
- Variables:
- `$$fluid_type` – fluid where swimming stopped
## On Start Touching Fluid
- Fires when the player starts touching a fluid.
- Variables:
- `$$fluid_type` – touched fluid
## On Stop Touching Fluid
- Fires when the player stops touching a fluid.
- Variables:
- `$$fluid_type` – fluid no longer touched
## On Music Track Started
- Fires when a new music track begins.
- Variables:
- `$$track_resource_location` – audio file
- `$$track_display_name` – human-readable name or UNKNOWN
- `$$track_artist` – artist or UNKNOWN
- `$$track_duration_ms` – milliseconds (0 if unknown)
## On Music Track Stopped
- Fires when the current music track ends or is replaced.
- Variables:
- `$$track_resource_location`
- `$$track_display_name`
- `$$track_artist`
- `$$track_duration_ms`
## On World Sound Triggered
- Fires when a positional world sound starts near the player.
- Variables:
- `$$sound_resource_location` – sound file
- `$$sound_display_name` – subtitle name when available
- `$$sound_origin_pos_x`
- `$$sound_origin_pos_y`
- `$$sound_origin_pos_z`
- `$$sound_origin_distance_to_player`
- `$$sound_origin_direction_from_player` – degrees 0–360 relative to facing
## On Weather Changed
- Fires when weather changes globally or locally (biome change or going indoors can retrigger).
- Variables:
- `$$weather_type` – clear/rain/thunder
- `$$weather_can_snow` – TRUE if snow renders
- `$$weather_can_rain` – TRUE if rain renders
## On Started Burning
- Fires when the player starts burning.
- Variables:
- (none)
## On Stopped Burning
- Fires when the player stops burning.
- Variables:
- (none)
## On Started Drowning
- Fires when the player begins taking drowning damage.
- Variables:
- (none)
## On Position Changed
- Fires whenever the player’s block position changes.
- Variables:
- `$$old_pos_x` – previous block X
- `$$old_pos_y` – previous block Y
- `$$old_pos_z` – previous block Z
- `$$new_pos_x` – new block X
- `$$new_pos_y` – new block Y
- `$$new_pos_z` – new block Z
## On Started Running
- Fires when the player starts sprinting.
- Variables:
- (none)
## On Stopped Running
- Fires when the player stops sprinting.
- Variables:
- (none)
## On Jump
- Fires whenever the player jumps.
- Variables:
- (none)
## On Server Joined
- Fires after successfully joining a multiplayer server.
- Variables:
- `$$server_ip` – joined server address
## On Server Left
- Fires after disconnecting from a multiplayer server.
- Variables:
- `$$server_ip` – left server address
## Singleplayer World Entered
- Fires after a singleplayer world finishes loading and control is returned.
- Variables:
- `$$world_name` – display name
- `$$world_save_path` – absolute save folder
- `$$world_difficulty` – difficulty key
- `$$world_cheats_allowed` – TRUE if cheats enabled
- `$$world_icon_path` – absolute icon path
- `$$world_is_first_join` – TRUE on very first visit
## Singleplayer World Left
- Fires after a singleplayer world closes and finishes saving.
- Variables:
- `$$world_name`
- `$$world_save_path`
- `$$world_difficulty`
- `$$world_cheats_allowed`
- `$$world_icon_path`
## On Other Player Joined World/Server
- Fires when another player joins the current world/server.
- Variables:
- `$$player_name` – name of joining player
- `$$player_uuid` – UUID
## On Other Player Left World/Server
- Fires when another player leaves the current world/server.
- Variables:
- `$$player_name`
- `$$player_uuid`
## On Other Player Died
- Fires when another player in the current world dies.
- Variables:
- `$$player_name`
- `$$player_uuid`
- `$$death_pos_x`
- `$$death_pos_y`
- `$$death_pos_z`
## On Item Picked Up
- Fires when the player picks up an item entity.
- Variables:
- `$$item_key` – picked-up item resource location
## On Item Dropped
- Fires when the player drops an item from their inventory.
- Variables:
- `$$item_key` – dropped item resource location
## On Item Consumed
- Fires when the player finishes consuming an item.
- Variables:
- `$$item_key` – consumed item
## On Item Hovered in Inventory
- Fires when the user hovers an item in any inventory screen.
- Variables:
- `$$item_key` – hovered item resource location
- `$$item_display_name_string` – plain text item display name
- `$$item_display_name_json` – JSON component item display name
## On Item Used
- Fires when the player uses an item.
- Variables:
- `$$item_key` – used item
- `$$used_on_type` – block/entity/self/none
- `$$used_on_entity_key` – target entity type or empty
- `$$used_on_block_key` – target block or empty
- `$$target_pos_x` – target X or -1
- `$$target_pos_y` – target Y or -1
- `$$target_pos_z` – target Z or -1
## On Item Broke
- Fires when an item in the player’s inventory breaks.
- Variables:
- `$$item_key` – broken item
- `$$item_type` – tool/armor/other
================== END PAGE: https://docs.fancymenu.net/docs/listeners ==================
================== BEGIN PAGE: https://docs.fancymenu.net/docs/loading-screen ==================
---
title: Loading Screen
description: How to edit Minecraft's game loading screen (aka. splash screen).
published: true
date: 2025-04-14T20:15:15.383Z
tags:
editor: markdown
dateCreated: 2025-04-14T20:15:12.882Z
---
FancyMenu does not directly support Minecraft's game loading screen (aka. splash screen), but you can use **[Drippy Loading Screen](https://www.curseforge.com/minecraft/mc-mods/drippy-loading-screen)** for this, which is an **addon** for FancyMenu!
================== END PAGE: https://docs.fancymenu.net/docs/loading-screen ==================
================== BEGIN PAGE: https://docs.fancymenu.net/docs/localization ==================
---
title: Localizing Layouts
description: How to localize layout content.
published: true
date: 2025-06-16T21:58:07.153Z
tags:
editor: markdown
dateCreated: 2025-04-14T20:15:16.589Z
---
# Localizing Layouts
FancyMenu lets you localize text content and even whole elements or layouts!
# Text Content
FancyMenu allows you to add your own localizations to the game.
These can then be used with the **Localize Text** placeholder to localize text to the current game language.
## Using Vanilla Minecraft Localization Keys
Before creating custom localizations, you might want to use existing Minecraft localization keys. This saves time and ensures consistency with vanilla Minecraft text.
### Finding Vanilla Localization Keys
The easiest way to find Minecraft's localization keys is to browse the game's asset files online:
1. **Visit MCAsset.cloud:**
Go to [https://mcasset.cloud/](https://mcasset.cloud/) - this website allows you to browse Minecraft's assets without extracting them from the game.
2. **Navigate to Language Files:**
- Select your Minecraft version from the dropdown
- Navigate to: `assets` → `minecraft` → `lang`
- Open `en_us.json` to see all English localizations
3. **Find the Key You Need:**
- Use your browser's search function (Ctrl+F or Cmd+F) to find specific text
- The format is `"key": "text"` - the first part in quotes before the colon (`:`) is the key
- For example: `"menu.singleplayer": "Singleplayer"` - the key is `menu.singleplayer`
### Using Mod Localization Keys
If you have other mods installed, you can also use their localization keys:
1. Check the mod's documentation for available keys
2. Browse the mod's language files if they're open source
## Custom Localization Files
Localization files are text files with all the text content that should be available in multiple languages. Each translatable text has a unique key, so Minecraft can find the correct translatable text in the localization files.
- **Default File (en_us.json):**
English (US). This file is used when no other language file is chosen. It acts as the backup language file.
- **Other Language Files:**
For example, you can create a German file called `de_de.json` for players who use German.
### How to Create a Custom Localization File
You always need an `en_us.json` file! Without it, the game has no fallback when stuff goes wrong or an unsupported language is set.
1. **Open a Text Editor:**
Use Notepad (Windows), TextEdit (Mac), or any simple text editor.
2. **Write Your JSON Code:**
Create your file with your custom keys. A key is a unique name that Minecraft uses to find the text. For example:
```json
{
"modpack_name.custom.localization.key": "Your custom text here",
"modpack_name.another.key": "Another message"
}
```
3. **Save the File:**
Save the file as `en_us.json` for the default English text.
If you now want to add translated versions, like German, copy the content from the `en_us.json` file to the new file and only translate the actual text, NOT the keys! Keys need to stay the same, so the game can still find the text.
For German, you would then save the file as `de_de.json`. For other languages, please check [this Minecraft wiki page](https://minecraft.wiki/w/Language) for the correct language code for your language and name the file after it. Search for the **"in-game locale code"** for your language.
## Creating a Minecraft Resource Pack for MC 1.21.4
Now that your localization files are ready, we need a way to load them in Minecraft. For that, we will use a resource pack. We will make the pack to be enabled by default and we can even hide it if we don't want modpack users to mess with it.
A **resource pack** is a ZIP file that holds files that change the game's look and feel.
### Steps to Create Your Resource Pack
1. **Make a New Folder:**
Create a folder named something like `my_custom_pack` where you will add your custom localization files.
2. **Create the Pack File (`pack.mcmeta`):**
Inside your folder, create a file called `pack.mcmeta` with the following content:
```json
{
"pack": {
"pack_format": 16,
"description": "My Custom Pack with Localizations"
}
}
```
*Note: `pack_format` 16 is for Minecraft 1.21.4.*
3. **Add Your Localization Files:**
Inside your resource pack folder, create the following folder structure:
```
my_custom_pack/
├── assets/
│ └── minecraft/
│ └── lang/
│ ├── en_us.json
│ └── de_de.json
└── pack.mcmeta
```
Place your custom `en_us.json` (and any other language files like `de_de.json`) in the `lang` folder.
4. **ZIP the Resource Pack:**
Once your folder is ready, **compress the entire folder into a ZIP file**. Name the ZIP file **my_custom_pack.zip**. This is the example name used throughout the guide.
## Where to Place the Resource Pack
Place your **my_custom_pack.zip** file in the **Minecraft Resourcepacks folder**. This folder is usually located at:
- **Windows:** `%appdata%\.minecraft\resourcepacks`
- **Mac:** `~/Library/Application Support/minecraft/resourcepacks`
- **Linux:** `~/.minecraft/resourcepacks`
> For modpacks, the `resourcepacks` folder is in your pack's instance directory.
{.is-warning}
## Auto-Loading the Pack with "Resource Pack Overrides"
The **Resource Pack Overrides** mod makes it possible enable resource packs by default.
### Steps to Auto-Load Your Pack
1. **Install the Mod:**
Download and install the mod from [CurseForge](https://www.curseforge.com/minecraft/mc-mods/resource-pack-overrides) or [Modrinth](https://modrinth.com/mod/resource-pack-overrides).
2. **Locate the Config File:**
Find the file at `.minecraft/config/resourcepackoverrides.json`.
*If the file does not exist, create it manually.*
3. **Edit the Config File:**
Open the file and add your resource pack to the `default_packs` list using its file name:
```json
{
"schema_version": 2,
"default_packs": [
"file/my_custom_pack.zip"
]
}
```
This tells Minecraft to load your resource pack automatically when you start the game.
**It's important to add the `file/` prefix!**
*Note: The resource packs in the list are applied in reverse order. That means the pack at the top of the list will appear below the others in the game's resource pack menu.*
## Hiding the Resource Pack in the Selection Screen
You can hide your resource pack so players do not see it in the resource pack selection screen.
### How to Hide It
1. **Edit the Config File Again:**
In the same file `.minecraft/config/resourcepackoverrides.json`, add an override for your pack:
```json
{
"schema_version": 2,
"default_packs": [
"file/my_custom_pack.zip"
],
"pack_overrides": {
"file/my_custom_pack.zip": {
"hidden": true
}
}
}
```
This configuration will hide **my_custom_pack.zip** from the selection screen while still loading it automatically.
## Using Your New Localization Keys with FancyMenu
Now that your custom localization files are loaded, you can use your new keys in FancyMenu layouts.
1. **Edit a Text-Based Element:**
Open FancyMenu and choose an element like a Button or Text element.
2. **Click on the Placeholders Button:**
Look for the Placeholders button at the top-right of the text editor. (If you don't see it, the element might not support placeholders.)
3. **Insert the Localize Text Placeholder:**
The Localize Text placeholder appears as a JSON snippet. It looks like this:
```json
{"placeholder":"local","values":{"key":"localization.key"}}
```
Replace `localization.key` with your own custom key. For example, if you want to use your key from the localization file, change it to:
```json
{"placeholder":"local","values":{"key":"modpack_name.custom.localization.key"}}
```
Well, and that's basically it! The placeholder should get replaced with the actual localized content when not editing it in the text editor.
Keep in mind that the placeholder will always localize the text content to the current game language.
# Non-Text Content (Images, etc.)
FancyMenu also allows you to localize images and basically every element you want.
To do this, you will need to use **loading requirements**.
The **Is Game Language** requirement to be more specific.
The **Is Game Language** requirement allows you to show elements or layouts only if a specific game language is set, so you can, for example, make two Image elements that contains text and localize that image to a version with Japanese text when the language is set to Japanese or a version with English text, if the language is set to English.
To set loading requirements to an **element**, right-click it and click on **Loading Requirements**.
To set loading requirements to **whole layouts**, right-click the layout editor background and click on **Loading Requirements [Layout-Wide]**.
================== END PAGE: https://docs.fancymenu.net/docs/localization ==================
================== BEGIN PAGE: https://docs.fancymenu.net/docs/menu-backgrounds ==================
---
title: Menu Backgrounds
description: How to set custom menu backgrounds (images, animations) for screens.
published: true
date: 2026-05-03T11:01:52.000Z
tags:
editor: markdown
dateCreated: 2025-06-10T00:20:13.298Z
---
# Menu Backgrounds
FancyMenu lets you set custom backgrounds for menus. You can use images, animated textures, slideshows, cubic panoramas, colors, browsers, videos, GLSL shaders and more.
# Setting a Background
In FancyMenu 3.9.0+, menu background customization happens directly from the layout editor context menu:
1. Open the layout editor.
2. Right-click the editor background.
3. Open **Menu Backgrounds**.
4. Enable and configure the background type(s) you want.
Common background types include:
- Vanilla
- Image
- Slideshow
- Cubic Panorama
- Color (HEX)
- Browser
- Video
- GLSL Shader
- Video [MCEF] (deprecated)
- and more..
The old **Video [MCEF]** background type is deprecated in FancyMenu 3.9.0. Use the new native **Video** background powered by Watermedia V3 for new layouts.
# Removing the Custom Background
Open **Menu Backgrounds** again and disable/remove the custom background type you no longer want. If no custom background type is active, the screen will fall back to its normal vanilla background behavior.
# Stacking Backgrounds
FancyMenu 3.9.0 allows multiple menu background types to be enabled in the same layout. Active backgrounds are rendered as a stack, so you can combine a base image or panorama with translucent overlays, browser layers, shader layers, parallax layers and other effects.
If you also have multiple layouts active, their background stacks can combine too. To sort layouts and make them show up in a specific order, right-click the editor background and click on **Layout Index**.
# Transparent Backgrounds
Since there is nothing behind backgrounds, it is not possible to make the background at the very bottom transparent, because that would result in graphical glitches, but it is absolutely possible to use transparency for stacked background setups, as long as the bottom one stays as full opacity. That way you can have translucent background layers on top of the bottom one.
To make a background image translucent, use an image editor of your choice.
# Browser Backgrounds
The **Browser** background type works like the Browser element, but fills the whole screen and is auto-focused. This is useful for fullscreen web content, local HTML pages, or web-video layers.
# GLSL Shader Backgrounds
The **GLSL Shader** background type renders custom GLSL shaders and supports Shadertoy-style shader authoring. See the [GLSL Shader API](/glsl-shader-api) page for supported uniforms and shader structure.
================== END PAGE: https://docs.fancymenu.net/docs/menu-backgrounds ==================
================== BEGIN PAGE: https://docs.fancymenu.net/docs/minecraft-options ==================
---
title: Set/Get Minecraft Options
description: How to set and get Minecraft options like volume, FOV, render distance, etc.
published: true
date: 2025-05-10T02:07:08.261Z
tags:
editor: markdown
dateCreated: 2025-05-07T04:47:56.021Z
---
# Working with Minecraft Options in FancyMenu
FancyMenu allows you to get and set Minecraft game settings (options) using different UI elements. This guide will show you how to use buttons, sliders, and tickers to work with Minecraft options in your custom menu layouts.
# Understanding Minecraft Options
Minecraft has many built-in options that control everything from graphics settings to sound volume. FancyMenu lets you access these options by their names.
Some common option names include:
- `soundCategory_master` - Main volume
- `soundCategory_music` - Music volume
- `soundCategory_ambient` - Ambient sounds volume
- `soundCategory_players` - Player sounds volume
- `soundCategory_blocks` - Block sounds volume
- `fov` - Field of view
- `gamma` - Brightness
- `renderDistance` - Render distance
# Displaying Option Values
You can display the current value of any Minecraft option using a special placeholder.
The placeholder looks like this:
```
{"placeholder":"minecraft_option_value","values":{"name":"option_name"}}
```
Replace `option_name` with the actual option name you want to display.
# Setting Options with Buttons
Buttons can be used to set specific values to Minecraft options.
## How to set up a button:
1. Create a new Button element
2. Set the button label (what appears on the button)
3. Add an action: Right-click on the button → Edit Action Script → Add Action → Set Minecraft Option Value
4. In the "Set Minecraft Option Value" window:
- Name: Enter the option name (like `renderDistance`)
- Value: Enter the value to set (like `16`)
## Example:
Creating a button that sets render distance to 16 chunks:
- Option Name: `renderDistance`
- Value: `16`
- Label: "Set Render Distance to 16 chunks"
# Setting Options with Sliders
Sliders are perfect for options with a range of values, like volume settings or brightness.
## How to set up a slider:
1. Create a new Slider element
2. Set the slider type:
- For whole numbers (like render distance): Choose "Integer Range"
- For decimal numbers (like volume): Choose "Decimal Range"
3. Set minimum and maximum values
4. Add an action to set the Minecraft option:
- Right-click → Edit Action Script → Add Action → Set Minecraft Option Value
- Name: The option name
- Value: `$$value` (this special variable contains the current slider value)
5. Set the pre-selected value to the current option value:
- Set "Pre-Selected Value" to `{"placeholder":"minecraft_option_value","values":{"name":"option_name"}}`
## Example slider label formats:
To show the current option value in the slider label, use:
```
Volume: {"placeholder":"minecraft_option_value","values":{"name":"soundCategory_master"}}
```
To show a percentage (useful for volume):
```
Volume: {"placeholder":"calc","values":{"expression":"$$value * 100.0","decimal":"false"}}%
```
# Setting Options with Tickers
Tickers are invisible elements that can change options automatically on a schedule.
## How to set up a ticker:
1. Create a new Ticker element
2. Configure the tick settings:
- Tick Mode: Choose when the option should update
- Tick Delay: Set how often it updates (in milliseconds)
3. Add the action to set a Minecraft option:
- Right-click → Edit Action Script → Add Action → Set Minecraft Option Value
- Set the option name and value
## Example:
Setting gamma (brightness) to maximum when the menu loads:
- Tick Mode: On Load Screen
- Name: `gamma`
- Value: `1.0`
# Common Use Cases
Here are some common cases for what you can do when using FancyMenu to set and get Minecraft options.
## Creating Custom Volume Sliders
Volume sliders are a common use for the Minecraft option integration. Here's how to make a custom music volume slider:
1. Create a new Slider element
2. Set the "Slider Type" to "Decimal Range"
3. Set the "Minimum Range Value" to "0.0"
4. Set the "Maximum Range Value" to "1.0"
5. Edit Action Script → Add Action → Set Minecraft Option Value
- Set Name to `soundCategory_music`
- Set Value to `$$value`
6. Set "Pre-Selected Value" to `{"placeholder":"minecraft_option_value","values":{"name":"soundCategory_music"}}`
7. To display the volume as a percentage, set the label to:
```
Music: {"placeholder":"calc","values":{"expression":"$$value * 100.0","decimal":"false"}}%
```
You can create similar sliders for other sound categories:
- Master Volume: `soundCategory_master`
- Music: `soundCategory_music`
- Ambient: `soundCategory_ambient`
- Blocks: `soundCategory_blocks`
- Players: `soundCategory_players`
- Weather: `soundCategory_weather`
## Creating a Custom FOV Slider
Field of View (FOV) is an important graphics setting that determines how wide your view is in the game. The FOV option internally uses values from -1.0 to 1.0, but displays as 30 to 110 in the UI.
### Understanding the FOV Value Mapping
- Internal value range: -1.0 to 1.0
- Display value range: 30 to 110
- Mapping formula: `(internal_value + 1) * 40 + 30`
### Step 1: Create a Ticker Element to Update FOV Text
First, we need a ticker that will check the current FOV value and set a variable with the appropriate description:
1. Create a new Ticker element
2. Set the "Tick Mode" to "Normal" (so it updates constantly)
3. Set the "Tick Delay" to around "10" (milliseconds) to avoid excessive checks
Now we need to set up actions for the FOV labels. Here's what your action script structure should look like:
```
▶ Action Script
│
├─▶ IF (mapped FOV = 70)
│ └─■ Set Variable Value: fov_text:Normal
│
├─▶ ELSE-IF (mapped FOV = 110)
│ └─■ Set Variable Value: fov_text:Quake Pro
│
└─▶ ELSE
└─■ Set Variable Value: fov_text:[calculated numeric value]
```
Let's set up each part:
#### Set up the "Normal" FOV Label:
1. Right-click → Edit Action Script → Add Action
2. Click "IF Statement" to add a conditional block
3. Set the requirement to "Is Number" with:
- Compare Mode: "equals"
- Number: `{"placeholder":"calc","values":{"decimal":"false","expression":"({"placeholder":"minecraft_option_value","values":{"name":"fov"}} + 1) * 40 + 30"}}`
- Compare With: "70"
4. Inside this IF block, add "Set Variable Value (FM Variable)" action with:
- Value: `fov_text:Normal`
#### Set up the "Quake Pro" FOV Label:
1. Inside the Action Script, add "ELSE-IF Statement"
2. Set the requirement to "Is Number" with:
- Compare Mode: "equals"
- Number: `{"placeholder":"calc","values":{"decimal":"false","expression":"({"placeholder":"minecraft_option_value","values":{"name":"fov"}} + 1) * 40 + 30"}}`
- Compare With: "110"
3. Inside this ELSE-IF block, add "Set Variable Value (FM Variable)" action with:
- Value: `fov_text:Quake Pro`
#### Set up the Numeric FOV Label:
1. Add an "ELSE Statement" block
2. Inside this ELSE block, add "Set Variable Value (FM Variable)" action with:
- Value: `fov_text:{"placeholder":"calc","values":{"decimal":"false","expression":"({"placeholder":"minecraft_option_value","values":{"name":"fov"}} + 1) * 40 + 30"}}`
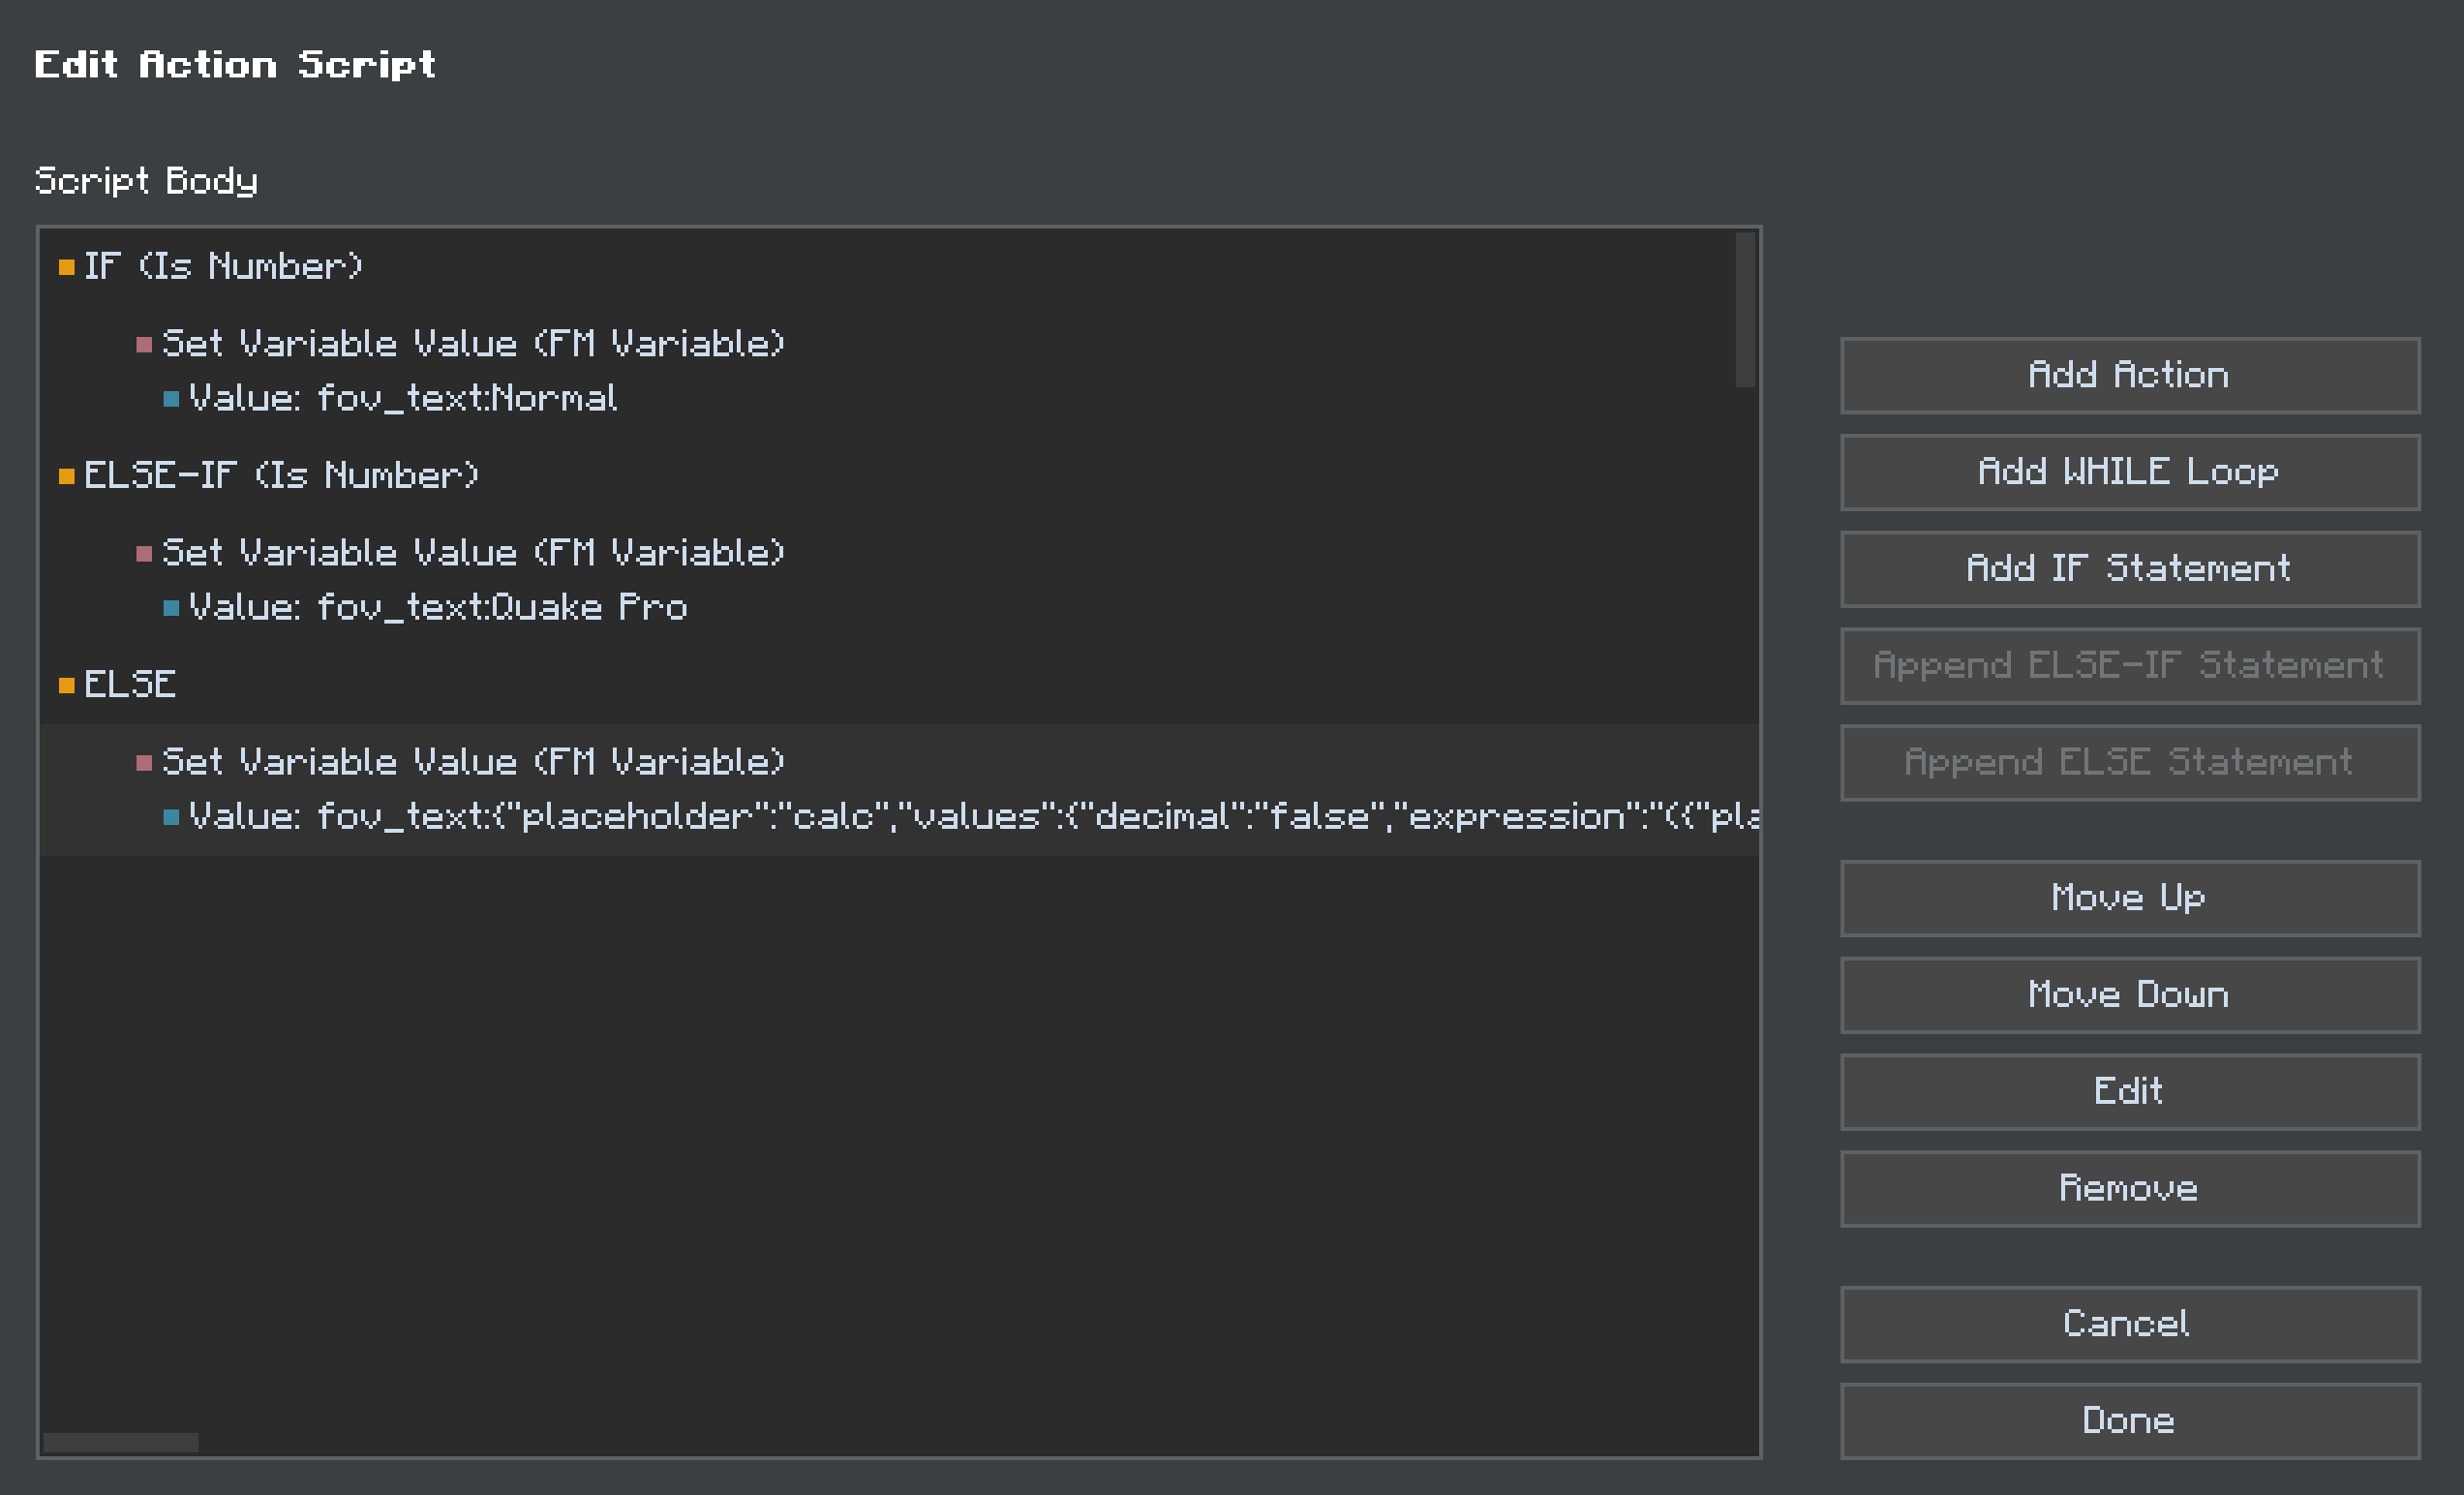 ### Step 2: Create the FOV Slider
1. Create a new Slider element
2. Set the "Slider Type" to "Decimal Range"
3. Set the "Minimum Range Value" to "-1.0"
4. Set the "Maximum Range Value" to "1.0"
5. Edit Action Script → Add Action → Set Minecraft Option Value
- Set Name to `fov`
- Set Value to `$$value`
6. Set "Pre-Selected Value" to `{"placeholder":"minecraft_option_value","values":{"name":"fov"}}`
### Step 3: Set the Slider Label
Set the slider label to simply display the FOV text variable:
```
FOV: {"placeholder":"getvariable","values":{"name":"fov_text"}}
```
This label will show:
- "FOV: Normal" when the value is 70
- "FOV: Quake Pro" when the value is 110
- "FOV: 85" (or any other number) for all other values
### Tips for FOV Sliders
- The internal slider value range is -1.0 to 1.0, which needs to be mapped to 30 to 110 for display
- The conversion formula is: `(internal_value + 1) * 40 + 30`
- Only two values have special labels: 70 (Normal) and 110 (Quake Pro)
- The default FOV in Minecraft is 70 (which corresponds to internal value 0.0)
- The `fov_text` variable automatically contains either the special label or the numeric value
## Displaying Option Values in Text Elements
You can also display current option values in Text elements:
1. Create a Text element
2. For the text content, use the placeholder: `{"placeholder":"minecraft_option_value","values":{"name":"option_name"}}`
For example, to show the current render distance:
```
Current render distance: {"placeholder":"minecraft_option_value","values":{"name":"renderDistance"}} chunks
```
# Finding Option Names
You can find the names of all available options by:
1. Creating a button
2. Right-clicking it
3. Clicking "Edit Action Script"
4. Adding "Set Minecraft Option Value" action
5. When editing the action's value, look at the dropdown suggestions when you start typing in the "Name" field
# Important Tips
- **Valid Values**: Not all options accept all values. For example:
- Volume options accept values from 0.0 to 1.0
- Render distance typically accepts whole numbers from 2 to 32
- Boolean options (true/false) like `pauseOnLostFocus` accept "true" or "false"
- **Testing**: Always test your settings to make sure they work as expected!
- **Visual Feedback**: Give users visual feedback about the current value using the placeholders described above.
================== END PAGE: https://docs.fancymenu.net/docs/minecraft-options ==================
================== BEGIN PAGE: https://docs.fancymenu.net/docs/modified-fancymenu ==================
---
title: Modified FancyMenu Found
description: What to do when getting the "Modified FancyMenu JAR Found" error.
published: true
date: 2025-06-25T20:07:55.920Z
tags:
editor: markdown
dateCreated: 2025-06-25T20:07:53.523Z
---
# Modified FancyMenu JAR Found
If you got that error, it's probably due to a broken Minecraft instance, broken mod loader or a bad mod launcher.
It normally shows when FancyMenu got modified, but it can also show if your game fails to correctly load mods like it's supposed to.
This can be due to your **Minecraft instance being broken** in some way, which should make your **reinstall your game**.
Another possible cause for the error is when your **game semi-crashes** on launch because some mods (including FancyMenu) **failed to load properly**. In that case please post your `/logs/latest.log` file in the Discord server or open an issue on GitHub.
The error can also be triggered due to **using a bad mod launcher** (most cracked/pirate launchers trigger the bug, so please buy the game). Recommended launchers that are stable and work great with FancyMenu are the **official CurseForge launcher and the official Modrinth launcher**.

================== END PAGE: https://docs.fancymenu.net/docs/modified-fancymenu ==================
================== BEGIN PAGE: https://docs.fancymenu.net/docs/modpacks ==================
---
title: Modpacks
description: How to include layouts in a modpack.
published: true
date: 2025-05-07T05:11:28.393Z
tags:
editor: markdown
dateCreated: 2025-04-14T20:15:20.891Z
---
# FancyMenu in Modpacks
Including your FancyMenu setup in a modpack is very easy and only takes some simple steps.
> This page is **ONLY** for FancyMenu setups made completely in **FancyMenu v3+**, so if you use a legacy setup (made in v2 and converted to v3), some steps could be different.
{.is-warning}
# Including the FancyMenu Setup in Your Modpack
The main thing you need to do is copy one special folder that FancyMenu uses to save all your designs.
## What you'll need to find
1. **Your "Minecraft Instance" Folder:** This is the main folder on your computer where all the files for a specific Minecraft setup (like the one where you designed your menus) are stored. Launchers like CurseForge and Modrinth call these "instances" or "profiles."
2. **The `config` Folder:** Inside your Minecraft instance folder, there's usually a folder named `config`. This is where many mods store their settings.
3. **The `fancymenu` Folder:** Inside that `config` folder, FancyMenu creates its own folder called `fancymenu`. This is the golden folder we need!
## How to Find the Instance Save Location
### If you use the CurseForge App
1. Open CurseForge.
2. Find your Minecraft profile/instance in the list and open it.
3. Click the three dots.
4. Choose "Open Folder." This will open the main folder for that Minecraft instance.
### Step 2: Create the FOV Slider
1. Create a new Slider element
2. Set the "Slider Type" to "Decimal Range"
3. Set the "Minimum Range Value" to "-1.0"
4. Set the "Maximum Range Value" to "1.0"
5. Edit Action Script → Add Action → Set Minecraft Option Value
- Set Name to `fov`
- Set Value to `$$value`
6. Set "Pre-Selected Value" to `{"placeholder":"minecraft_option_value","values":{"name":"fov"}}`
### Step 3: Set the Slider Label
Set the slider label to simply display the FOV text variable:
```
FOV: {"placeholder":"getvariable","values":{"name":"fov_text"}}
```
This label will show:
- "FOV: Normal" when the value is 70
- "FOV: Quake Pro" when the value is 110
- "FOV: 85" (or any other number) for all other values
### Tips for FOV Sliders
- The internal slider value range is -1.0 to 1.0, which needs to be mapped to 30 to 110 for display
- The conversion formula is: `(internal_value + 1) * 40 + 30`
- Only two values have special labels: 70 (Normal) and 110 (Quake Pro)
- The default FOV in Minecraft is 70 (which corresponds to internal value 0.0)
- The `fov_text` variable automatically contains either the special label or the numeric value
## Displaying Option Values in Text Elements
You can also display current option values in Text elements:
1. Create a Text element
2. For the text content, use the placeholder: `{"placeholder":"minecraft_option_value","values":{"name":"option_name"}}`
For example, to show the current render distance:
```
Current render distance: {"placeholder":"minecraft_option_value","values":{"name":"renderDistance"}} chunks
```
# Finding Option Names
You can find the names of all available options by:
1. Creating a button
2. Right-clicking it
3. Clicking "Edit Action Script"
4. Adding "Set Minecraft Option Value" action
5. When editing the action's value, look at the dropdown suggestions when you start typing in the "Name" field
# Important Tips
- **Valid Values**: Not all options accept all values. For example:
- Volume options accept values from 0.0 to 1.0
- Render distance typically accepts whole numbers from 2 to 32
- Boolean options (true/false) like `pauseOnLostFocus` accept "true" or "false"
- **Testing**: Always test your settings to make sure they work as expected!
- **Visual Feedback**: Give users visual feedback about the current value using the placeholders described above.
================== END PAGE: https://docs.fancymenu.net/docs/minecraft-options ==================
================== BEGIN PAGE: https://docs.fancymenu.net/docs/modified-fancymenu ==================
---
title: Modified FancyMenu Found
description: What to do when getting the "Modified FancyMenu JAR Found" error.
published: true
date: 2025-06-25T20:07:55.920Z
tags:
editor: markdown
dateCreated: 2025-06-25T20:07:53.523Z
---
# Modified FancyMenu JAR Found
If you got that error, it's probably due to a broken Minecraft instance, broken mod loader or a bad mod launcher.
It normally shows when FancyMenu got modified, but it can also show if your game fails to correctly load mods like it's supposed to.
This can be due to your **Minecraft instance being broken** in some way, which should make your **reinstall your game**.
Another possible cause for the error is when your **game semi-crashes** on launch because some mods (including FancyMenu) **failed to load properly**. In that case please post your `/logs/latest.log` file in the Discord server or open an issue on GitHub.
The error can also be triggered due to **using a bad mod launcher** (most cracked/pirate launchers trigger the bug, so please buy the game). Recommended launchers that are stable and work great with FancyMenu are the **official CurseForge launcher and the official Modrinth launcher**.

================== END PAGE: https://docs.fancymenu.net/docs/modified-fancymenu ==================
================== BEGIN PAGE: https://docs.fancymenu.net/docs/modpacks ==================
---
title: Modpacks
description: How to include layouts in a modpack.
published: true
date: 2025-05-07T05:11:28.393Z
tags:
editor: markdown
dateCreated: 2025-04-14T20:15:20.891Z
---
# FancyMenu in Modpacks
Including your FancyMenu setup in a modpack is very easy and only takes some simple steps.
> This page is **ONLY** for FancyMenu setups made completely in **FancyMenu v3+**, so if you use a legacy setup (made in v2 and converted to v3), some steps could be different.
{.is-warning}
# Including the FancyMenu Setup in Your Modpack
The main thing you need to do is copy one special folder that FancyMenu uses to save all your designs.
## What you'll need to find
1. **Your "Minecraft Instance" Folder:** This is the main folder on your computer where all the files for a specific Minecraft setup (like the one where you designed your menus) are stored. Launchers like CurseForge and Modrinth call these "instances" or "profiles."
2. **The `config` Folder:** Inside your Minecraft instance folder, there's usually a folder named `config`. This is where many mods store their settings.
3. **The `fancymenu` Folder:** Inside that `config` folder, FancyMenu creates its own folder called `fancymenu`. This is the golden folder we need!
## How to Find the Instance Save Location
### If you use the CurseForge App
1. Open CurseForge.
2. Find your Minecraft profile/instance in the list and open it.
3. Click the three dots.
4. Choose "Open Folder." This will open the main folder for that Minecraft instance.
 ### If you use the Modrinth App
1. Open the Modrinth App.
2. Find your Minecraft profile/instance in the list and open it.
3. Click the three dots.
4. Choose "Open Folder." This will open the main folder for that Minecraft instance.
### If you use the Modrinth App
1. Open the Modrinth App.
2. Find your Minecraft profile/instance in the list and open it.
3. Click the three dots.
4. Choose "Open Folder." This will open the main folder for that Minecraft instance.
 ### For other launchers
Look for a similar "Open Folder," "Open Instance Folder," or "View Files" option for your specific Minecraft setup.
## Copying the FancyMenu Setup
1. Navigate to the `config` folder of your MODPACK instance (the one you want to copy your setup to).
2. If there is a `fancymenu` folder inside, DELETE it.
3. Open the `config` folder of the SOURCE instance (the one you want to use the setup from).
4. Copy the `fancymenu` folder inside the `config` folder of your SOURCE instance to the `config` folder of your MODPACK instance.
5. Done. That's it. Restart your modpack instance now and you should see the setup load.
> Please keep in mind that old legacy setups made in FancyMenu v2 (even if converted to v3) allowed you to store layout assets outside FancyMenu's `/config/fancymenu/assets/` folder, so in that case you need to make sure you also include all of your assets in the modpack.
{.is-danger}
# Disabling the Menu Bar and Hotkeys
You surely don't want to keep FancyMenu's menu bar visible in your modpack, so you should disable it. But since people can still press the hotkey to make it visible again, let's do something a little bit more *aggressive*.
Navigate to `/config/fancymenu/options.txt` and open the file in a text editor.
Now set `modpack_mode` to `true` and save the file.
This will completely disable all overlays and hotkeys.
To be able to edit your layouts again, set the config option back to `false`.
# Disabling the Welcome Screen
This shouldn't be needed in most cases, but if you didn't close the Welcome screen yet (the screen that tells you to read the documentation), make sure to set `show_welcome_screen` to `false` in `/config/fancymenu/options.txt`.
The screen only shows once and disables itself when clicking on the **Open Documentation** button, so again, doing this manually shouldn't be needed in most cases.
### For other launchers
Look for a similar "Open Folder," "Open Instance Folder," or "View Files" option for your specific Minecraft setup.
## Copying the FancyMenu Setup
1. Navigate to the `config` folder of your MODPACK instance (the one you want to copy your setup to).
2. If there is a `fancymenu` folder inside, DELETE it.
3. Open the `config` folder of the SOURCE instance (the one you want to use the setup from).
4. Copy the `fancymenu` folder inside the `config` folder of your SOURCE instance to the `config` folder of your MODPACK instance.
5. Done. That's it. Restart your modpack instance now and you should see the setup load.
> Please keep in mind that old legacy setups made in FancyMenu v2 (even if converted to v3) allowed you to store layout assets outside FancyMenu's `/config/fancymenu/assets/` folder, so in that case you need to make sure you also include all of your assets in the modpack.
{.is-danger}
# Disabling the Menu Bar and Hotkeys
You surely don't want to keep FancyMenu's menu bar visible in your modpack, so you should disable it. But since people can still press the hotkey to make it visible again, let's do something a little bit more *aggressive*.
Navigate to `/config/fancymenu/options.txt` and open the file in a text editor.
Now set `modpack_mode` to `true` and save the file.
This will completely disable all overlays and hotkeys.
To be able to edit your layouts again, set the config option back to `false`.
# Disabling the Welcome Screen
This shouldn't be needed in most cases, but if you didn't close the Welcome screen yet (the screen that tells you to read the documentation), make sure to set `show_welcome_screen` to `false` in `/config/fancymenu/options.txt`.
The screen only shows once and disables itself when clicking on the **Open Documentation** button, so again, doing this manually shouldn't be needed in most cases.
 ## Where can I use Nine-Slicing?
In FancyMenu, Nine-Slicing is available for:
- **Button Elements** (both custom buttons and when editing Vanilla buttons)
- **Progress Bar textures** (bar and background textures)
## How to Use Nine-Slicing with Buttons
1. **Create or select a Button Element** in your layout editor.
2. Right-click on the button and look for "Button Textures" option.
3. Set your button's background textures (normal, hover, inactive states).
4. Enable the "Nine-Slice Custom Background" option.
5. Set the **Nine-Slice Background X-Borders** (left and right border size).
6. Set the **Nine-Slice Background Y-Borders** (top and bottom border size).
### Tips for Button Nine-Slicing
- Use an image with clear borders and corners.
- The border values (X and Y) tell FancyMenu how many pixels from each edge should be treated as the border.
- A typical value might be 5 pixels for both X and Y borders.
- The corners will always stay the same size, while the middle parts will stretch to fill the button.
# What is Tiling?
Tiling (also called repeating textures) lets you fill a large area with a small image by repeating it like tiles on a floor. This is perfect for backgrounds or large images where you want a pattern to continue.
## Where can I use Tiling?
In FancyMenu, Tiling is available for:
- **Image Elements**
- **Image Menu Backgrounds**
## How to Use Tiling with Image Elements
1. **Create or select an Image Element** in your layout editor.
2. Right-click on the image and look for "Image Source" to set your texture.
3. Find and enable the **"Repeat Texture"** option.
4. Resize your image element to see the texture repeat to fill the space.
## How to Use Tiling with Menu Backgrounds
1. Open **Menu Backgrounds** from the layout editor background context menu.
2. Choose the **Image** background type.
3. Select your background image.
4. Enable the **"Repeat Texture"** option.
5. Your background will now repeat the texture to fill the entire screen.
# Creating Good Textures for Nine-Slicing and Tiling
## For Nine-Slicing:
- Create textures with distinct borders and corners.
- Make sure your borders are clear and have a consistent width.
- Test different border sizes to find what works best.
- Buttons usually work well with 3-5 pixel borders.
## For Tiling:
- Create seamless textures that can connect with themselves on all sides.
- Keep patterns simple to avoid visual confusion.
- Test your texture by repeating it in a small area first.
# Examples
## Nine-Sliced Button Example
A simple button might start as a 30x30 image with 5-pixel borders on all sides. When you make the button larger, the corners stay at 5x5 pixels, while the edges and center stretch to fit your button size.
## Tiled Background Example
A small 64x64 tile with a subtle pattern can be repeated to fill your entire menu background, no matter what the screen size is.
# Common Issues and Solutions
## My nine-sliced button looks stretched or distorted:
- Your border values may be too small or too large
- Try changing the border values to match your actual texture
## My tiled background has visible seams:
- Your texture isn't seamless
- Try editing your image to make sure the edges match perfectly
## My textures look blurry when scaled:
- Use higher resolution textures
- Keep your designs simple with clean lines
# Remember
- **Nine-Slicing** is perfect for UI elements that need to change size but keep their appearance (like buttons).
- **Tiling** is great for filling large areas with a pattern (like backgrounds).
- Both features help your UI look good at any resolution or screen size!
Now go create some amazing Minecraft menus with perfectly stretched buttons and beautiful tiled backgrounds!
================== END PAGE: https://docs.fancymenu.net/docs/nine-slicing-and-tiling ==================
================== BEGIN PAGE: https://docs.fancymenu.net/docs/opengui-command ==================
---
title: Open GUIs by Command
description: How to open Vanilla and Custom GUIs via command.
published: true
date: 2025-06-26T20:50:52.238Z
tags:
editor: markdown
dateCreated: 2025-04-14T20:15:25.104Z
---
# Opening GUIs by Command
FancyMenu comes with a command that lets you open Vanilla and Custom GUIs via command.
You can even remotely open GUIs for **other players** when installing FancyMenu on both **server and clients**.
To open a GUI, just use the command `/openguiscreen
## Where can I use Nine-Slicing?
In FancyMenu, Nine-Slicing is available for:
- **Button Elements** (both custom buttons and when editing Vanilla buttons)
- **Progress Bar textures** (bar and background textures)
## How to Use Nine-Slicing with Buttons
1. **Create or select a Button Element** in your layout editor.
2. Right-click on the button and look for "Button Textures" option.
3. Set your button's background textures (normal, hover, inactive states).
4. Enable the "Nine-Slice Custom Background" option.
5. Set the **Nine-Slice Background X-Borders** (left and right border size).
6. Set the **Nine-Slice Background Y-Borders** (top and bottom border size).
### Tips for Button Nine-Slicing
- Use an image with clear borders and corners.
- The border values (X and Y) tell FancyMenu how many pixels from each edge should be treated as the border.
- A typical value might be 5 pixels for both X and Y borders.
- The corners will always stay the same size, while the middle parts will stretch to fill the button.
# What is Tiling?
Tiling (also called repeating textures) lets you fill a large area with a small image by repeating it like tiles on a floor. This is perfect for backgrounds or large images where you want a pattern to continue.
## Where can I use Tiling?
In FancyMenu, Tiling is available for:
- **Image Elements**
- **Image Menu Backgrounds**
## How to Use Tiling with Image Elements
1. **Create or select an Image Element** in your layout editor.
2. Right-click on the image and look for "Image Source" to set your texture.
3. Find and enable the **"Repeat Texture"** option.
4. Resize your image element to see the texture repeat to fill the space.
## How to Use Tiling with Menu Backgrounds
1. Open **Menu Backgrounds** from the layout editor background context menu.
2. Choose the **Image** background type.
3. Select your background image.
4. Enable the **"Repeat Texture"** option.
5. Your background will now repeat the texture to fill the entire screen.
# Creating Good Textures for Nine-Slicing and Tiling
## For Nine-Slicing:
- Create textures with distinct borders and corners.
- Make sure your borders are clear and have a consistent width.
- Test different border sizes to find what works best.
- Buttons usually work well with 3-5 pixel borders.
## For Tiling:
- Create seamless textures that can connect with themselves on all sides.
- Keep patterns simple to avoid visual confusion.
- Test your texture by repeating it in a small area first.
# Examples
## Nine-Sliced Button Example
A simple button might start as a 30x30 image with 5-pixel borders on all sides. When you make the button larger, the corners stay at 5x5 pixels, while the edges and center stretch to fit your button size.
## Tiled Background Example
A small 64x64 tile with a subtle pattern can be repeated to fill your entire menu background, no matter what the screen size is.
# Common Issues and Solutions
## My nine-sliced button looks stretched or distorted:
- Your border values may be too small or too large
- Try changing the border values to match your actual texture
## My tiled background has visible seams:
- Your texture isn't seamless
- Try editing your image to make sure the edges match perfectly
## My textures look blurry when scaled:
- Use higher resolution textures
- Keep your designs simple with clean lines
# Remember
- **Nine-Slicing** is perfect for UI elements that need to change size but keep their appearance (like buttons).
- **Tiling** is great for filling large areas with a pattern (like backgrounds).
- Both features help your UI look good at any resolution or screen size!
Now go create some amazing Minecraft menus with perfectly stretched buttons and beautiful tiled backgrounds!
================== END PAGE: https://docs.fancymenu.net/docs/nine-slicing-and-tiling ==================
================== BEGIN PAGE: https://docs.fancymenu.net/docs/opengui-command ==================
---
title: Open GUIs by Command
description: How to open Vanilla and Custom GUIs via command.
published: true
date: 2025-06-26T20:50:52.238Z
tags:
editor: markdown
dateCreated: 2025-04-14T20:15:25.104Z
---
# Opening GUIs by Command
FancyMenu comes with a command that lets you open Vanilla and Custom GUIs via command.
You can even remotely open GUIs for **other players** when installing FancyMenu on both **server and clients**.
To open a GUI, just use the command `/openguiscreen