Element Animator
The Animator is an element that lets you animate other elements. With this element, you can smoothly change another element’s size, position, and anchor point over time using keyframes. Keyframes are like snapshots that capture how the element should look at a specific moment. The Animator element then plays these snapshots in order to create smooth motion.
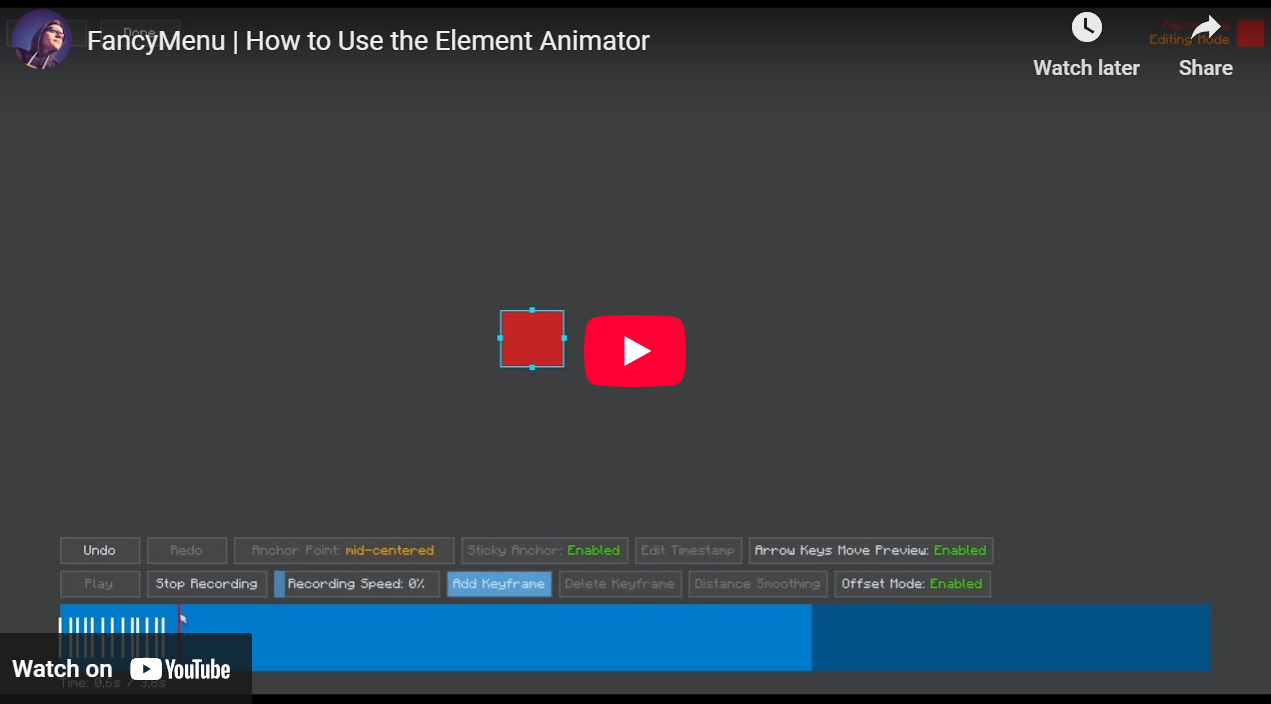
Video Tutorial
Since many of you were a bit confused about how the animator works, I made a little video that shows how to work with it.
FancyMenu | How to Use the Element Editor - YouTube (youtu.be/F9S8cIPssww)
Adding the Animator Element
-
Right-Click the Background:
In the layout editor, right-click on the background. -
Select New Element -> Element Animator:
In the menu that pops up, go to New Element and click on Element Animator. This adds the Animator Element to your layout. -
Set It Up:
After adding, the Animator element shows up with its default settings. You can change options like looping or color by right-clicking the Animator and choosing from the menu.
Managing Keyframes
Keyframes are like bookmarks that tell the Animator what the element should look like at a certain time.
Opening the Keyframe Editor
- Open the Editor:
Right-click the Animator element and choose Edit Keyframes (or Manage Keyframes). This opens a screen where you can add, edit, or delete keyframes.
Recording and Adding Keyframes
-
Start Recording:
In the keyframe editor, press theRkey to start recording. When recording, the preview box changes color to show it’s active. -
Change the Preview:
Move or resize the preview box to set the look you want. In offset mode, the preview stays centered on a crosshair so changes are shown as offsets. -
Add a Keyframe:
Press theKkey to save the current look as a keyframe. This keyframe saves the preview’s position, size, and anchor settings.
Editing Keyframes
-
Select a Keyframe:
Click on a keyframe marker in the timeline. You can also hold Ctrl and click to select more than one. -
Move a Keyframe:
Drag the keyframe marker left or right to change its time. You can also use:- Left Arrow: to move it 100ms earlier.
- Right Arrow: to move it 100ms later.
-
Fine-Tune the Preview:
When a keyframe is selected, adjust the preview box by moving or resizing it. Use Ctrl + Z to undo and Ctrl + Y to redo changes if needed.
Removing Keyframes
-
Delete a Keyframe:
Select a keyframe and press the Delete key to remove it. -
Delete Multiple Keyframes:
You can select several keyframes (for example, using Ctrl + A to select all) and press Delete to remove them all.
Keyframe Smoothing
Keyframe smoothing is a feature that helps you evenly space out your keyframes. This makes your animation look more consistent and smooth.
-
Select Multiple Keyframes:
First, select two or more keyframes that you want to smooth out (use Ctrl + Click or Ctrl + A). -
Click the Smoothing Button:
In the keyframe editor’s bottom toolbar, click the button labeled Distance Smoothing. -
Enter a New Distance:
A small input box will appear. Type in a value (in milliseconds) to set the same time gap between each selected keyframe. -
Apply the Smoothing:
Press Enter to apply the smoothing. The keyframes will be adjusted so that the time difference between them is even.
Previewing Your Animation
After you have recorded keyframes, you can see how your animation will look:
-
Play the Animation:
In the keyframe editor, press thePkey or click the play button. The preview will start from the beginning and show how the preview box changes over time. -
Note on Looping:
While previewing in the keyframe editor, the animation will not loop. This means it plays from start to end only once. Looping will only be active when the Animator element is applied to a target element in the final layout. -
Pause the Preview:
Press thePkey again to pause the animation if you want to stop at a certain point. -
Drag the Progress Bar:
If available, you can drag the timeline marker to check how the animation looks at any specific time.
Choosing Target Elements
After setting up your keyframes, you need to choose which layout elements will be animated:
-
Open the Target Manager:
Right-click the Animator element and choose Manage Targets. -
Add Targets:
Click Add Target to see a list of available elements. Pick the ones you want to animate. -
Remove Targets:
To remove a target, open the manager and click Remove Target.
When the animation plays in the final layout, the Animator will use your keyframes to change the chosen elements’ size, position, and more. Looping will be applied here if you set it.
Keyboard Shortcuts
Use these shortcuts in the keyframe editor to work faster:
RKey: Start or stop recording.TKey: Pause or resume recording.PKey: Play or pause the animation preview.KKey: Add a new keyframe at the current time.- Left/Right Arrow Keys:
- Left Arrow: Move a keyframe 100ms earlier.
- Right Arrow: Move a keyframe 100ms later.
- Delete Key: Remove the selected keyframe(s).
- Ctrl + A: Select all keyframes.
- Ctrl + Z: Undo your last change.
- Ctrl + Y: Redo the change you just undid.
- Ctrl + Keyframe Dragging: Drag multiple selected keyframes at once.
Extra Settings and Tips
-
Loop Animation:
You can set the Animator to loop. When looping is on, the animation will restart after the last keyframe—but note that this only happens for the final target element. In the keyframe editor preview, looping does not occur. -
Ignore Size/Position:
If you do not want the keyframes to change an element’s size or position, turn these options off. -
Timing Offsets:
You can offset individual target elements or use random timing offsets in a configured range, so one animation starts at different times for each target. -
Offset Mode:
In offset mode, animations are applied as changes from the element’s original spot. The preview is shown centered on a crosshair. -
Undo and Redo:
Use Ctrl + Z to undo and Ctrl + Y to redo changes. -
Check the Order:
Make sure your keyframes are in the right order by time. The system sorts them for you, but if you move one, double-check the order. -
Preview Changes:
Use the play button orPkey to see your animation in action before saving it.